Danish Pastry..... This recipe comes from my searching through many recipes at the library when I moved to Montana. I jotted down quite a few recipes at the time. Eventually, I tried the Danish recipe. I had never tried doing Danishes at home. But, I was intrigued with the folding of the Danish dough... it mimics puff pastry. It had to be good ! It turned out to be fabulous! Just like a real Danish, but better!!
This recipe does involve 2 days...but, really you can do Day 1 the night before. It only involves a few steps. Day 2 is where all the action takes place. It might seem like a lot of work, but the result is awesome! And, really most of the time the dough has to do some chilling in the refrigerator or sitting on the counter top to rest.
I've done this recipe many times and love the versatility of the dough . You can make it into any shape you want...or do the classical braided one. I love how well it freezes and the fact that you can be creative with the fillings....make it your own. Well, in this post I have done small Danish " bites" . With the scraps from the "bites", I made a smaller version of the braided classical Danish. Maybe, one day you will venture out to try this Danish! I will post the original recipe with my additions. Hope you enjoy...
Note: Remember you don't have to do the "bites" . You can do two large size braided Danishes....or cut larger squares and make individual breakfast sized danish.
FILLINGS OF CHOICE... can make ahead
1. Cream Cheese Filling: I use a cream cheese mixture and preserves.
I sweeten the cream cheese with a few TBS of powdered sugar( to taste)... and maybe add some flavoring as well. I then top with a tsp of preserves before baking.
2. Ricotta Cheese filling: (that came with the original recipe).
1 cup ricotta cheese
6 TBS sugar
1 TBS lemon zest
1 large egg beaten
3 TBS unsalted butter melted and cold
Combine all ingredients until well blended.
3. Almond Filling:
1/2 cup + 2TBS toasted almonds
1/3 cup +2 TBS powdered sugar
2 TBS unsalted butter (rm.temp)
1/2 tsp almond extract
1 large egg white beaten lightly
Process almonds and sugar till finally ground. Add butter, extract and 2 TBS egg white and pulse again. Use as a filling. Sprinkle some sliced almonds on top of danish.
Dough Ingredients:
1/4 cup warm water
1/2 cup milk (room temp)
1 large egg (room temp)
2 1/4 cups bread flour
2 1/4 tsp instant yeast
pinch of salt
1 TBS sugar (sometimes I add vanilla sugar)
1 cup unsalted chilled butter
1 TBS orange/lemon zest
Additional Glazes:
Egg Glaze:
1 egg, beaten with 2 TBS milk
Clear Glaze:can be made while danish is baking
1/3 cup sugar
1/4 cup water
1-2 tsp vanilla/almond flavoring (my addition)
3 tsp lemon juice(my addition)
In a saucepan, heat sugar ,water and lemon juice to boil. Boil for 2-3 minutes. Stir in flavoring. Set aside.
Sugar glaze:can be made while danish is baking
1/2 cup powdered sugar
1-2 TBS water
1 tsp lemon juice(my addition)
In a plastic sandwich bag, place sugar and add water 1 TBS at a time while mixing the mixture in the bag. You don't want the mixture to be too runny. You can always correct it by adding more sugar to bring it to the right consistency. Cut a small hole at the tip of the plastic bag and drizzle over danish.
Directions For Dough:
DAY 1:
1. Pour water and milk in a cup and add egg. Beat with a fork to mix. I add the orange zest in this liquid mixture as well or any flavorings. Set aside.

2. Put flour, yeast, salt and sugar in a large bowl and mix to incorporate. Cut butter in thin slices.
3. Using a knife, cut butter slices into flour mixture.
4. Pour liquids quickly using hands to fold the ingredients. (I usually mix with a fork, since the heat in the hands can melt the butter...and you don't want that!) Do not overdo the stirring ...you don't want the butter to melt into the dough. It will be sticky and sort of dry with lumps of butter at this point.
Day 2:
1. Take dough out of fridge and let it get to room temperature.
2. Roll out 20 inch square ( or thereabouts). The dough might be a bit scraggly but as you do the turns it will come together wonderfully. You want to see little butter pieces throughout the dough. This will make the pastry flaky.
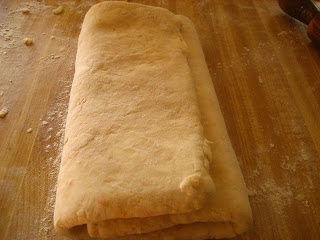
3. Fold into thirds (like a letter).
4. Turn dough so that closed fold is on your left (like the spine of a book).
5. Roll dough out again and repeat 3 more times ( I always do 4).
7. Refrigerate covered for at least 30 minutes.
8. Take out of fridge and roll into big square. At this point you can make any shape you like. I rolled mine out to 13 in by 13 inch and I used a 2 in round pastry cutter to make about 30 danish bites from each half of dough.

9. Top with choice of filling. I usually make an indentation in the middle of the dough to hold the filling better. I use about 1 tsp of cream cheese filling with about 1 tsp preserves.Some filling you will still lose as it bakes. That is why parchment paper comes in really handy.But, if you use chunky preserves you will have a better chance of less filling lost in the baking than jelly or loose jams. You won't have this problem if you do the braided one or bigger sized danishes. But, since I like mine on the smaller side, I overlook this problem.
10. Place each danish on a parchment lined sheet.
11. Brush with egg glaze. Let rise till doubled ~about 1 hr.
12. Bake in preheated 350 oven for 15 minutes. Let cool.
13. Pour some clear glaze on each, a little at a time, to ensure you have enough glaze for all of them.
14. Let set and add sugar glaze.
Braided version:
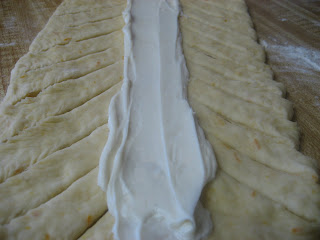
2. Cut about 1/2 inch strips at a slant(sort of like making straight Christmas tree branches) leaving about a 2 inch space. You want them to be the same number of strips on the right side and on the left side.
3. Place filling in the middle and braid.
4. Put on parchment lined baking sheet.
5. Brush with egg glaze. Let rise till doubled (1-1/2 hrs).
6. Preheat oven to 350 and bake for 15 minutes.
7. Let cool add clear glaze .


6 comments:
Hello, Ellie: You have a great blog - and wonderful photos! I found your blog via the Saveur link for your chicken cordon bleu recipe. Congratulations!
Have you ever made your own ricotta cheese? Simplicity itself - I am a sucker for most DIY foods.
Anyway, great job!
CEM
Craig, Thanks for stopping by and for your kind words. I really appreciate it. I, too, enjoy DIY foods:)...the flavor can't be beat!
I really have a passion to cook with fresh ingredients...and if I can make it, I will try it.
Ricotta is on my soon to make -list:)...
Again, thanks for taking the time to drop by ~Ellie
It is incredibly simple; one of those "doh!" moments I have so often and wonder, "why didn't I realize that years ago?".
Here's a basic recipe:
http://italianfood.about.com/library/rec/blr0949.htm
I found you have a 1/4 yield of product from the milk.
Take Care,
CEM
Craig, Ah, wonderful! Am definitely going to try it. Thank you so much.
The link gives a variation, which I love, to the original version....adding a bit of cream to it to make a decadent filling for desserts. That's neat.
Thank you for the inspiration... I knew I should have done it years ago:)
Have a great day!~Ellie
I'm new with making pastries and this is the first recipe I can actually eat something of. I still want to learn how to get rid of the weird dough taste but compared to the others I made, this is good. I love the fold and roll method to make it flaky and light.
Anita, Thanks for trying out the recipe and glad you enjoyed it. Maybe the dough taste comes from the yeast?... just wondering. Sometimes adding orange peel helps somewhat. Just a thought... But thank you for your feedback, I really appreciate it!
Post a Comment