
 .
. .
.
Peter Reinhart's Pain a l' Ancienne Rustic Bread (Part 1).... Ciabatta Loaves. I am a huge fan of Peter Reinhart and love his bread recipes. I have only made a few of his recipes...his 100% whole wheat bread, his pizza dough, and now his ciabatta bread. But each recipe has been a winner for me and I have learned so much from each one.
Ever since I saw the recipe on Andreea's blog(Romanian), I knew I had to make it. Her step-by-step photos were so beautiful that she inspired me to make them. I hadn't baked bread in a while, so I was quite eager to try it out.


I do have to admit that it did take me a couple of days to think about the recipe( reading it and re-reading it) before I finally started. Many times it's much easier to do something simple, something I am used to. But in order for me to learn and improve, I need to push myself....to try a recipe I may be unfamiliar with. It was good to get out of my comfort zone and make the bread.... regardless of the outcome.
So I forged ahead and decided to make 2 batches of the bread. One batch was for this ciabatta recipe while the other batch was used for making baguettes, rolls, etc.( which is Part 2...to be posted soon)....The really neat thing about making more than one batch, is that you can leave it in the fridge for up to 4 days....so you don't have to bake it all on the same day. I was quite thrilled with the final result.
I have to say, it was by far the best artisan/rustic bread I've made. The outside is nice and crisp while the inside is pleasantly soft. It's light and airy with a wonderful chew...and tastes way better than store-bought:)! For me, this was a winner of a recipe.
The process wasn't as difficult as I first thought:). The stretch and fold technique is applied to the dough... giving you a great hands-on experience. It's actually quite neat to see the different stages that's involved in bread making/baking....and then be rewarded with wonderful bread.
I think weighing the ingredients is key. Just for curiosity, I measured my flour as I usually do and noticed I would have been off by 1/4 cup-1/3 cup in comparison to weighing in grams... makes a big difference. I also like to weigh my liquids as I find it is much more accurate. Had loads of fun making the ciabatta. Will definitely be making it again....Thinking of using it as a focaccia and making the Italian Schiacciata con L'uva. If you have a free day, you might want to give this recipe a try. Start the dough the night before and finish it off the next day...or a few days later. Hope you enjoy...
NOTE: Please don't be put off by the long procedure, I have tried to make it visually helpful...it isn't really that difficult as it looks.
You will need: initially inspired by Dimineti Insorite ...and adapted from Peter Reinhart's Artisan Breads Every Day....You can also see a sample of the book with the ciabatta bread recipe HERE
4 1/2 cups (20 oz / 567 g) unbleached bread flour( I used King Arthur)
1 3/ 4 teaspoons (0.4 oz / 11 g) table salt
1 1/4 teaspoons (0.14 oz / 4 g) instant yeast
2 cups (16 oz / 454 g) chilled water (about 55°F)
1 tablespoon (0.5 oz / 14 g) olive oil
Directions:
PART 1...the night before.
1. In a mixing bowl, combine flour, yeast, salt and water. (For accuracy, I weighed my flour and water... for the rest I used my measuring teaspoons/tablespoons).
2. Using the paddle attachment, mix on low for about 1 minute.
3. Stop the mixer and let the dough rest and hydrate for 5 minutes.
4. After the dough has rested 5 minutes, add 1 TBS olive oil. Mix again( using the paddle attachment) for another 1 minute. At this point the dough is a bit smoother...but still sticky and wet.
5. Lightly oil a large bowl. Place the dough in the oiled bowl...since the dough is a bit sticky you might want to use a wet scraper or even wet hands to remove the dough.
6. Cover the bowl and let the dough rest for 10 minutes at room temp.
7. Lightly oil your work surface...you don't want to put too much oil otherwise the dough will move away from you without being able to do the stretch and fold technique, which follows.
You can see Peter Reinhart performing the stretch and fold technique in this video link:
~~~~STRETCH AND FOLD TECHNIQUE~~~~
8. Using wet or oiled hands transfer the dough unto the working surface and sort of pat it in a rough rectangle.
9. Using wet or oiled hands reach underneath the front end of the dough and stretch it out a bit before folding it on top of the dough.
10. Do the same from the back end( stretching it and folding it over).
11. Now take the left side of the dough( from underneath) and fold over...do the same with the right side.
12. Flip the dough over and tuck the dough in to form a ball. Place the dough ball back in the oiled bowl.
13. Let the dough rest for 10 minutes and repeat process 2 more times for a total of 3 times...all stretching and folding should be done within 40 minutes.
14. Place the dough in the bowl, cover tightly, and refrigerate.
PART 2/ Next day( or up to 4 days later)
1. Remove dough from refrigerator 3 hours before baking.
2. After you remove the dough from the fridge, let dough rest at room temp for about 1 hour.
3. After 1 hour, line a baking sheet with parchment paper and flour it well. Set aside.
4. Flour your work surface and gently remove the dough from the bowl...(being careful not to degass the dough....you want as many bubbles in the dough as possible, which will give you those nice big bread holes).
5. Using a wet dough scraper, cut the dough in 3 strips...(or as many ciabattas as you plan on making).
6. Fold each strip like a letter... left side over and then right side over left.

7. Turn the folded dough over(seam side down) and place on floured parchment....rolling it a bit(gently) in the flour so that it won't stick. Do the same with the other strips.
8. Cover with oiled plastic wrap and let rise for about 1 hour.
9. After 1 hour, gently turn the dough over so that the seam is up. Gently place your hands underneath the folded dough and stretch it to about 7 inches if doing larger ciabattas(less if doing smaller ciabattas). Place the stretched dough(seam side up) back unto the floured parchment. Repeat the process with the remaining pieces.
10. Cover the stretched dough pieces with oiled plastic wrap(loosely) and let proof for another 1 hour....you should see large bubbles on the surface of the stretched out dough.
It is at this time you may want to do a little bit of cleaning:) and then get the oven ready for pre-heating.
11. Close to 45 minutes before baking, get your oven ready by preheating it to 550... or as high as your oven heats...mine goes to 500 deg. If using a stone, place it inside as well. I also place a steam pan( broiler pan that came with the oven...don't use glass) as well.
Have a towel ready( to cover glass on door... so as not to crack the glass).
You can see Peter Reinhart explaining how to get your oven ready for baking in this video link:
12. After the 45 minute rise, slide the ciabatta bread doughs(with parchment paper) unto the hot stone(...or simply place the whole sheet pan with the bread doughs and parchment paper).
13. Place your towel over the glass door...add 1 cup hot water to the steam pan....be VERY careful so as not to burn yourself...use oven mitts). Take towel off and....
14. Lower oven to 450 deg...
15. Bake for 12 minutes and then turn pan over and bake for an additional 12 or so minutes ...or until rich brown all over and sounds hollow when tapped. (The baking time may vary depending how large or small your ciabatta loaves are.)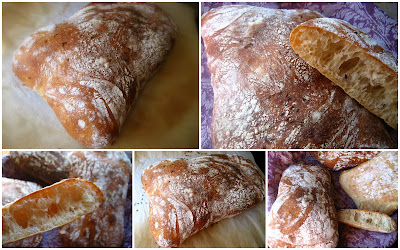
16. Let cool on wire rack for an hour or so before slicing.
You can freeze the bread and re-heat in oven to crisp up again.


14 comments:
Ellie,cred ca ai muncit mult sa faci o paine asa de buna ? Da ,painea asta as manca si eu caci imi place ca are coaja si e rumenita .Multumesc pentru reteta.
Sa ai o zi buna...
Ellie this is fantastic! Thank you so much for posting this and doing the step by step. I've gotten all to comfortable and bored with my regular bread, its time for me to venture out of my comfort zone :) Cibatta is the perfect place to start! They look delicious, I want a sandwich on those babies :)
Superbe Ellie!
Huge fan si eu :)
Cel putin tot ce am incercat din cartea lui este de nota 10.
Si de peste 4 luni tot incerc ... :))
Speranta, Multumesc mult!
Andrea, Oh, if you ever get the chance to make it, I think you will love it.
Andreea, Multumesc mult pentru inspiratie! Am vazut ca toate painele lui ies asa de faine. Cred ca o sa incerc si eu mai multe din retetele lui:)...O zi buna.
Ellie, ti-au iesit asa bine painicile! Arata asa apetisanta, numai buna pentru un sandwich :) Si eu tot cu paine experimentez in ultima vreme, cel mai bun lucru de facut pe zapada asta :) Numai bine!
Mihaela, Multumesc mult!...sa sti ca am vazut ce multa zapada aveti la voi...pot sa zic ca este ca la noi in Montana:)...
paine calda de la cuptorul tau si facuta de mana ta:) ...nu se compara cu cele cumparate. O zi buna!
Ellie, I am really impressed, you have done a beautiful job with the ciabatta, you are a great baker and a fantastic photographer. Peter Reinhart's book is one of my favourite bread books, I made his Greek celebration bread this morning.
Megi, Thank you so much! I really am not much of a photographer, yet I try my best to capture what I would like to see in recipes:)...
Mmmm, the Greek bread sounds fantastic!
Ellie, I am confused about one particular step.
After the 3 series of S & F , Andreea says that you let the volume double, then you place dough in the fridge. Your recipe says to place dough in the fridge after the S/F series. Can you please clarify if you skipped the doubling volume step? Your loaves look great. Thanks.
Simo, I'm assuming you are talking about Part 1(Day 1) step 13-14 on my recipe.... You know, I didn't let it rise till double...after making the turns I placed it in the fridge until next day. I simply followed the recipe as per PR. book... see link I posted above the recipe....As for Andreea's version, allowing it do double before placing it in the fridge may work( I know she is a phenomenal baker!), but I didn't do that for mine. I hope this clarifies it a bit :)...Thanks for your kind comment on the bread...appreciate it!
Hi Ellie,
somehow jumping from a post to another I ended up here and read the comments. I reviewed my post because somehow Simo misunderstood my explanation, my bad, they were not very clear.
What was in the brackets at the final strench and fold step was saying that at that point, if we don't bake the bread the same day, we can put the dough in the fridge. I corrected my explanations hopefully now it's clear. Thank you for the kind word Ellie :)
have a great weekend!
Andreea, No worries... it happens. I'm glad you caught it, though. But even when we are detailed and thorough there's still the chance of being misread, misunderstood, etc... Hopefully Simo was able to make a wonderful bread, regardless. But thanks for stopping by and clarifying it.
As a side note:
I noticed I couldn't publish both your comments... ended up copying and pasting from the email I received which allows me to moderate comments... not sure why it happened(maybe blogger issues). I've had that happen a few other times... Hopefully it will go away:)... but just so you know.
In instructions number 15, do you mean turn pan around in the oven versus turn pan "over"?
Denise, Yes! Turn pan around... or "rotate pan" would sound much better. Sorry about the wording. You basically want to get the bread evenly brown on all sides. Thanks for bringing that to my attention... I appreciate it!
Post a Comment