~ "By wisdom a house is built, and through understanding it is established; Through knowledge its rooms are filled with rare and beautiful treasures." ~ "Reckless words pierce like a sword, but the tongue of the wise brings healing" ~ "But the wisdom that is from above is first pure, then peaceable, gentle, and easy to be intreated, full of mercy and good fruits, without partiality, and without hypocrisy." ~ "Trust in the LORD with all your heart, and lean not on your own understanding; in all your ways acknowledge Him, and He shall direct your paths."~

Thursday, February 24, 2011

Mushroom and Potato Crema with Roasted Poblano...Rick Bayless

Mushroom and Potato Crema with Roasted Poblano...Rick Bayless
It's been quite cold for the past week. This morning we hit -10 deg. F.... Cold. Very Cold. And when it gets that cold, I usually gravitate towards making soup. Lately though, I've wanted a change from the regular soups I make... wanted to try something new. It's nice to vary things a bit from time to time....
I stumbled upon this soup on Rick Bayless' website... while I was actually searching for another recipe. The Potato and Mushroom Crema with Roasted Poblano really caught my eye ...and I really think it was the roasted poblano in the ingredient list that made me look twice. Roasted poblano...now, I don't know why I had never thought of using poblanos in my soups before. I loved the idea! Definitely wanted to make the soup. It sounded quite delicious and I had all the ingredients at home... even the fresh poblano! There were just enough mushrooms in the fridge and I had some yukon gold potatoes that I wanted to use. I quickly whipped up this flavorful soup for lunch and loved it. Loved the bits of chile and corn in the soup...and the cilantro really added a nice fresh taste.
I love roasted bell peppers, and when I make a batch on the grill, I will oftentimes add some fresh poblanos as well. I like to cut them up and freeze them in small quantities...they are great in salsas and recipes like this... even for green enchilada sauces. But this time, since I had a fresh poblano, I roasted that and used it for the purpose of this post. Incidentally, you will find quite a few of Rick Bayless' recipes on his website that are worth trying out...you will also find his tortilla soup that I made earlier.
I made a slight change to his original recipe that is worth mentioning....just because I personally like it. I ended up sautéing the sliced mushrooms to get a good caramelization and flavor going. I then added a bit of the stock to remove any browned bits that may have stuck to the skillet and proceeded to add it to the soup. I like the golden color of the mushrooms as they float through the soup...reserved a few slices for garnish. The original recipe uses only 8 oz of mushrooms, but I ended up using what I had in the fridge...more like 10 oz. Now, Rick simply adds the fresh mushrooms to the soup...you can easily do that if you like. It is easier and you don't have to take out the skillet:).
I added some sour cream to finish off the soup... more like a 1/2 cup. But you can also use some heavy cream, creme fraiche, or even plain yoghurt. Bacon is optional, so omit if you don't care for it. This was yet another great soup that we enjoyed very much. A different take on the classic mushroom and potato chowder...and a very nice change from the usual soups I make. Hope you enjoy...

You will need: adapted from Rick Bayless

4 medium (1 lb) Yukon Gold potatoes, cut in 1-inch pieces
4 garlic cloves, peeled and halved
6 cups chicken broth
1 large fresh poblano chile
10 ounces mushrooms, sliced*
1 scant cup corn kernels, fresh or frozen
1/4-1/2 cup heavy cream or sour cream( I used sour cream)
Salt, to taste
butter/oil to saute mushrooms
* you can use some oyster and/or shiitake mushrooms for an elegant twist
Garnish with:
1/4 cup roughly chopped cilantro
1/4 cup crispy bacon bits, optional

Directions:

1. Roast the poblano... over an open flame, grill, or in oven, under broiler. Turn when poblano is blistered and blackened all over. Do the same on the second side....this should take 10-15 minutes under the broiler( I use my toaster oven).
2. Cover roasted poblano with a towel and let cool. Peel the blackened skin off the chile, and remove the stem and seeds. Cut into small pieces. Set aside.
3. Saute mushrooms till golden brown ....over med/high heat in a bit of oil/butter. Set aside. Reserve a few slices for garnish if you like.
4. In a medium soup pot, add potatoes, garlic, and 3 cups of broth. Heat on high and when the liquid boils, reduce the heat to medium. Simmer until the potatoes are tender, about 15-20 minutes.
5. When the potatoes are tender, blend the soup.... either in the pan with an immersion blender, or food processor/blender and return to the pan. Add the remaining 3 cups of the broth, the sauteed mushrooms(and the scraped up bits), poblano and corn.
6. Simmer for about 10 minutes or so over medium heat.... the soup should thicken slightly.
7. Right before serving, take out about 1⁄2 cup of the hot soup and place in a small bowl. Mix in the sour cream( or cream) and stir it back in the soup pot. Taste and season with salt.
8. Garnish with cilantro, reserved sauteed mushrooms( if using), and crispy bacon(optional).

Monday, February 21, 2011

Tortilla Soup( Sopa Azteca)...Rick Bayless Style

.

Tortilla Soup...Rick Bayless Style A couple of summers ago, my husband and I had the chance to visit my brother and his wife.... who at the time, lived in downtown Chicago. They took us to many restaurants... including Frontera Grill, Rick Bayless' well-known restaurant. And since they lived within walking distance of the restaurant, they suggested we go there for a Saturday brunch. I was quite excited, as I love Rick's style of cooking....packed full of flavor and authentic in style. We woke up early that morning to make sure we would make it in time...there's usually a very long line. But we managed to get seated, and had a lovely brunch. The food was delicious....worth waking up for:). Remembering that day, I quickly picked up his cookbook from my shelf entitled, Mexican Everyday. Leafing through the book, I spotted a recipe for tortilla soup. Decided to make it that day for lunch...
Now, I know most tortilla soups have chunks of tomatoes, and various vegetables in it... almost all use canned tomatoes.... I've done it that way before, but my husband can quickly taste the "canned" taste, and so I have not made it that way in a long time. But Rick's version has you puree the soup base, including a can of tomatoes:)...but he also cooks down the pureed vegetables for a bit, and I think that eliminates the "canned" taste... In any case, I think I have found a new favorite way of making tortilla soup.
I did change a couple of things...added a bit of masa harina at the end, to sort of thicken the soup ever so slightly and to give the soup extra corn flavor. Now you can easily skip that, if you like. Also, since I like to add some fresh vegetables to almost any meal:), I decided to add some fresh onion and tomatoes as additional garnishes. Simply optional. Oh, I almost forgot...I used only 2 chicken breasts instead of 4. I think it was plenty...and actually felt the soup could easily be done without the chicken. Rick's version uses raw chicken, but he says you can also use cooked chicken...so I marinated mine and cooked it for additional flavor. You can use any tortillas you prefer. You can even make your own, using corn tortillas and then baking them. Use as little or as many tortillas as you like. I left some of my tortillas whole, as I like to break mine in the soup, but you can break them up beforehand...it soaks up some of the soup and thickens it a bit. The lime adds a real nice touch. Loved the soup. Hope you enjoy...

Tip: I think this is a great soup to make, especially when you have some leftover chicken that needs to be used up...
Feel free to add some black beans or a few corn kernels for a heartier variation.

You will need: inspired and adapted a bit from Rick Bayless, Mexican Everyday.... Makes about 10 cups...probably just enough for 6 servings.

1 large dried pasilla (negro) chile, stemmed and seeded*
15-ounce can diced tomatoes in juice (preferably fire-roasted, which is what I used)
2 TBS olive oil
1 medium white onion, sliced
3 garlic cloves, minced
8 cups chicken broth, preferably homemade
2-4 chicken breasts, cooked and cut in cubes or shredded**
1 1/2 cup shredded Mexican melting cheese
4-5 cups tortilla chips, roughly broken
*Rick mentions that you can substitute 1 TBS of ground chili for the pasilla chile, adding it to the onion mixture...I haven't tried it with the powdered chili version yet. If you are doing this for children, you might even want to skip the chili altogether.
** I like to marinate my chicken with a bit of garlic, cilantro, olive oil and a bit of salt the night before or a few hours before I make my soup. I then grill the chicken or pan fry. You can also use leftover rotisserie chicken or leave it out completely.

To thicken a bit and to flavor: totally optional, but I like it
2-3 TBS masa harina
3-4 TBS water or stock

Mix the the 2 ingredients until you get a thick slurry and add to simmering broth at the end.

Toppings: any or all
avocado, pitted, flesh scooped from the skin and cut into 1/4-inch cubes
onion, chopped
tomato, chopped
cilantro, roughly chopped
extra fresh chile
Mexican crema, sour cream or creme fraîche
lime, cut into wedges

Directions:
1.Heat the oil in a medium saucepan over medium-high. Add the onion and garlic and cook, stirring frequently, until golden, about 7 minutes. Set aside.
2. Toast the chile in a dry pan on medium heat, pressing it flat for a few seconds, then flipping it over and doing the same on the second side. This should take about 30 seconds or so...don't over toast the chile or it will become bitter.
3. Cut or break the chile into pieces and place them in a blender. Add tomatoes with their juice.
Add the reserved cooked onion and garlic. Process until smooth.
4. Heat the saucepan on medium-high heat, add a drizzle of oil and when quite hot, add the puree.
5. Stir the puree nearly constantly, until thickened. Slightly cover with a lid if need so as not to splatter all over. This should take about 5-6 minutes and have a tomato paste consistency.
6. Slowly add the broth. Reduce the heat to medium-low and simmer for about 15 minutes.
7. Add the chicken to the simmering broth....and masa harina slurry( if using). Cook for an additional 2-3 minutes( the soup won't thicken too much). If using raw chicken cook for for 5-7 minutes or until chicken is cooked through.
8. Taste and season with salt.

To serve:
In bowls, add tortilla chips and cheese. Ladle some of the soup and a few pieces of chicken. Garnish with some chopped avocado, onion, cilantro, tomatoes and sour cream( or crema), if desired. Squeeze a bit of lime juice.

Wednesday, February 16, 2011

Pressure Cooker Risotto...an absolute favorite!

..
Pressure Cooker Risotto...an absolute favorite!
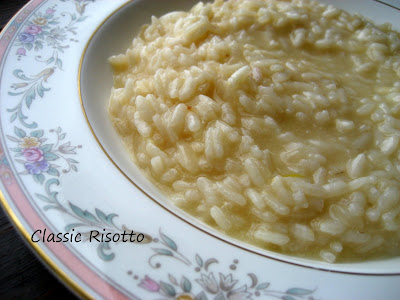
It was a cloudy and cold day. The type of day you want to snuggle up with a good cookbook:). You can actually see the cloudy day in the photos as well:). Anyway, I wanted to make us something warm and comforting...and quick. Why not make some pressure cooker risotto? Risotto is the type of dish I can make in a hurry, with just a few simple ingredients... usually ingredients I have in the house. When I decided to make the risotto, I instantly thought of posting it... especially since I make it quite often. And just like the pressure cooker polenta, I thought it would be good to share the risotto recipe... as well as adding it to my recipe file for future reference. I know most of you might not have a pressure cooker, but I am hoping that there might be just a few out there who do own one. In case you don't, I have posted a link to a risotto that is cooked without the use of a pressure cooker....a recipe that's worth trying. I am sure there are a ton of other recipes online, but I find the pressure cooker makes an excellent risotto. So bear with me as I share my favorite way of making risotto.
We really like the pressure cooker risotto. Did I already mention that? Sorry. But making risotto in the pressure cooker gives me such great results that I don't have to worry if it will come out right or not. Each time I make it, the risotto is just as delicious. Of course, when I vary the add-ins that usually changes the flavors. But, the classic version is always the same. I actually like to vary the risotto according to ingredients I have on hand. Sometimes it could be some asparagus with a bit of lemon zest( or without)... at other times, a bit of sundried tomatoes or mushrooms or peas or various vegetables that need to be used up. But regardless of what ingredients I use, I like the creamy-ness of the risotto and often have a bowlful....sometimes, I'll even skip the butter and Parmesan cheese. But if you are doing it for the first time, you might want to indulge in the richness of the butter and cheese:).
Because I don't often stick to the classic version, we never get tired of risotto:). I love the fact that I can have the risotto on the table in a matter of minutes. The risotto is delicious, uses simple ingredients, and it cooks really fast. There's absolutely no stirring as it cooks....and I think that's pretty neat.
I thought to share 3 types of risotto I made( from the same pot:))...I had to work quickly so the risotto would not clump up on me as I took photos of each. By the time I got to the mushroom one... well, you can tell it isn't as creamy. But I really wanted share the simple variations.
With the pea risotto, I simply pureed some defrosted peas and seasoned it a bit with salt before stirring it into the risotto. The mushrooms I simply cooked in a skillet with a bit of olive oil (you could use a bit of butter as well) until they were nicely golden. I like to keep my heat on med/high when cooking the mushrooms...this way the mushrooms get that nice golden color. If you want, you can place the mushrooms with the rice and liquid and cook it right from the start....the risotto will have a brownish color, but you'll get a bit more mushroom flavor that way. Be creative with ingredients you have around the house....toss in some roasted bell peppers, some shrimp, some cooked sausage, etc. The variations are endless..but don't overdo the ad-ins. You want the rice be the star of the dish. Hope you enjoy....

Note: If you do not have a pressure cooker, you can opt to making this version of Seared Scallops on Pea and Mint Risotto, and adapting to preference.

You will need:
1 cup Italian Arborio or other short‐grain rice
2 tablespoons olive oil
2 cups chicken broth(preferably homemade)
1/2 cup white wine( you can substitute this with extra broth )
1/2 cup onion/shallots, diced
¼ cup grated Parmesan cheese(you can use a bit more if you like)
pad of butter(optional, but really good)
salt and/or pepper to taste(you might not need if using store-bought broth)
Tip: you can also add some fresh basil, parsley,etc.

Optional add-ins or toppings to taste...some can be cooked right along with the risotto from the start...it is great to experiment.
sauteed mushrooms
pea puree/whole peas
sundried tomatoes
asparagus
roasted bell peppers
lemon zest/juice
roasted sweet potatoes/pumpkin
pan-fried sausage slices
cooked ground breakfast sausage(I tried this version at a Spanish restaurant in Chicago, I think it had some tomatoes as well )
seared scallops/fish/shrimp
and the list can go on and on....

DIRECTIONS:
1. In pressure cooker, on medium-low heat, sauté onion (or shallots) in olive oil.
2. Cook onion for about 3 minutes and then add risotto rice.
3. Sauté for an additional minute to coat the rice with the oil.
4. Slowly add chicken broth and wine. Increase heat to high. Close the lid and bring to pressure....When the button pops up, immediately lower the heat to a simmer and begin timer.
5. Cook for 7‐10 minutes (depending on preference 7 minutes for al dente or 10 for a creamy/soft texture). I like mine al dente and cook it for 7 minutes.
6. Remove pot from fire and release pressure.
7. When pressure has gone down, open lid and stir. You will notice that there is a bit of liquid still( for 7 minutes)...this will give you a chance to stir in some of the add-ins while quickly warming it up.
8. Mix in your favorite additions ...such as pureed peas, mushrooms, lemon zest, or herbs. Taste and season with salt and pepper. Add Parmesan cheese and a pad of butter, if using.
9.The liquid will soon be absorbed by the time you serve it...though risotto, in general, should not be clumpy but have some liquid still.
10. Stir risotto well and  serve at once. It is important that you serve the risotto as soon as it is done...the rice will continue to absorb the liquid as it sits....sort of like pasta. You don't want the risotto to clump up on you. I am sure it will still be good...you will just have to call it rice pilaf:).

Wednesday, February 9, 2011

Phyllo Dough " Cannoli "...filled with Vanilla Ice Cream


Phyllo Dough " Cannoli "... filled with Vanilla Ice Cream. I came up with this dessert one night after seeing an Australian chef make a strawberry cream-filled "cannoli". He ended up using a tuile cookie to form the "cannoli", but I loved the idea and instantly thought of using phyllo dough. It would be unique and different...plus, I had some on hand. At the time I really didn't know if it would work. But I really wanted to give it a try. If it would work, I'd be thrilled...if not,well... I'd just have some crispy phyllo:). Funny how at the moment you think that you've invented something new... to later find out that it's been done before:). Anyway, at least it was new for me:)...
Since vanilla ice cream is one of my husband's favorites, I ended up using it to fill the "cannoli" shells. Next time, I would like to fill it with different fillings...maybe some chocolate mousse or pastry cream. The phyllo shell isn't very difficult to make. You just need a very light hand when removing them from the cannoli tubes and when filling them. Other than that, they're pretty much straightforward. You can fill the shells with whatever filling you like and decorate as desired. The shells can be made in advance and you can make as many shells as you need...just fill them the following day(or even the same day). If filling them with ice cream, they stay frozen and crispy for days. Love this type of dessert that can be made ahead.
The result was wonderful and I am glad it worked! It is a nice alternative to the traditional fried cannoli that's filled with sweetened orange-scented ricotta. Sure it isn't the same...and maybe I shouldn't even call it a "cannoli". But since it was inspired by the cannoli, I can only give it credit:). It's still a rather nice dessert, regardless of the name....and it was a sweet surprise for my husband. He loved it. Hope you enjoy...

You will need:

phyllo dough sheets (mine are 13x9 inches)
melted butter
cannoli molds*
* I think you can make the molds out of aluminum foil...or for better stability, you can make a tube out of cardboard and then wrap it in aluminum paper, making sure the aluminum paper is quite smooth...like I made my bread cones, except make the paper forms tube-like.

Filling of choice: just some ideas
ice cream
mousse
cannoli filling
pudding
custards

Decorate with: just ideas
melted chocolate
chopped pistachios or other nuts
berry sauce
chocolate sauce
caramel sauce
powdered sugar

Directions:
1. Preheat oven to 375 deg.
2. Butter/oil cannoli forms.
3. Brush a 13x9 phyllo sheet with melted butter...fold in half and brush with melted butter...fold in half again to give you a strip and brush with melted butter.
4. Place buttered cannoli form on one end and roll up.
5. Place forms(seam side down) onto a parchment paper/silpat and bake in preheated oven for about 7-10 minutes or until golden brown...do keep an eye on it, so as not to burn.
6. Let forms cool a bit. Use oven mits to hold the cannoli forms and remove phyllo forms GENTLY....use a light hand, as the phyllo can break on you. If need be, twist gently as you pull the steel forms keeping your fingers in the ends(not the middle part).
7. Cool completely.
8. Decorate as desired...and let set completely.
9. Scoop some ice cream into a piping bag, making sure the ice cream isn't soft. Twist the end of the piping bag and squeeze the bag a bit to warm the ice cream enough to pipe through the cannoli forms.
10. Pipe ice cream in cannoli forms(being very gentle with the phyllo)...from both ends. Immediately place in freezer.

The ice cream-filled "cannoli" can be frozen ...place them in a container with lid and place some parchment paper in between the layers.

Friday, February 4, 2011

Peter Reinhart Pain a l'Ancienne ( Part 2)...Baguette, Rolls, Fougasse, etc.

.
.

Peter Reinhart Pain a l'Ancienne ( Part 2)...Baguette, Rolls, 'Fougasse', etc.
This particular recipe is a take on Peter Reinhart's ciabatta bread that I posted earlier. The only difference is that you will omit the oil in the ingredients and the dough doesn't actually proof for as long the next day. Other than that, the basic technique of stretching and folding the dough and the overnight refrigeration is still followed. The dough can stay refrigerated for up to 4 days... which gives you plenty of time to work with it. I find the flavor of the bread increases with time. I let my dough sit in the refrigerator for 2 days. You will need to check the ciabatta post for some of the steps in this recipe...
To be honest, I made this second batch for trial and error...to sort of "play" with the dough and create various breads. Initially, I had intended to make most of it into baguettes and with the rest, make a couple of different shapes. I just wanted to see how the dough would handle if I changed it into other types of shapes. Because I handled the dough a bit more when making the rolls, twists, and "fougasse", some of the bread holes weren't as evident in the final product. It really didn't change the taste, just was a bit less airy and the bread structure was more compact. You can see the result in the first photo of a regular baguette slice and the second photo of the twist. Less holes in the latter version. The "fougasse" was a last minute decision...even the sprinkling of the herbs was an afterthought. It turned out to be my favorite:)...
I think this dough would work really well as a pizza dough. Loved, loved the bread. I think Peter Reinhart has done a marvelous job explaining the techniques that are used to attain beautiful artisan style breads right in your own home. Hope you enjoy....

You will need: adapted from Peter Reinhart's Artisan Breads Every Day
You can also see a sample of the book with this recipe HERE

4 1/2 cups (20 oz / 567 g) unbleached bread flour( I used King Arthur)
1 3/ 4 teaspoons (0.4 oz / 11 g) table salt
1 1/4 teaspoons (0.14 oz / 4 g) instant yeast
2 cups (16 oz / 454 g) chilled water (about 55°F)

Directions:
Part 1: Day before
See instructions for this part....in PART 1 of my previous ciabatta post.
Just skip the olive oil

Part 2: Day after dough has refrigerated overnight( or up to 4 days later...I made mine on the second day)

1. Remove dough from refrigerator 1 hour before baking( by the time I got to baking everything, it was more like 1.5-2 hours for me).
2. After you remove the dough from the fridge, let dough rest at room temp for about 1 hour...
45 minutes before baking, preheat your oven to 500 deg....see preparing your oven for baking in the ciabatta post. If using a stone, place it inside the oven as well as a steam pan. Have a towel ready( to cover glass on door... so as not to crack the glass).
3. After 1 hour, line a baking sheet with parchment paper and flour it well. Set aside.
4. Flour your work surface and gently remove the dough from the bowl...(being careful not to degass the dough....you want as many bubbles in the dough as possible, which will give you those nice big bread holes).
5. Using a wet dough scraper, cut the dough in strips... and place them on the parchment paper rolling it in a bit of the flour. It is ready for baking.
~for baguettes you can leave them in strips.
~for smaller pieces, just cut the strip in half leave them as is or twist a couple together
~ for rolls, cut a small piece of dough and gently form into a ball( I just pinch the outside of the dough to a point and tuck the pinched dough inside....boy, I don't know if I explained that very well:)).
~ for "fougasse", stretch out a strip and cut a center slit and 2-3 slits on each side of the center slit..... or if you want, make it like I did, just cut a few slits in the dough:)....spray a bit of water and sprinkle a mixture of dried herbs...or leave it without the herbs.
Since I folded a few and made some into rolls, I let them proof a bit more( just because I handled them more than the plain strips/baguette). I baked the baguette and smaller strips first... while the rolls, twists and 'fougasse' I put aside to rest/ proof for half an hour( or so) while the first batch was baking. Cover the dough pieces with oiled plastic wrap(loosely) while it is resting.
6. Slide the baguettes(with parchment paper) unto the hot stone(...or simply place the whole sheet pan with the bread doughs and parchment paper).
7. Place your towel over the glass door...add 1 cup hot water to the steam pan....be VERY careful so as not to burn yourself...use oven mitts).
8. Lower oven to 475 deg...
9. Bake for 12 minutes and then turn pan over and bake for an additional 12 or so minutes ...or until rich brown all over and sounds hollow when tapped. (The baking time may vary depending how large or small your loaves are.)
10. Bake the remaining bread. Let cool before slicing.
The bread is wonderful with some smoked salmon, as a dipping bread, with ham and cheese...or whatever you like:)

Wednesday, February 2, 2011

Peter Reinhart's Pain a l' Ancienne Bread (Part 1) .... Ciabatta

.
.
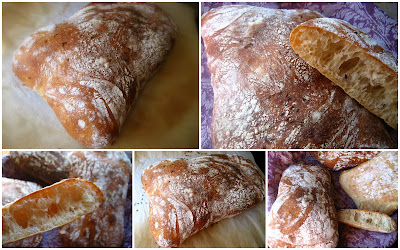
Peter Reinhart's Pain a l' Ancienne Rustic Bread (Part 1).... Ciabatta Loaves. I am a huge fan of Peter Reinhart and love his bread recipes. I have only made a few of his recipes...his 100% whole wheat bread, his pizza dough, and now his ciabatta bread. But each recipe has been a winner for me and I have learned so much from each one.
Ever since I saw the recipe on Andreea's blog(Romanian), I knew I had to make it. Her step-by-step photos were so beautiful that she inspired me to make them. I hadn't baked bread in a while, so I was quite eager to try it out.
I do have to admit that it did take me a couple of days to think about the recipe( reading it and re-reading it) before I finally started. Many times it's much easier to do something simple, something I am used to. But in order for me to learn and improve, I need to push myself....to try a recipe I may be unfamiliar with. It was good to get out of my comfort zone and make the bread.... regardless of the outcome.
So I forged ahead and decided to make 2 batches of the bread. One batch was for this ciabatta recipe while the other batch was used for making baguettes, rolls, etc.( which is Part 2...to be posted soon)....The really neat thing about making more than one batch, is that you can leave it in the fridge for up to 4 days....so you don't have to bake it all on the same day. I was quite thrilled with the final result.
I have to say, it was by far the best artisan/rustic bread I've made. The outside is nice and crisp while the inside is pleasantly soft. It's light and airy with a wonderful chew...and tastes way better than store-bought:)! For me, this was a winner of a recipe.
The process wasn't as difficult as I first thought:). The stretch and fold technique is applied to the dough... giving you a great hands-on experience. It's actually quite neat to see the different stages that's involved in bread making/baking....and then be rewarded with wonderful bread.
I think weighing the ingredients is key. Just for curiosity, I measured my flour as I usually do and noticed I would have been off by 1/4 cup-1/3 cup in comparison to weighing in grams... makes a big difference. I also like to weigh my liquids as I find it is much more accurate. Had loads of fun making the ciabatta. Will definitely be making it again....Thinking of using it as a focaccia and making the Italian Schiacciata con L'uva. If you have a free day, you might want to give this recipe a try. Start the dough the night before and finish it off the next day...or a few days later. Hope you enjoy...
NOTE: Please don't be put off by the long procedure, I have tried to make it visually helpful...it isn't really that difficult as it looks.

You will need: initially inspired by Dimineti Insorite ...and adapted from Peter Reinhart's Artisan Breads Every Day....You can also see a sample of the book with the ciabatta bread recipe HERE

4 1/2 cups (20 oz / 567 g) unbleached bread flour( I used King Arthur)
1 3/ 4 teaspoons (0.4 oz / 11 g) table salt
1 1/4 teaspoons (0.14 oz / 4 g) instant yeast
2 cups (16 oz / 454 g) chilled water (about 55°F)
1 tablespoon (0.5 oz / 14 g) olive oil

Directions:

PART 1...the night before.

1. In a mixing bowl, combine flour, yeast, salt and water. (For accuracy, I weighed my flour and water... for the rest I used my measuring teaspoons/tablespoons).
2. Using the paddle attachment, mix on low for about 1 minute.
3. Stop the mixer and let the dough rest and hydrate for 5 minutes.
4. After the dough has rested 5 minutes, add 1 TBS olive oil. Mix again( using the paddle attachment) for another 1 minute. At this point the dough is a bit smoother...but still sticky and wet.
5. Lightly oil a large bowl. Place the dough in the oiled bowl...since the dough is a bit sticky you might want to use a wet scraper or even wet hands to remove the dough.
6. Cover the bowl and let the dough rest for 10 minutes at room temp.
7. Lightly oil your work surface...you don't want to put too much oil otherwise the dough will move away from you without being able to do the stretch and fold technique, which follows.

You can see Peter Reinhart performing the stretch and fold technique in this video link:

8. Using wet or oiled hands transfer the dough unto the working surface and sort of pat it in a rough rectangle.
9. Using wet or oiled hands reach underneath the front end of the dough and stretch it out a bit before folding it on top of the dough.
10. Do the same from the back end( stretching it and folding it over).
11. Now take the left side of the dough( from underneath) and fold over...do the same with the right side.
12. Flip the dough over and tuck the dough in to form a ball. Place the dough ball back in the oiled bowl.
13. Let the dough rest for 10 minutes and repeat process 2 more times for a total of 3 times...all stretching and folding should be done within 40 minutes.

14. Place the dough in the bowl, cover tightly, and refrigerate.

PART 2/ Next day( or up to 4 days later)

1. Remove dough from refrigerator 3 hours before baking.
2. After you remove the dough from the fridge, let dough rest at room temp for about 1 hour.
3. After 1 hour, line a baking sheet with parchment paper and flour it well. Set aside.
4. Flour your work surface and gently remove the dough from the bowl...(being careful not to degass the dough....you want as many bubbles in the dough as possible, which will give you those nice big bread holes).
5. Using a wet dough scraper, cut the dough in 3 strips...(or as many ciabattas as you plan on making).
6. Fold each strip like a letter... left side over and then right side over left.
7. Turn the folded dough over(seam side down) and place on floured parchment....rolling it a bit(gently) in the flour so that it won't stick. Do the same with the other strips.
8. Cover with oiled plastic wrap and let rise for about 1 hour.
9. After 1 hour, gently turn the dough over so that the seam is up. Gently place your hands underneath the folded dough and stretch it to about 7 inches if doing larger ciabattas(less if doing smaller ciabattas). Place the stretched dough(seam side up) back unto the floured parchment. Repeat the process with the remaining pieces.
10. Cover the stretched dough pieces with oiled plastic wrap(loosely) and let proof for another 1 hour....you should see large bubbles on the surface of the stretched out dough.
It is at this time you may want to do a little bit of cleaning:) and then get the oven ready for pre-heating.
11. Close to 45 minutes before baking, get your oven ready by preheating it to 550... or as high as your oven heats...mine goes to 500 deg. If using a stone, place it inside as well. I also place a steam pan( broiler pan that came with the oven...don't use glass) as well.
Have a towel ready( to cover glass on door... so as not to crack the glass).

You can see Peter Reinhart explaining how to get your oven ready for baking in this video link:

12. After the 45 minute rise, slide the ciabatta bread doughs(with parchment paper) unto the hot stone(...or simply place the whole sheet pan with the bread doughs and parchment paper).
13. Place your towel over the glass door...add 1 cup hot water to the steam pan....be VERY careful so as not to burn yourself...use oven mitts). Take towel off and....
14. Lower oven to 450 deg...
15. Bake for 12 minutes and then turn pan over and bake for an additional 12 or so minutes ...or until rich brown all over and sounds hollow when tapped. (The baking time may vary depending how large or small your ciabatta loaves are.)
16. Let cool on wire rack for an hour or so before slicing.

You can freeze the bread and re-heat in oven to crisp up again.