~ "By wisdom a house is built, and through understanding it is established; Through knowledge its rooms are filled with rare and beautiful treasures." ~ "Reckless words pierce like a sword, but the tongue of the wise brings healing" ~ "But the wisdom that is from above is first pure, then peaceable, gentle, and easy to be intreated, full of mercy and good fruits, without partiality, and without hypocrisy." ~ "Trust in the LORD with all your heart, and lean not on your own understanding; in all your ways acknowledge Him, and He shall direct your paths."~

Friday, January 29, 2010

Starbucks Banana Bread...an absolute favorite!


Starbucks Banana Bread... Banana bread recipes abound...all sorts of variations. But I thought I would make this version, since I had so many frozen bananas. With the rest of the frozen bananas, I ended up making some healthier banana muffins....a new post soon:). The bananas really needed to be used up. Frozen bananas.... somehow, they always make it in some sort of bread recipe.

You know, this recipe was really, really good....actually it is an absolute favorite! Moist and flavorful, the way I like it. It comes together rather quickly, not a fussy recipe at all. Plus, the bananas get used up. I like that. Try adding some extra flavoring to make it unique. I like to add a bit of almond flavor to mine. It sort of goes with all the added nuts. Purely optional, though. And, as with all banana breads, they are best eaten the second day. The flavors fully develop and the bread becomes quite moist. Much, much better.

You could likewise freeze the bread. ...which is what I do. It is always good to have some on hand...for unexpected guests, the next potluck, or for those days that you want something to go along with your cup of tea or coffee.

You can also make Banana Nut muffins... just bake in a muffin tin for 24-25 minutes... or until toothpick comes out clean. Makes 12 muffins. Hope you enjoy...


Update: I no longer use the whole amount of sugar... have cut the sugar amount to 3/4 cup....though I think 2/3 cup will work just as well.
Also, I now most always use half whole wheat flour...though sometimes I will make it with 100% whole wheat... or half oatmeal flour( finely ground oats) and half whole wheat/ spelt flour. I also use extra-light olive oil...

Note: This recipe can easily be made into a wonderful pumpkin/winter squash bread. I normally make it with white whole wheat/spelt or half whole wheat /white flour. I substitute the mashed bananas for 1 cup cooked and mashed canned pumpkin(or winter squash that has been baked till soft, and then pureed)... with this particular recipe the sugar needs to be increased to about 1 cup and spices added. I normally add 1 tsp pumpkin spice and 2 tsps cinnamon. I quickly snapped a picture of our last slice so I could show you the winter squash variation....with no nuts.

Starbucks Banana Bread Recipe as per original recipe below.

You will need:
2 cups all purpose flour
1 tsp baking soda
1 ⁄4 tsp salt
1 egg
1 1 ⁄8 cups sugar
1 ⁄2 cup vegetable oil
2 TBS buttermilk*
1 ⁄2 tsp vanilla extract
3 ripe medium-large bananas (mashed)
1 ⁄2 cup + 1 ⁄3 cup chopped walnuts
* I just use plain whole milk with 2-3 tsps lemon juice, let it sit until curdled, and use it in place of the buttermilk

Directions:
1. Pre-heat the oven to 325.˚F. Grease a 9x5 loaf pan...I like to use parchment paper. Set aside.
2. Blend together the flour, baking soda and salt and set aside.
3. Mix together the egg, sugar, and oil until combined. Add to the flour mixture.

4. When blended, add the buttermilk, vanilla and mashed bananas and mix until combined.


5. Fold in 1 ⁄2 cup chopped walnuts and pour batter into prepared loaf pan.
6. Top batter with remaining 1 ⁄3 cup chopped walnuts.

7. Bake for 45 to 60 minutes, or until a toothpick inserted in the center comes out clean. Cool for 10 minutes on a wire rack before removing from pan.
8. Dust with some powdered sugar for some elegance.
9. Banana bread always tastes better the next day....just wrap it up...or freeze.

Wednesday, January 27, 2010

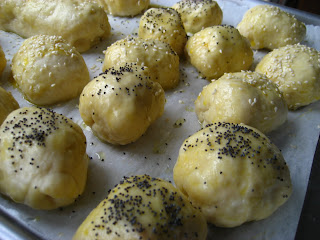
Mini Pretzel Bites,Pizza Swirls,Mini Bagel Dogs, and Parmesan Cheese Swirls...All made out of one Dough!


Mini Pretzel Bites, Pizza Swirls, Mini Bagel Dogs, and Parmesan Cheese Swirls...All made out of one Dough!
Here we go, again...working with bread dough:). This was actually really fun. Seriously. It was fun to come up with different ideas for all the bagel dough I made. I love using ingredients that I have around the house...its always more challenging. It saves you money, as well as a trip to the store. For the filling ingredients, I used sausages instead of hot dogs, leftover homemade spaghetti meat sauce, and cheddar cheese instead of mozzarella, etc...
My inspiration for this post was a memory of eating bagel dogs with my oldest brother. He was the one who actually introduced me to the BAGEL DOG. Have you ever had a bagel dog? Well, it took a visit to the to the mall one day, to make me appreciate what he liked about them. I figured bread and a hot dog together...no big deal. I've had that before. But a bagel dog...now, I've never had that before. The hot dog(more like a polish sausage), encased in chewy bagel bread, with a bit of mustard on the side, was just mmm,mmmm, good! It was only after I had eaten my bagel dog, that I understood why my brother liked them so much. That bagel dog was something else...! Sweet, sweet memories... Ok, so you have to like hot dogs/sausages to appreciate where I am coming from. I know many girls wouldn't dream of enjoying a bagel dog as much as I do. But, you know, I am thankful I grew up with plenty of brothers who broadened my outlook on things:)....
But, I haven't had a bagel dog in a VERY LONG time. I don't know if they have them at the malls anymore. I just know they don't have them where I live... and I wanted a bagel dog. I thought, why not...I could make my own. I searched through my freezer and found NO hot dogs. But I did have some sausages...that would work , wouldn't it? I decided to make do with what I had. I realized after making 2 regular-size sausage dogs, that they were going to be too much. I mean, I could have eaten a whole one ...but knew I shouldn't. So I changed my plan, and made them into smaller bites. I think that was much better:). Since I had a lot of dough left, I decided to do other things with it....pizza swirls, pretzel bites, and some Parmesan/ham swirls. By the way, I used my Best-Ever Bagels dough for all of these recipes. Please click on the link to see my original post and then proceed to make one or all of the 4 recipes. Actually, if you have a different idea you would like to try, feel free. These are just ideas... I used what I had on hand. I like the fact that the bagel recipe makes quite a lot of dough. This gives you enough dough to make quite a few recipes. You can freeze these goodies ...just re-heat them in the oven. It crisps them up nicely....they are just wonderful! What was my absolute favorite?...why, the bagel dog, of course! The pizza swirl came in at a close second:)...Kids will love the pizza swirls. Put them on a stick and they will be really happy...well, most kids will:) Hope you enjoy...

For the Mini Pretzel Bites:

Take an orange size chunk (or smaller) of dough and roll it in a thin round log/strip.
Using the kitchen shears, cut about 1 inch chunks.
Let rise for about 20 minutes. Boil the pretzel pieces for about 1 minute in simmering water(with baking soda/sugar...check out the post on the bagels.)just like you would boil the bagels.
Brush with beaten egg.
Bake at 400 deg for 10-12 minutes or until golden brown.
Eat them plain...or dip in a honey mustard sauce, plain mustard, marinara sauce, balsamic/olive oil/parmesan dip, cheese sauce, etc.
FOR THE PIZZA SWIRLS:
Take a chunk of dough and roll into a rectangular shape. Spread a layer of pasta sauce onto the dough.
I had some meat sauce, so that is what I used. But feel free to use regular pizza/pasta sauce. If your sauce is on the thinner side, you can cook it down some to thicken a bit.
Sprinkle some chopped Canadian bacon/ham along with some cheese. I ran out of mozzarella and had to use some Colby/Cheddar cheese.Roll the dough jelly roll style and pinch the end.
Cut in 1-1/2 inch slices(or thereabouts) and place on a parchment lined baking sheet. You can brush the sides of the dough with some beaten egg if you like. I didn't...but it will give it some nice golden color.
Bake in a preheated 400 deg oven for 10-12 minutes.Some cheese/sauce will ooze out. Just let it cool down a bit.


FOR THE PARMESAN HAM AND JALAPENO SWIRLS:

Basically the same idea as above(pizza swirls), except you don't use any sauce. I substituted some Parmesan cheese and added some diced pickled jalapenos.This was more "plain" flavored. You can definitely be creative...try adding some Alfredo sauce with a bit of roasted garlic, etc...
FOR THE BAGEL DOG/SAUSAGE ROLLS:
You will need some hot dogs... or in my case, some sausage. I didn't have any hot dogs, so I used what I had. The casing from the sausage will make you pull at it a bit, unlike a regular hot dog... but, the flavor was incredible!
Cut sausage into 1 inch(or so) slices. Set aside.
Take a chunk of bread dough and roll into a rectangle. Using a 2-2 1/2 inch biscuit cutter, cut out circles.
Wrap the dough around the sausage slice and pinch the dough to encase the sausage. Make sure it is completely closed/pinched(Otherwise it will open as you boil them). Then gently form the dough around the sausage piece....basically to get the dough evenly distributed around the sausage.
Let it rise for 20-25 minutes. Boil as you would bagels. See my bagel recipe post.
Brush with beaten egg and sprinkle with sesame seeds, poppy seeds, or leave plain.
Bake in a pre-heated 375 oven for 10-12 minutes or until nicely golden brown.

Friday, January 22, 2010

Peter Reinhart’s 100 % Whole Wheat Sandwich Bread


Peter Reinhart’s 100 % Whole Wheat Sandwich Bread Ok, so I am in a bread baking mood as of late. I really have come to LOVE bread baking...and the more I bake, the better I get at it. Of course, I am still learning... I can still remember how scared I was of making bread. Actually, I avoided any recipe that listed yeast as an ingredient. I just didn't want to mess around with it....didn't want to be disappointed. So for the longest time, I stayed away from those little packets of yeast. I always figured it was meant for those who were professionals.... or like my mom, who always used yeast as if it was no big deal. My mom made wonderful pizza dough, cozonac, gogosi (Romanian version of doughnuts) and various other doughs. I would see her making the dough, adjusting amounts as she went along. She would add more flour if she felt the dough needed it, or maybe adjust the amount of liquid, and so on. So, when I first started using yeast, I wanted spectacular results...sort of like my mom's:). I mean, I wanted the final product to be perfect! Oh, believe me, it wasn't perfect by any means...but I slowly learned how the dough should feel. I also found out that certain factors can affect the final result ...such as the humidity on that particular day, the right temp. of the liquid(not too hot, not too cold) and the need for the dough to rise in a WARM environment. I also learned that properly mixing the dough was just as important. I started out kneading the dough by hand. That was fun ...for a while. But then my hand would get too tired ...and that wasn't fun. Even though I gained valuable experience kneading the dough by hand, I didn't want it to become a chore, or even worse, disliking it. I wanted to enjoy it. I was thrilled when my husband eventually bought me a Kitchen-Aid mixer. From then on, it was a piece of cake:)!! Well, almost...at least the kneading part was. I am still learning about bread baking to this day. I really like to try a different bread recipe every so often....it just helps me practice my bread making skills.
This post was inspired by Peter Reinhart, a genius at bread baking. Well, I consider him a genius because he came up with a 100% WHOLE WHEAT bread that's TASTY, FLUFFY and TENDER! It slices beautifully. 100% whole wheat?...yes! Trust me, this bread is really good....DELICIOUS! We love it, and the recipe is definitely a keeper. I originally saw this recipe HERE and took the challenge to make it myself. Ok, so the recipe may look long and tedious. It really does involve two days!...yes, two days. But, you really don't have to do too much. The dough just needs to rest and get hydrated. This in fact is what makes the bread so soft and tender vs. other 100% whole wheat breads. It also gets better flavor as it rests... and since I like to bring in whole grains into our diet, I was up for the challenge. The bread was fantastic. Worth the time. Of course, since I was going through all that trouble, I decided to make 2 loaves. Glad I did. Hope you enjoy...

YOU WILL NEED: Just a note, I did measure my ingredients using the scale this time around. I didn't need to adjust anything... Oh yes, I finally got a kitchen scale!:)

~~~~~~~~~~~STEP 1~~~~~~~~~~~~~

For the Biga (Pre-fermented Dough):
1 3/4 cups (227 grams)whole wheat flour
1/4 tsp instant yeast
3/4 cup (170 grams)water, at room temperature

Biga (Pre-fermented Dough) Directions:
1. Mix the biga ingredients until a shaggy ball of dough is formed. Knead the biga for about 2 minutes or until the ingredients are evenly distributed.
2. Place the biga in a bowl and cover.

3. Refrigerate for at least 8 hours and up to 3 days. Let the biga sit at room temperature for about 2 hours before using in the final dough.

~~~~~~~~~~~~STEP 2~~~~~~~~~~~~~~~

For the Soaker:
1 3/4 cups( 227 grams) whole wheat flour
1 tsp (4 grams) kosher salt
3/4 cup + 2 TBS (198 grams) whole milk

Soaker Directions:

1. Mix the soaker ingredients until evenly hydrated. Cover and leave at room temperature for 12 to 24 hours.


~~~~~~~~~~~~~STEP3~~~~~~~~~~~~~

Final Dough Formula:
all of the biga (Step 1), cut into small pieces
all of the soaker (Step 2), cut into small pieces
7 TBS (57 grams) whole wheat flour
1/2 TBS (5 grams) kosher salt
2 1/4 tsp (7 grams) instant yeast
2 1/4 TBS (43 grams) honey
1 TBS (14 grams) unsalted butter, melted

Final Dough Instructions:

1.Mix all of the ingredients until evenly incorporated.

2. Knead 8 to 10 minutes I kneaded mine for 8 using my Kitchen-Aid mixer

3. Rest 5 minutes.

4. Knead 1 minute to further strengthen the gluten.

5. Let rise for 45 to 60 minutes at room temperature, in a lightly oiled bowl, or until 1 1/2 times its size.


6. Shape loaf and place in a greased 8 1/2 x 4 1/2 loaf pan ( I like to use parchment paper on the bottom.).... you can also use a 9x5 loaf pan, though it probably won't get such a high rise. The smaller pan works a bit better.

7. Roll bread dough similarly to a jelly roll style.

8. Pinch the seam so that the dough won't unravel and place seam side down in a parchment lined(or greased) loaf pan/s.

9. Preheat Oven 425ºF/218ºC...you will only need to pre-heat the oven at 425 deg F.... you will bake the bread at 350 deg. F.

10. Final Proof: Let dough rise for 45 to 60 minutes, at room temperature, or until 1 1/2 times its size.

Before baking: Lower the oven temp immediately to 350 deg.
11. Place the loaf on the middle rack and bake for 20 minutes. Rotate pans and bake for another 20 minutes ( I like to loosely cover my loaves with aluminum foil to prevent overbrowning in the last 10 minutes or so). OR until the loaf is a rich brown on all sides and registers at least 195 deg.F in the center. I like to brush my bread with a bit with melted butter...that's why the loaf is so shiny. It won't stay shiny...just softens the crust a bit.


12. Transfer the bread to a cooling rack and allow it to cool for at least 1 hour before serving.
You can definitely freeze the bread....actually, I recommend it. Just wrap it well.

Wednesday, January 20, 2010

Kopanisti Dip...Whipped Feta and Red Pepper Dip


Kopanisti Dip...Whipped Feta and Red Pepper Dip/Spread. A week ago, I came across this dip on Tastespotting. Since then, I found it here and here and here. It sounded delicious and very easy to whip up. I knew I wanted to try it. I just love unique dips. Because I had all the ingredients, I whipped it up in no time. This recipe came together rather quickly. Ok, maybe it was because I had some ready-made roasted peppers on hand:). I had bought these peppers from Costco, and wanted to see if they were just as good as the homemade ones. They didn't have any preservatives... just peppers, salt, vinegar, water and grape juice. Plus, they were Florinas peppers ... supposedly the best peppers to use for this dip. The Florinas peppers are distinguished by their cone shape and scarlet color, and cultivated in the eastern part of Greece. Greek dip, Greek peppers... now, that should work. So I gave them a try:). They did the job! This dip was definitely easy to do. Simple. Different. You can roast your own peppers, and it would be just as delicious, if not better. Actually, I think I will roast my peppers next time... just to see the difference. There are so many variations to this dip...Some use sundried tomatoes, others use just the cheese without any bell peppers, while still others add a few pepperonchini peppers. Ingredients and amounts can vary...but the cheese is the star. Traditionally, it should be the Kopanisti cheese found in Greece, therefore the name. But, feta cheese can be substituted. A lot of the dips use quite a bit of feta. So, if you don't like feta....well, that could pose a problem:)...maybe you could substitute some milder cheese. The neat thing about making this at home, is that you can play around with the amounts to suit your liking. Use less feta or use more bell peppers...add more garlic or don't put so much. It is up to you. This is how I made mine and liked it. Hope you enjoy!
You will need:
1/2 cup crumbled feta cheese
2-3 TBS Olive Oil, you might want to add more
1 garlic clove, peeled
1 TBS fresh mint (optional)
red pepper flakes (optional)
1 roasted red pepper, skin peeled
pepper to taste
cumin, to taste, very optional (my addition, liked it better, actually)
a pinch of sugar, in case your dip is a bit on the sour side(I think my peppers were a bit on the sour side)

Directions:
Combine all the ingredients(except the oil) into a food processor and blend together. Drizzle olive oil until it becomes smooth. You might need to add more than the 2-3 TBS. I just limit the amount of oil I use....though it does bring it together quite nicely. It also tastes better with more oil:).
Taste and adjust seasoning for red pepper flakes. Add pepper if needed. Blend again until smooth. Serve with pita/naan/ crusty bread. I think this dip tastes better as it sits, so the flavors blend.