~ "By wisdom a house is built, and through understanding it is established; Through knowledge its rooms are filled with rare and beautiful treasures." ~ "Reckless words pierce like a sword, but the tongue of the wise brings healing" ~ "But the wisdom that is from above is first pure, then peaceable, gentle, and easy to be intreated, full of mercy and good fruits, without partiality, and without hypocrisy." ~ "Trust in the LORD with all your heart, and lean not on your own understanding; in all your ways acknowledge Him, and He shall direct your paths."~
Showing posts with label Soup. Show all posts

Tuesday, March 18, 2014

Brazilian-style Shrimp Soup/Stew...


Brazilian-style Shrimp Soup/Stew... with onion, peppers, tom
atoes and rice.
Not too long ago, a reader(Yung) recently commented on my Spanish Marmitako dish and shared with me her tip for adding some coconut milk to the stew to make it creamy. I loved her suggestion, as variations to the dishes I post are always, always welcome... I really enjoy hearing from all my readers when they have a tip or suggestion, it makes me learn as well:). In any case, the comment had instantly reminded me of a Brazilian dish which uses coconut milk ... and it's somewhat similar to the Marmitako I made recently. So I thank Yung for her suggestion... because I made the Brazilian dish not too long after :)!

I thought to share this Brazilian-style dish as well... only because it's quite simple to prepare and it can come together in no time at all. If you have a few ingredients you can make a dish that's quite healthy, filling.... and it's gluten-free as well. The only thing that made this dish more of Brazilian-style, (emphasize the style) is that I substituted the usual coconut milk for cashew milk. Now, you can easily sub in the coconut  milk if you like... I just didn't have it on hand, as I don't normally buy canned coconut milk( but I'm wanting to one day... for the mere fact of making some whipped coconut frosting:)). The coconut milk will definitely make the soup more creamy than the cashew milk... but it's good with the cashew milk as well.

Now, I always like to quickly brine my frozen seafood, but you can easily skip the brining if you like... just season the shrimp with a bit of salt/pepper and proceed with the recipe. While I used only a couple of garlic cloves, you can definitely increase amount if you like more garlic. This dish was a welcome meal on a cold rainy day. Hope you enjoy... 

Note: The soup will thicken as it sits... the rice will absorb some of the liquid...  and will make a stew-like dish.

Tip: The soup can easily be eaten without the acidity... it will taste more like a seafood chowder... but the lemon juice brightens the dish and makes it taste "alive" .  

You will need: inspired by Epicurious

Cashew Milk :  need only 1 cup for this dish,  this amount makes more than enough, so opt to freeze the rest... or use some coconut milk instead... or you can even scale down the recipe.

1 cup raw cashew pieces
3 cups water

Shrimp Brine

5 cups water
2 TBS kosher salt
1 pound medium (26 count) frozen raw shrimp

Soup Base:

1 onion chopped fine
1 bell pepper chopped fine
2 garlic cloves, grated (can use more if you like)
2 TBS chill olive oil (can use regular)
Salt and pepper to taste
1/2 cup long grain rice
1 1/2 cups crushed canned tomatoes (I used whole in juice and processed)
4 cups water
1 cup cashew milk from above, or use coconut milk
1 lb brined shrimp from above, cut  in pieces if too big
1-2 TBS lemon juice or to taste ( I used meyer lemon, can also use lime)

Topping:

chopped green onion/ parsley/cilantro, etc.
drizzle of olive oil

Directions:
Make cashew milk... this step can be skipped if using coconut milk.
1. Soak cashews in water  while getting everything ready. Can soak overnight or soak for a few hours.... if not in a hurry:). 
2. In a blender( I used  my Vitamix ), place soaked cashew, add water and blend until smooth and milky in texture... a couple of minutes or so. 
3. Remove 1 cup and set aside... freeze the rest in small batches (or use in other dishes, smoothies, etc).


Brine Shrimp: Can be skipped as well, though brining makes the shrimp taste great as well as makes them plump and juicy. If you don't want to brine, season shrimp with a bit of salt and pepper and set aside. 
1. Dissolve salt in water, add frozen shrimp(with shell on) and allow to sit in brine for about 30 minutes or so... the shrimp will defrost almost completely, if it is still frozen,  you can start to clean the shrimp, removing shell and deveining... by the end of the cleaning, the shrimp should have defrosted completely. Set aside.

Note: if using deveined shrimp that has already been cleaned, allow to sit in the brine no longer than 20 minutes as the brine will penetrate the shrimp much quicker.  

2. Process the canned tomatoes to a puree.... I used a large 28 oz can and had leftover, but you can use a smaller can. Remove puree and set aside 1 1/2 cups. 
3. Chop onion, and bell pepper. 
4. Heat oil in a soup pot on medium heat. Add chopped onion, chopped bell pepper and garlic. Stir to combine and season with about 1 tsp kosher salt.
5. Saute vegetables for 10-15 minutes... stirring often so as not to burn. Lower heat if necessary. 
6. Add rice and saute for another minute or so. Then stir in crushed tomato.
7. Add about 4 cups water and bring to a boil. Cover with lid lower heat to a simmer. Cook for 12-15 minutes or so.... or until rice is almost done. Yo don't want the rice to be too mushy.
8. Add milk (cashew or coconut) and cook for another 2-3 minutes. Season with salt and pepper as needed.

Note: The picture shows I added the milk and shrimp at the same time, I plumb forgot as I was taking the pictures to add the milk first... but do add milk first:). 

9. Add shrimp and cook for another minute or so, then turn heat off... the residual heat will continue to cook the shrimp. 
10. Add lemon juice(or lime) to taste and top with fresh green onion and/or parsley/cilantro.


Friday, January 24, 2014

Chinese Egg Dumplings... and another soup idea.

Chinese Egg Dumplings... and another soup idea. Sometimes I come upon a recipe that simply blows me away. Like making dumplings... with an egg "wrapper". Now, why haven't I ever thought of using eggs in such a way? I mean, it's a genius idea! And to top it off, the dumplings are gluten-free... and SO, so tasty. 

While the egg dumplings can take a bit of time to make, I think they are totally worth making. After making a few, you'll get the hang of them and do what works for you. I ended up using a couple of buttered molds to make a few dumplings that would have a "perfect" half moon shape.... the molds are optional, though. And after making them freehand, I found they were actually easier without the molds. 

But imagine the possibilities. The meat fillings can vary and the dumplings can be used in a variety of ways. They'd be great as an appetizer, with a light dipping sauce. I'm thinking they would also work in a stir fry. You could even use them in soups, which is what I ended up doing. But you know, if the filling would be Italian based, then they could be topped with a marinara sauce, sprinkled with a bit of cheese and then baked. Sort of like baked raviolis. Wouldn't that taste yummy?  Anyway, the possibilities are endless... but I just love, love the idea. 

So I'm sharing the idea mainly... and you can make  as many dumplings as you like. Or you can make a few, and form some of the meat into meatballs if making a soup like I did. I just used ingredients I had in my pantry and fridge... but you can make it your own. The soup is quite simple, and comes together in no time. For my soup, I used a homemade chicken stock, some rice noodles, a few meatballs, torn cabbage leaves and some green onion... and of course, some of the egg dumplings. It was simple, yet so delicious! 

Have fun with the recipe. Sorry about the lighting in the photos, made these for dinner with minimal light....  a greenish tinge in the photos, but the idea is there:).  Hope you enjoy...

Note: I don't know if I should mention this, but in case you are interested.... I've made these with egg whites only, they work ... definitely not as fluffy, but still doable. Of course, you can use a vegetarian filling instead of the meat if you like. 
  
You will need: inspired by userealbutter

Meat Mixture:
6-8 slices dried shitake, soaked, stems removed, and squeezed dry(can use fresh)
1 green onion, minced
1 cabbage leaf, stem removed, finely minced
1/2 lb ground chicken 
1/2 tsp grated fresh ginger
1 tsp sesame oil
1 tsp cornstarch
1 tsp coconut aminos ( or soy sauce)
1/4 tsp kosher salt
1/4 tsp pepper

Egg Dumplings:
beaten eggs as needed

Note: 1 ex-large beaten egg makes about 6 dumplings. You can use all of the meat mixture to make dumplings, so you may need 6 eggs or so. If making only a few dumplings and making some meatballs with some of the meat , then beat one egg at a time so you don't  have leftover beaten eggs.  

Soup Ingredients: can add ingredients of choice, or skip some and add others.
Homemade chicken stock
Cooked rice noodles
Cooked meatballs from meat mixture above
Cabbage leaves, chopped in large pieces
Sliced green onion 
Cooked egg dumplings

Directions:
1. If using dry shitake, soak in hot water until soft, squeeze dry, remove stem and mince. Mince the green onion and the cabbage leaf as well. Place in a bowl.
2. To the minced vegetables, add the ground chicken, ginger, sesame oil, cornstarch and coconut aminos(or soy sauce) and the salt and pepper. Mix until combined. Refrigerate for a couple of hours or overnight.  
To Make Egg Dumplings:

1. Beat egg (or eggs). Season with a bit of salt.
2. Heat a nonstick skillet on medium heat, add a bit of oil. 
Note: I lower my heat to low when forming and cooking dumplings.
3. Using about 1 -2 TBS of beaten egg, 
a) pour in a greased mold, spreading egg to fill the mold (this method was my initial try, makes neat circle dumplings, but I recommend the second for making them, as it's much quicker) 
or
b)pour in the center of pan and using the back of a spoon spread egg in a circular  motion to form a 3 inch circle. 
4. Allow egg to set a bit, but making sure the top is till quite wet, then add  1-2 tsps of chicken mixture in the middle of the egg... a bit off center. Flatten the meat a bit so it's not in a mound.
5. Using a small spatula, lift half the egg over the filling, pressing edges so it seals... forming a half moon shape. Allow to set a bit and you can turn it over to cook the second side, if you like. 
6. Repeat  with the rest.
NOTE: You can cook one dumpling at a time, but I found I was OK cooking 3-4 at a time on low heat. I moved the folded ones out to the edge, and poured a new one in the center. However, do what works best for you.     
Making a Simple Soup:

Tip: Feel free to add whatever ingredients you like to a simple homemade chicken stock... mushrooms of all sorts would be wonderful. This is just an idea...

1. Boil water, season water with a bit of salt. Place rice noodles and small 1 inch meatballs (from meat mixture above) in boiling water... Turn off heat and allow to sit until noodles are soft and meatballs are cooked through. Remove noodles and rinse under cold running water. Set aside.
2.  Add chicken stock to pot, bring to a boil, add cabbage leaf pieces, meatballs and cook for a couple of minutes. Add egg dumplings, green onion and noodles. Cook for another minute or so until everything is warmed through and soup is hot. Ladle in bowls. Sprinkle with a bit more fresh green onion....   


Wednesday, October 30, 2013

Kale, Potato and Chorizo Soup... 2 versions(with sauerkraut or cream)


Kale, Potato and Chorizo Soup... 2 versions(with sauerkraut or cream). When I made the homemade chorizo some time ago, I knew I wanted to use some of it to make a soup. At the time I was looking to make a homey, comforting sort of soup.... or more like a rustic looking soup that would use minimal ingredients and be somewhat on the healthier side. The usual combination of potato and onion often imparts a wonderful flavor to soups... and normally it adds "bulk" so the soup stretches quite a bit. And because I had plenty of kale in my garden( it lasts well into the cool months), I wanted to add some of it to the soup as well. Kale stands up remarkably well in soups, so I picked up a whole bunch thinking I was going to make just one type of soup. Instead I made 2... 

Dividing the soup in 2 was more like a last minute decision. Initially, I wanted to use up most of the kale I had already picked from my garden, but after tasting the soup, I knew the flavors would go incredibly well with some sauerkraut. I had plenty of pickled cabbage in the fridge, so why not add some? The sauerkraut addition made the soup so good that I want to make it again. It was simply delicious.

In the end, I decided to use up all the kale I had picked, so it made the soup feel quite "full"... lots of leafy vegetables, potatoes and meat... with minimal liquid. And I was alright with that. But if you want more liquid, then you can increase the stock if you like, or cut down on the kale. Also you don't have to make 2 versions of the soup, you can just stick with the original by using just kale, potato and chorizo... and adding cream to taste. You'll end up with a delicious soup. But if you want to skip the cream (no dairy), then making the sauerkraut version is just as delicious. My husband really enjoyed the sauerkraut variation.

In any case, I split the soup in 2 just to see the difference... and to have some variety as leftovers. The soup is great to play around with, because sometimes the ingredients work so well together, that you can just adjust the soup to taste. Potato, onion and seasoned meat always marry well. If you like, you can skip the kale, and add some spinach, or even omit it all together. And while I added half water, half stock for the liquid, you can use just stock for additional flavor. Also, you can skip the cream( though it makes the soup taste extra special) and top with some fresh green onion, and maybe some crumbled bacon. These are just ideas... but the soup is rather easy to make(one pot)... and makes for a quick meal. It's also gluten-free and has the option of being made dairy-free. A great fall-like soup that warms you through and through. Hope you enjoy...      

Tip: If you don't have chorizo, opt to use ground beef and adjust seasoning to include some spice of sorts, including a bit of smoked paprika.

You will need: 
1 lb russet potatoes 
2 cups diced onion(1 large onion)
1 large garlic clove, grated
1/2 cup water, for deglazing
3-4 cups chicken stock
2 1/2 cups water
2-4 cups packed chopped kale(I used 4 cups)
salt and pepper as needed

Optional add ins: dividing the soup in half (or you can make the soup one version only and doubling ingredient of choice below, be it sauerkraut or cream)

1 cup shredded homemade sauerkraut to 1/2 of soup
1/4 cup cream, or to taste  added to the other 1/2 of soup

Directions:
1. Wash and peel potatoes. Cut in thick slices and cut each slice in quarters. Set aside. Wash and roughly chop kale. Set aside. Dice onion and grate garlic. Set aside. 
2. In a large soup pot, add chorizo sausage meat and cook on medium heat breaking up the sausage meat to a crumble. Cook meat until nicely browned.
3. Add onion and garlic and continue to cook until onion softens, stirring every so often so as not to burn... about 5 minutes.
4. Add the 1/2 cup water  to de-glaze, scraping any browned bits that may have formed at the bottom of the pot... continue to cook until water is almost evaporated but meat still has a bit of moisture.
5. Pour the chicken stock and 2 1/2 cups water over meat.
6. Add the cut potatoes and bring soup to a boil, cover and lower heat to a simmer. Simmer for 10-15 minutes. 
7. Add kale and cooker for another 10 minutes or until potatoes are soft. Adjust seasoning.
8. At this point you can make 2 versions of the soup: 

~Divide in 2: you will need another pot
1) Add 1 cup of shredded sauerkraut to half of the soup and cook on low for another 5 minutes until the sauerkraut gives off its flavor.  
2) Add 1/4 cup cream(or to taste) to the other half of the soup and simmer for 3-5 minutes.  

~OR Make ONE type of soup by choosing one preferred version below:
1) Add 2 cups sauerkraut and cook on low for about 5-7 minutes.
OR
2) Add 1/2 cup cream and simmer for 3-5 minutes


Wednesday, October 2, 2013

Cauliflower Pear Soup... with toasted walnuts and chives(Gluten, Dairy Free)


Cauliflower Pear Soup... with toasted walnuts and chives(Gluten, Dairy Free). Sometimes the simplest of ingredients make a delicious and healthy meal. I've been wanting to make a cauliflower and pear soup for quite some time now. I loved the idea of combining cauliflower with pear. And as much as I don't make pureed soups very often, I like to introduce them in our meals from time to time... especially so during the fall season. 

I love butternut squash or pumpkin soups. They're the type of soup that's quite comforting on a cold day, and with a side of toasted cheese sandwich, well, it really makes for a nice fall meal. This time around though, I wanted to step aside from the usual pumpkin soups and make the cauliflower pear soup that's been on my mind. The cauliflower soup can be made with all sorts of variations, including mixing in some gorgonzola, or adding a bit of curry paste and finishing off with some coconut milk...or if you like, a bit of heavy cream. While the variations all sound delicious,  I chose to go the simpler and healthier option. Decided to skip all form of dairy and made it gluten-free.... this meant no cream or croutons. 

As with most pureed foods, the silky smooth texture is essential for making a luxurious mouth feel. At the same time, I like to add another textural element to the smoothness of the soup, which is usually done by introducing some sort of "crunch". Normally croutons work really well, as would crispy chips of sorts, be it tortilla or vegetables crisps. But since I wanted to go a bit healthier, I chose to reserve a few of the cooked vegetables pieces from the soup and added some toasted walnuts instead. The toasted walnuts brought the extra crunch the soup needed, along with additional flavor. 

You can easily top the soup with other healthy alternatives, be it by simply roasting some cauliflower florets seasoned with a bit of spice... or even some baked thin pear slices that have been made into chips. While I finished off the soup with a drizzle of olive oil, other flavored oils could be added instead. Walnut oil would be super nice.

The soup is simple to make and quite budget friendly... can easily feed 6 people. The nice part is that while it is a homey type of soup, it can easily be served at any elegant dinner gathering... and it really wouldn't be out of place. The soup can double up as an amuse bouche or even served as a first course. I'm thinking it would be a great little starter for Thanksgiving. In any case, if you like to make a different sort of soup, you might try this version, adjusting spices and toppings to preference if you like. Hope you enjoy...   
  
Note: You can easily adjust the consistency of the soup by adding more or less chicken stock, until you reach desired thickness.

Tip: You can substitute butter or oil of choice for the coconut oil... You can opt to skip the potato if  you like. An Asian pear can easily be substituted for the regular pear. And while I haven't tried it yet, an apple instead of pear could work just as well. Feel free to add a bit of garlic along with the onion... even a shallot or leek will work.
Opt to use fresh thyme instead of the dried, and include a bay leaf, if you like. Other herbs could work, such as tarragon, sage, etc... Celery, fennel, carrots can be added to make a variation off the basic soup... Stirring in a bit of cashew cream would be lovely. Be creative and make the soup your own...

You will need: 

Soup
3 TBS coconut oil
1 yellow onion, sliced
1 large pear, peeled and diced 
1 medium russet potato, peeled and diced 
1 head cauliflower, cut in florets
1 tsp dried thyme
6 cups homemade chicken stock, or as needed
1/4 tsp cayenne pepper, or to taste 
salt, to taste

Toppings/Mix-ins of choice: just some ideas, but you can be quite creative.
toasted walnuts, chopped
chives
drizzle of olive oil(can try other oils, such as walnut oil)
freshly cracked pepper
even hot sauce( my husband's addition:))
croutons 
a bit of acidity in the form of (sherry vinegar, lime, lemon juice)
gorgonzola cheese/parmesan/goat cheese
cream or half and half
crumbled bacon
roasted cauliflower florets seasoned with smoked paprika
caramelized pear

Directions:
1. Heat the oil in a large soup pot over medium heat. 
2. Add the sliced onion and cook until they are soft, stirring occasionally, about 8-10 minutes. 
3. Add the diced potato and pear  stirring to thoroughly coat them with the oil  and cook for another 3-5 minutes. Season with a bit of salt, being careful not to add too much in case your stock is on the saltier side. 
4. Add the cauliflower and thyme and cook stirring frequently until lightly browned in areas, about 5-7 minutes. You want a bit of caramelization to occur, so you get some flavor. 
5. Add the chicken stock. Season with a bit of salt.


6. Bring to a simmer, cover and cook until all of the ingredients are very tender, about 25-30 minutes. At this point you can reserve a few pieces of cauliflower, potato, and pear for garnish later on.
7. Puree the soup until it’s silky smooth.... using a Vitamix (what I used), regular blender, or even an immersion blender. If using a blender you will need to blend in batches( be very careful as the soup is hot, place a towel over lid) and then return the soup to pot. You can thin soup with more chicken stock if you like. 
8. Season to taste with salt. Garnish with reserved vegetables, chives, toasted walnuts, freshly cracked pepper, and a drizzle of olive oil... or oil of choice.

Wednesday, May 22, 2013

Romanian Vegetarian White Bean Soup... "Ciorba de Fasole".


Romanian Vegetarian White Bean Soup (Ciorba de Fasole)... using a 1-pound bag of white beans to make 2 dishes (Part 1).  I know, I'm posting a soup when we are nearing the summer months. This should be more of a "winter" sort of soup. But honestly, I like this soup all year round. I could even eat it cold:). So, for the next couple of posts, I will be sharing 2 Romanian recipes that are inexpensive, vegetarian and relatively easy to make. Both recipes are made using just a small (1lb) bag of dried white beans. 

I'll admit both recipes came about one day when I remembered a delicious white bean dip I grew up with...  it was always so, so delicious. And because the bag was more than plenty for making the dip, I decided to make another dish with the rest of the beans. It happens to be a Romanian soup I make from time to time.... with variations.

Most times I make this bean soup, I'll end up using some sort of smoked meat or sausage...  sometimes I'll just add a bit of bacon. But the soup usually varies most times, because I'll use whatever ingredients I have in the house at the moment. This time around I wanted to go lighter and chose to skip all forms of meat... went completely vegetarian. The soup was still delicious. However, for one of the meals, I ended up frying a smoked sausage link, sliced it, and added that to my husband's soup bowl. He loved it...sometimes you just have to improvise:). 

We like to add a bit of shredded Romanian cabbage slaw (shredded cabbage seasoned with vinegar, oil, and salt/pepper) to this soup... it sorts of acts as a "topping". The slaw adds a bit of extra freshness and crunch... as well as flavor. It's not traditional, I mean, adding the cabbage slaw. But one day, I had some on hand and my husband decided to add it to the soup...we found it actually worked:). Didn't take a photo of that, but I thought to mention it, in case you care to try the cabbage slaw variation. Hope you enjoy...

You will need:
Cooking Beans: you will only be using some of the cooked beans. Reserve 2 cups cooked beans for another dish... coming up... Part 2.
The bean stock and remainder of the beans can be made into this bean soup.

Brine:
2 1/2 cups dried white beans(navy or northern)
4 cups water
2 TBS kosher salt

Vegetables: for cooking beans and making bean stock
enough water to cover beans(2-3 inches above beans)
2 celery stalks
1 onion
1 bay leaf
2 carrots
2 garlic cloves, sliced
1/2 parsnip, if desired( normally used, but I didn't have)

Additional Soup Vegetables:
1/2 onion, diced small
2 celery stalks, diced small
1/2 red bell pepper, diced small
2 carrots, diced small
2 TBS tomato paste
salt as needed
1/4- 1/3 cup chopped fresh dill
2 TBS olive oil
lemon juice, to taste, totally optional

Directions:

1. Soak beans overnight: Place beans in a large bowl, add water and salt. 
2. Next day: Rinse beans and drain.  
Cook Beans: I cooked my beans in a pressure cooker for about 15 minutes (to make soft beans), but you can cook the beans in a regular pot if you like.

1. Place drained and soaked beans in a large pot and cover with about 3 inches of water.
2. Add onion, celery, carrots, garlic, bay leaf, and parsnip (if using). Bring water to a boil, cover and lower heat to a simmer... cook beans until soft. Check after about 45 minutes or so.  Time is approximate.
3. In the meantime, cut up soup vegetables... the 1/2 onion, the celery, carrots, and red bell pepper. 
4. In a skillet, heat 2 TBS olive oil and add the chopped vegetables... season with a bit of salt. Cook vegetables on medium/low heat stirring every so often until vegetables are tender, about 10-12 minutes. Add the tomato paste and cook for an additional minute mixing it in with the vegetables.  Turn off heat and set mixture aside.      
5. When beans have cooked and are soft, strain stock using a colander... and remove vegetables. Add the stock in a large soup pot.
6. Reserve 2 cups worth of the beans to make bean dip (Part 2 coming up) ...  
Place the rest of the beans back in the strained bean broth.  
7. Place the soup back on the stove, heat on medium heat and add reserved cooked vegetables with tomato paste.  Stir to combine.
8. Cook soup for an additional 10 minutes or so... so the flavors blend. Adjust seasoning.
9. Add chopped dill and serve. If you like, you can add a bit of lemon juice to brighten the dish...

Wednesday, February 6, 2013

Jewish Matzo(Matzah) Ball Soup


Jewish Matzo(Matzah) Ball Soup... You know, I've never had matzo ball soup  before... well, until a few weeks ago in NYC... at the Carnegie Deli. Oh, I've actually known about the soup for a long time, just never tried it before. And the reason being, is that all this time I thought, " Neah, it can't be better than the Romanian version of Chicken Soup with Farina Dumplings (or Supa de Galuste)." Ashamedly not the best attitude... because when one isn't open minded, one misses out. And you know what? I was pleasantly surprised to find out that matzo soup is right up there with the supa de galuste. It's equally delicious... even though they're both slightly different from one another. I'm so, so glad I finally tried it! Plus, it actually gives me an excuse to switch from one soup to the other:).

So if you remember, when I made the shredded chicken in my pressure cooker, I had some leftover chicken stock. And since I had some matzo meal on hand, I decided to make a quick matzo soup. Even with the stock being lighter in color from not using chicken bones, it still tasted delicious! It's funny how the photo actually makes the stock look like water, but the lighting was off that day... it really was chicken stock:). 

In any case, I thought I would share this recipe that's become a favorite of mine. Real comfort food. Great soup for those cloudy and dreary days.... or when you just need to take the chill off from all the shoveling:). Oh, and I forgot to mention, the soup re-heats quite well  because the matzo balls don't fall apart. So in reality, it would be a great make-ahead sort of meal you can give to someone who's fighting a cold... or just to cheer them up. Great even for the elderly, a new mom, or as a dish to bring to a gathering. We absolutely loved this soup! Hope you enjoy...    

You will need: matzo ball ingredients taken from the back of the matzo meal box:)

Matzo Balls: makes about 8 (1 1/2 TBS) balls
1/2 cup matzo meal
2 eggs, lightly beaten (I forgot to beat mine)
2 TBS oil (can use chicken fat) 
kosher salt to taste( I used a big pinch)
1/4 tsp dried onion, powdered, optional but quite tasty
2 TBS chicken stock (can use water, I suppose)

For Soup:
8 cups prepared chicken stock(or as needed), homemade is best*
1 cooked carrot, thinly sliced, optional
a few sprigs of dill, parsley, celery leaves, etc. thinly sliced
thinly sliced leeks, green onion, totally optional
freshly ground black pepper, optional
* I ended up using the stock from when I made my pressure cooker shredded chicken, so it's lighter than normal

Directions:
1. Mix all matzo ball ingredients in a bowl. Cover and place in the refrigerator for 20-30 minutes.
2. Add 6 cups of water to medium sized pot. Salt water well... as you would pasta water.
3. Bring water to a full rolling boil. Reduce heat to simmer.


4. Wet or oil your hands and form matzo balls... I like to use the 1 1/2 TBS cookie scooper and then  lightly shape into balls. Roll them loosely. Do not compact the mixture as you roll. You want to use as light of a hand as possible when rolling. This ensures your matzo balls won't be heavy.
5. Drop the balls into simmering salted water... one at a time. 
As a side note: You can cook the matzo balls directly in your chicken stock, if you like... it will just make the soup a bit more cloudy. 
6. Cover the pot and cook for 30- 40 minutes.

Assemble Soup:
1. Bring prepared chicken stock to a simmer... add any cooked carrot slices you may have from making the chicken stock... or omit.  
2. Ladle some soup in a bowl, add 2-3 matzo balls and sprinkle any fresh herbs, or sliced leeks/green onion. Sprinkle with freshly ground pepper, if desired.


Monday, August 13, 2012

Romanian Tomato Soup... or "Ciorba de Rosii"


Romanian Tomato Soup... or "Ciorba de Rosii"  Ciorba de rosii was a staple at our house when I was growing up... always made during the summer months with garden-fresh tomatoes from my mom's garden. We especially loved it with my mom's homemade taitei, or fresh pasta noodles. It's interesting but our family, for the most part,  always ate the soup cold, but I know other  families eat the soup warm. In any case, the soup can easily be had warm or cold... 

Sometimes my dad would make a side dish of crushed/smashed salted onion, or "ceapa frecata cu sare"...  to go alongside the soup.  Now, I have to explain what I mean by the onion side dish. You see, my dad would take a large onion, score it about 1/ 3 of the way deep, sprinkle some salt inside the scored onion,  and then close it, all along crushing and smashing the onion between the palms of his hands. He did this just until the onion softened a bit. This technique actually allowed the onion to loose its pungency, and taste somewhat sweet. It was so delicious with the soup!

Normally, the tomato soup can have a variety of different starches added to it. While I ended up using the rice variation in this post for the step-by-step photos( gluten-free), I normally like to omit the rice altogether. From time to time I will substitute the rice with orzo, or make some semolina dumplings(my personal favorite). For ease of preparation, and  a quick alternative to homemade pasta(taitei), you can add some broken spaghetti, or bow-ties, or other small pasta. Either way, I thought to share yet another Romanian dish, one that is perfect for the summer months. The soup is best made with garden-fresh tomatoes that are at their peak... ripe and flavorful. And if you have your own garden, with quite a few tomatoes on hand, then you can easily add a couple more to the soup... it won't change the soup much( it will probably make it better:)). Of course, you can freeze some of the tomatoes for  winter if you have too many... they will come in real handy then:)! Actually, I ended up making this soup with a mixture of frozen tomatoes and fresh. 

I know some folks make this soup with canned tomatoes, I suppose you can, but I much prefer the taste from garden-fresh tomatoes. However, I do add a bit of tomato paste... for depth of flavor and rich color. This soup has got to be my absolute favorite soup of the summer. I could eat it cold, room temperature, or even hot. Hope you enjoy....   

Note: You can also make this soup in a pressure cooker. I've put the times in the directions below.
If you would like to make semolina dumplings, you can see how they are made here....  semolina dumplings.

Optional: You can puree the cooked tomatoes in a blender instead of crushing them through a sieve... see directions. 

You will need: 

2 celery stalks, cut in large pieces
2 carrots, cut in large pieces
1 small parsnip, cut in large pieces
1 large garlic clove, sliced
1 onion, cut in in quarters
10 cups water 
1 TBS kosher salt, or to taste
2 lbs( about 6-7 large) ripe, garden-fresh tomatoes

3 TBS olive oil
1 small onion, finely diced
1/4-1/3 cup short grain rice/orzo* 
1 heaping TBS tomato paste
extra salt, if needed
freshly ground pepper, to taste
* can substitute with homemade thin pasta(taitei) or semolina dumplings... or can be left out completely. 

Extra:
chopped lovage( leustean)
chopped celery leaves
ground pepper, to taste

Directions:
1. Clean/peel/cut up vegetables (except tomatoes) and place in a large soup pot. 
2. Add 10 cups of water and salt.
3. Bring  to a boil and cover... lower heat and simmer for about 20-30 minutes. I used my pressure cooker for 20 minutes. The longer you cook the vegetables, the better the flavor of the stock.   
4. Remove regular pot lid after about 20 minutes, and add the whole tomatoes(or process the tomatoes and skip step 5). Cook for and additional 10-20 minutes. If using a pressure cooker, release pressure after 20 minutes and then add the tomatoes and place the lid back, bring to pressure and continue to cook for an additional 10 minutes. 
5. Remove tomatoes from stock and place in a fine strainer, crush to release all the juice. Some tomatoes may be too soft to remove from  the stock... it's ok, you just want the bigger pieces of tomato. Place the cooked tomatoes in a fine strainer.  and crush to release as much juice/pulp as possible. The idea is to leave behind only the tomato skin and seeds.  You can pour some stock over the pulp to help the pulp move down  through the strainer. (Sidenote: If you want, you can always use a high speed blender to blend the tomatoes without having to worry about losing too much of the tomato pulp... just puree the tomatoes and add it in step 4.)     
6. After most of the pulp/juice from the tomatoes have been pushed through the strainer, pour the rest of the vegetables and stock from the pot ... passing the liquid and vegetables through the strainer. 
7. Press the vegetables down a bit to release any remaining liquid... you don't want to press too, too hard... just enough to get all the liquid.     

8. Set tomato stock aside.
9. In  the same pot, heat the 3 TBS oil and add the minced onion. Cook for 7-10 minutes or until onion is  soft and gets a slight golden color.
10. Add rice/orzo and cook for 30 seconds-1 minute.... if you don't want to use rice or orzo you can skip this step.
11. Add the tomato paste to the rice and onion mixture( or to the onion only, if not using rice) and cook for an additional minute.
12. Pour the reserved tomato stock over onion/rice mixture and whisk to combine.
13. Bring to a boil, cover pot with lid and lower heat to a simmer. Cook until rice/orzo is cooked... another 10-15 minutes.  (Sidenote: At this point, if you haven't used rice or orzo and want to use homemade dumplings/pasta, you can add it now and adjust cooking time until dumplings/pasta is cooked through... if you would like to make the semolina dumplings, just click on the above link(under ingredient list) for directions. Adjust seasoning... I added an extra 1 tsp of kosher salt. Add freshly ground pepper.
14. Garnish with chopped celery leaves and/or chopped lovage. You could also use parsley... or even basil.

Tuesday, August 7, 2012

Cold Avocado-Cucumber Soup... Gordon Ramsay.


Cold Avocado-Cucumber Soup... Gordon Ramsay.
With the warmer summer months we've been having lately I've managed to stay away from using the oven 90% of the time.... the cooktop is a bit more difficult, just because I'm so used to turning on the stove, even for warming things up. But I've been challenging myself to make as many of our meals as raw as I can.... a double blessing really, because this way we get more vitamins and stay cool:).

We love avocados, so I've been having quite a few of them on hand lately. Just love to use them in salads... but I'll also just slice them up and add it on our plates( purely for the health benefits, or maybe because we like avocados so much:). But one day, when I was about to slice up some of the avocados, I remembered a recipe I had seen in one of my cookbooks for a cold avocado soup recipe. Grabbed my book and was surprised to see that I had all the ingredients on hand to make the soup. Made a quick appetizer-style dish and enjoyed the freshness of it. Quick, simple to prepare... and a change from the way I use avocados. Hope you enjoy...

Note: While I chose to leave my soup a bit thick and chunky, you can easily puree it smooth and add a bit of water at the end to thin it out a bit.... and if you pass it through a fine sieve you'll get an even smoother soup.

You will need: adapted from Gordon Ramsay's Fast Food

2 large cucumbers, about 400g each, chilled
1 lemon, juice (or to taste)
2 ripe avocados
2 TBS Greek yoghurt
1 TBS Worcestershire sauce
Salt/black pepper
½ onion(red preferred, but I used white), finely chopped
1 plum tomato, deseeded and finely chopped
1 TBS olive oil
4 basil leaves, finely shredded
Cold water, if needed

cooked crabmeat/prawns/lobster, optional

Directions:

1. Peel the cucumbers and quarter lengthways. Remove the seeds if you like, but I didn't bother since mine were those small Persian cucumbers. Reserve a quarter of the cucumber as garnish... dice it and set aside to be used as garnish later. Roughly chop the rest, place in a blender and add half the lemon juice. Blend until smooth. I used a food processor for mine, but a blender should work better, especially if you want your soup super-smooth.

2. Cut the avocados in half and remove the pit. Dice one avocado half to use  later for the garnish and squeeze some lemon juice over the diced avocado. Set it aside with the diced cucumber. Add the rest of the avocados into the blender.

3. To the blender add the Greek yoghurt and Worcestershire sauce, then blend everything until very smooth. Season generously with salt and pepper, and then add some more lemon juice to taste. Chill until ready to serve.

4. For the garnish,  dice some red onion(or use a white onion) and a plum tomato and then combine it with the reserved diced cucumber and avocado. Toss with the olive oil and add some shredded basil.

5. Taste and adjust the chilled soup with extra seasoning. If it is too thick, you can add a splash of cold water. Pour into chilled bowls and top with some of the garnish in the center of each bowl. Add a drizzle of olive oil and some freshly ground pepper.

Optional: You can add some lump crabmeat, shrimp, or lobster for a light summer meal... and serve it with a slice or two of crusty bread.


Monday, March 26, 2012

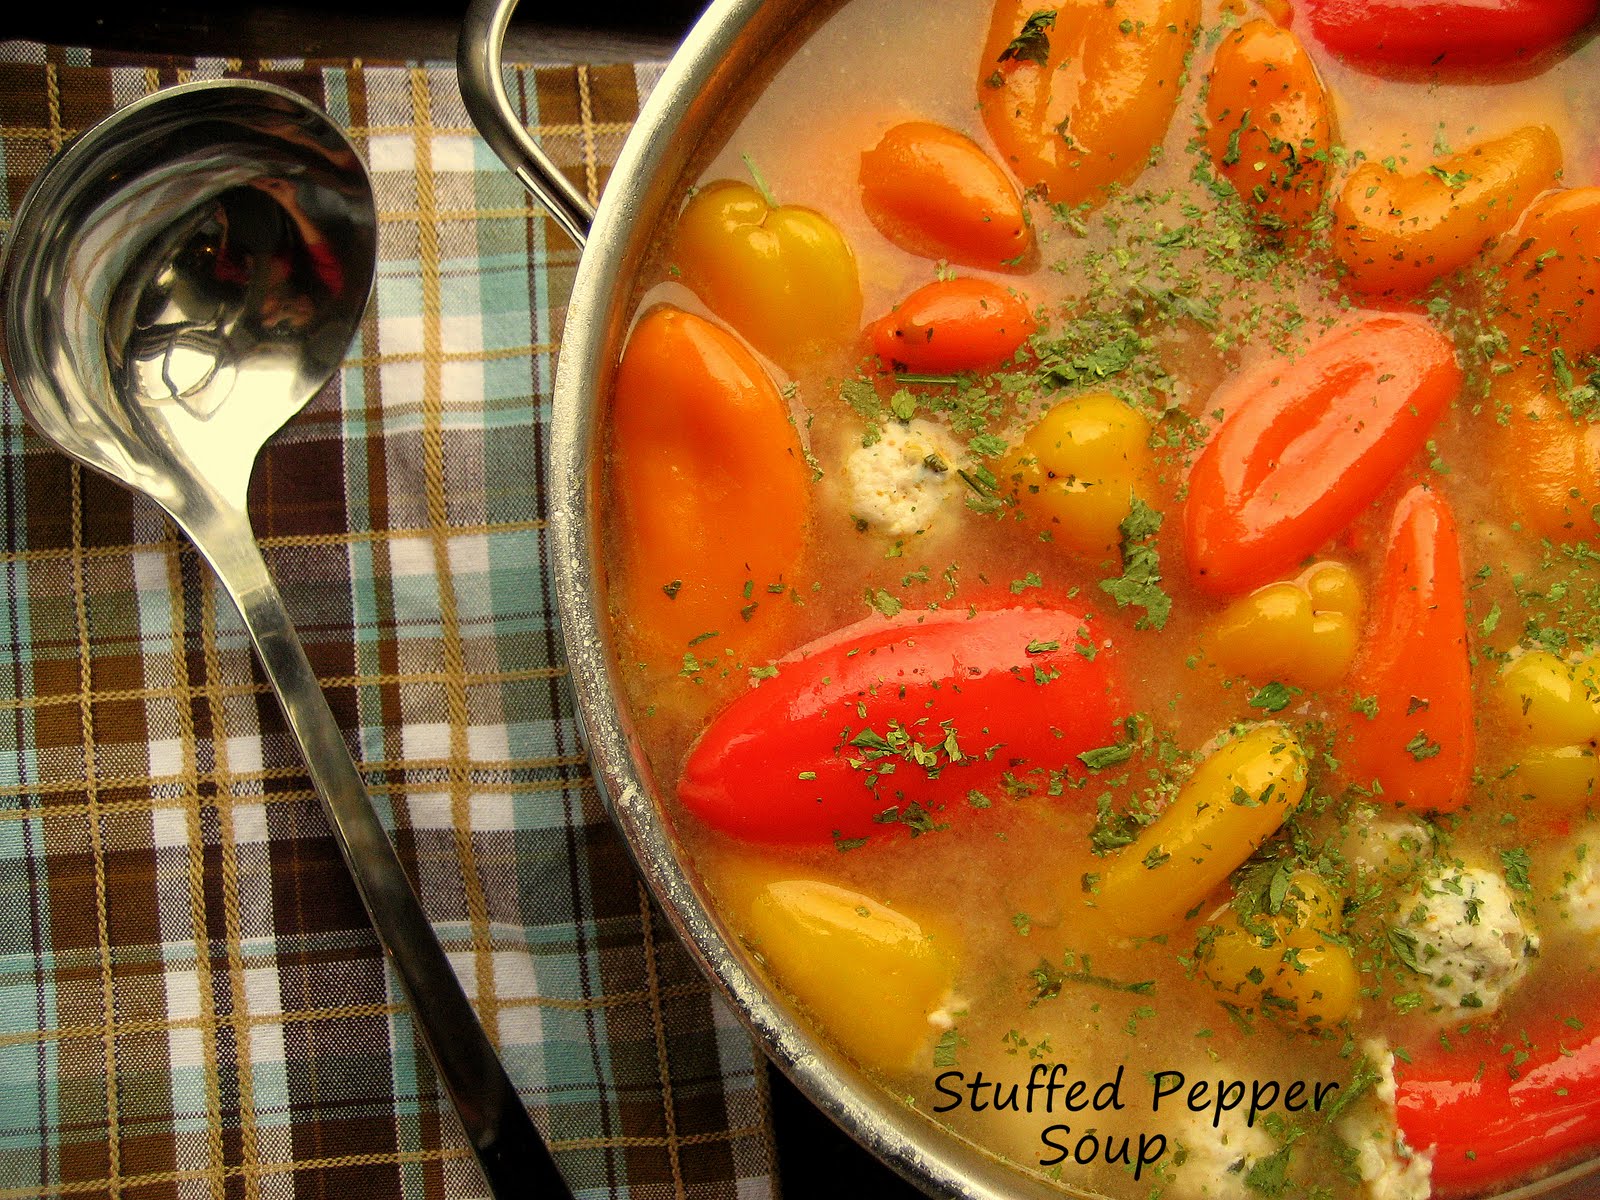
Romanian(or not) Stuffed Pepper Soup


Romanian(or not) Stuffed Pepper Soup... I made this dish some time ago. Just haven't had the time to post it. Actually it's been sitting in my draft since December of last year. I first made this dish during the busy holiday season. But in actuality, the recipe had been on my mind for longer than that... ever since I noticed Alina from Explora Cuisine post it on her own blog. I loved the idea of a stuffed pepper soup... just never heard of it before.

So when my parents were visiting for the holidays, I thought it would be perfect to make the soup with my mom. The soup would be new to all of us... both my dad and mom had never tried or heard of this type of soup before either. I told my parents that I had seen the recipe on another blog... and that the soup was supposed to be from another part of Romania... different from where my parents grew up. Now, I don't know if stuffed pepper soup is served in other parts of Romania...I personally never had it/never heard of it.... but that doesn't mean I know everything:). Sure, I am aware of stuffed peppers, but stuffed pepper soup? Romanian or not, the soup sounded interesting to me. Loved the idea. Knew I would eventually try it.

I'll admit I ended up making the soup my way... ended up using some turkey stock (from the Thanksgiving carcass) with some ground turkey. And because I had these mini peppers, I used those instead of the long thin peppers. I sort of went off the basic recipe for making any "soured" Romanian soup... similar to the Ciorba de Perisoare. While I used tomato paste to bring in the tomato flavor, you can opt to use fresh tomatoes or canned crushed/diced tomatoes if you prefer. My version is more brothy in nature.... and not so tomato-y.

I like to cook the stuffed peppers until they still have some bite to them... but that can be adjusted to preference. And even though I feel the sour cream is essential, you can opt to skip it. It does, however, tie everything together... makes the soup taste like stuffed peppers would. Didn't snap a picture with the sour cream topping... had the soup later on in the day and totally forgot about it:)...

The soup was well received... both my parents loved it(my dad especially so). They thought it was a wonderful variation of the Ciorba de Perisoare they are normally accustomed to. A different sort of soup... unique and tasty. And because of that, I'm finally posting the recipe. Months later. Hope you enjoy...

Note: I ended up using some dried lovage(leustan). Ended up using what I had on hand, but fresh would be much, much better.

You will need: inspired by Explora Cuisine

25 small bell peppers, or as needed

Turkey Stuffing/Meatballs:
1/3 cup short grain rice
1/2 cup water
~
1 1/2 lb ground turkey( you can use other meat of choice, if you prefer)
1/4 cup grated onion
1 egg lightly beaten
1 TBS chopped fresh parsley(or dill)
salt and pepper, to taste

Vegetables needed to add to stock:
1/3 cup diced onion
1/3 cup diced carrots
1/3 cup diced celery
diced bell pepper caps

Stock:
8-9 cups homemade chicken/turkey stock
4 cups water
3-4 TBS tomato paste( or you can use some tomato sauce/fresh tomatoes)

Finish off with:
chopped lovage( parsley will do in a pinch) and /or chopped chives
salt and pepper, if needed
juice of 1 lemon, or to taste

Serve with:
dollop( or 2) of sour cream,*
*optional but really good, and I think gives the soup that stuffed pepper taste

Directions:
1. Wash and clean mini peppers. Cut top off, remove stem and de-seed. Set aside.
2. Place rice with water in a sauce pan. Cook on medium heat for about 5 minutes... or until rice absorbs most of the liquid and cooks halfway. Allow to cool for a few minutes.
3. In a bowl, add turkey meat, grated onion, egg, parsley, salt and pepper.... then add the semi-cooked rice. Mix completely until thoroughly combined. Set aside.
4. Chop vegetables needed for the stock, along with the pepper caps. Set aside.
5. Stuff each mini pepper with the meat mixture. If you have leftover meat, just form it into small meatballs.
6. In a large stock pot, add chicken stock and water.... bring to a boil. Add tomato paste and lower heat to medium.
7. Add the chopped vegetables and stuffed peppers... along with any meatballs that you may have.
8. Cook for 20-30 minutes( the stuffed peppers will bob up) or until meat is cooked through and peppers are somewhat al-dente. If you like your peppers cooked till soft... just cook longer.
9. Finish the soup by adding the fresh herbs of choice, and lemon juice. Adjust seasoning.
10. Serve hot with a dollop of sour cream.