~ "By wisdom a house is built, and through understanding it is established; Through knowledge its rooms are filled with rare and beautiful treasures." ~ "Reckless words pierce like a sword, but the tongue of the wise brings healing" ~ "But the wisdom that is from above is first pure, then peaceable, gentle, and easy to be intreated, full of mercy and good fruits, without partiality, and without hypocrisy." ~ "Trust in the LORD with all your heart, and lean not on your own understanding; in all your ways acknowledge Him, and He shall direct your paths."~
Showing posts with label Snacks. Show all posts

Monday, June 20, 2016

Quick and Easy Brazilian Spicy Cheese Bread (GF)... and an idea.

Blender Brazilian Spicy Cheese Bread (GF)... and an idea. While I've made and posted the Brazilian  cheese breads (pao de queijo) before, this version is much, much easier! So easy in fact, that I've made them way too many times than I should have:). They are so delicious that you don't realize how quickly they disappear! And I love the amount it makes... not too many, nor too few. 

When I first made the first batch, I wanted them to be more mochi-like in texture because I like them chewy. But then I noticed something interesting with a pan that I had left a little longer in the oven. They no longer had the mochi like interior, especially after I had allowed them to cool. They froze extremely well and when I defrosted them some time later, I found the chewy texture had completely disappeared. Inside they were a bit hollow, which immediately reminded me of the pate choux pastry used to make eclairs/profiteroles... 

Of course my mind started thinking of all the possibilities. I just knew they would be wonderful as little "breads" that I could fill, to use for an afternoon tea sandwich... or even for an appetizer when I needed to make something for the gluten intolerant. And so I quickly filled the breads with an egg salad, and they were simply wonderful! My husband really loved these. The cheese flavor complimented the egg...  and well,  it was a win-win situation:). Hope you enjoy...

Tip: You can freeze the breads to use later and fill them if you like. To fill, simply cut the tops while still semi-frozen, scoop out some of the bread interior and then defrost completely.  Fill with your favorite filling... you can use them as a gluten-free appetizer or "sandwich" for afternoon tea.  

Ingredients: Now while I made these to be spicy, you can certainly make them without any chile:)... 

1 egg, at room temperature (I'll be honest, it's not always at room temp:)
1/3 cup extra light olive oil
2/3 cup milk
1 1/2 cups (170 grams) tapioca starch
1 cup medium packed (100 grams) grated cheese of choice*
1 teaspoon salt, or to taste
1/4-1 teaspoon togarashi chile flakes, can use any finely ground chile/adjust amount to taste/ or skip
*can use mozzarella, cheddar, parmesan, gryuere, or combination of hard cheeses, etc.

Directions:
  • Preheat the oven to 400°F. 
  • Grease 3 mini muffin tins generously. My tins are really mini... so if yours are bigger you might not need 3 tins, but you might need to adjust baking time to allow for the bigger tin.
1. Place all ingredients in blender and blend until smooth.

2. Divide batter into the mini muffin tins wells, filling the well to the top.

3. Bake in the oven for 12 -14 minutes, until all puffy and lightly browned.  

4. Eat while warm or save to reheat later... or simply freeze for later.

NOTE: If you want a more mochi-like interior, bake until breads barely get any color... if you want to have them on the drier side, bake a  minute or 2 longer or until the breads catch a bit more golden color. To dry them even further, turn off oven and allow the breads to cool in oven with door slightly open. Check on them though... and remove when you feel they have dried up enough. 


I filled mine with an egg salad, but tuna or chicken salad would work well... as well as other fillings of choice.

Tuesday, March 15, 2016

Kolaches

Kolaches... filled with apple filling. I know I haven't posted in a great while, but life has been quite busy for me. As much as I've wanted to post at least a recipe or 2 during this long absence, I simply haven't been able to do so until now. To make a long story short, I have been busy moving from our old house to a new house... and a new place... and all this during the wintery Montana months! As you can imagine, my kitchen utensils weren't always available to me... 

However, today I'm excited to finally share a recipe with you:). It's an easy sort of recipe with wonderful results! The dough is quite versatile...  it can be used as a sweet dough (fruit/ nut/ nutella)... or even savory(think spiced ground meat/sausage rolls or even an onion filling). 

The resulting recipe for Kolaches, came about when I found myself with a container of frozen apple filling that I wanted to use up. My thoughts initially was to  make a strudel, but I had no phyllo dough on hand. Then I thought to make an apple pie pizza, but didn't want to make something that I have been making too much of lately:). Incidentally, one of these days, I shall have to make the apple pizza again, just to post it here, because it is one of my favorites. In any case, because I had seen a video clip not too long ago on making simple and easy kolaches, I immediately thought the apple filling would work amazingly well in kolaches. And it sure did!

While I made my kolaches with an apple filling, you can  opt to make a cheese filling if you prefer...or try another fruit filling of choice. Since this recipe comes from Cook's Country, they include the cheese filling recipe, as well as the option of making your own fruit filling from frozen fruit. I've included the information as part of the recipe, even though I used my own apple filling. You can certainly be creative and make any filling you prefer...  but the dough is really nice to work with. I have plans to one day make  kolaches that are filled with custard and then topped with half on apricot(similar to these)... doesn't that sound good? I know there are a ton of filling variations, so the recipe is perfect....to make again and again... and file it in the recipe index:).  Hope you enjoy...

Note: The original recipe includes all purpose flour, but I used bread flour because I like the result I get in sweet doughs... however, feel free to use all purpose. Also, while the original recipe doesn't include any vanilla, I find I can't bake without it:). You can even add some orange/lemon zest to the dough if you like.

Tip: You can make smaller kolaches... making 32 instead of 16 and using a smaller cup to make indentations. I think the smaller versions would be lovely as part of an afternoon tea menu.  

You will need: makes 16 kolaches  adapted from Cook's Country

Kolach dough:
1 cup whole milk, can be straight out from fridge
10 tablespoons butter, melted
1 large egg plus 2 large egg yolks
3 ½ cups bread flour
⅓ cup sugar 
2¼ teaspoons instant yeast
1 ½ teaspoon salt, can lower to taste
1 tsp vanilla extract, can be optional

For a cheese filling:
6 ounces cream cheese, softened
3 tablespoons sugar, can adjust to taste
1 tablespoon flour
½ teaspoon grated lemon zest
6 ounces (3/4 cup) ricotta cheese
vanilla extract, to taste

For a frozen type fruit filling:
10 ounces frozen pineapple, blueberries, or cherries
5 tablespoons sugar
4 teaspoons cornstarch
can add extract of choice, vanilla, almond, lemon etc 

Streusel Topping:
1 tablespoon plus 2 teaspoons all purpose flour
2 tablespoons plus 2 teaspoons sugar 
1 tablespoon unsalted butter cut into 8 pieces and chilled

Egg Wash:
1 egg mixed with 1 tablespoon milk

Powdered sugar glaze, optional 
mix powder sugar with a bit of water/milk until drizzling consistency

Directions:

For the dough: 

1. Combine milk, hot melted butter and eggs together in measuring cup... and add vanilla extract, if using. Mixture may be lumpy.

2. Combine dry ingredients in the bowl of a standing mixer then add milk mixture and knead for 2 minutes on low speed until combined. Increase speed to medium and continue kneading for 8 to 12 minutes until dough no longer sticks to side of bowl. If the dough hasn't cleared the bowl after 12 minutes, add more flour, 1 Tablespoon at a time, up to 2 Tablespoons.

3. Place dough in an oiled bowl and cover with plastic wrap... let rise in warm place for 1 hour  or until doubled. 
( Alternately, adjust oven racks to upper-middle and lower-middle positions.  Place dough bowl on the upper-middle rack and place a small pot on the lower-middle rack (underneath dough bowl)and  pour 3 cups boiling water into small pot, close oven door, and let dough rise about 1 hour or until doubled.)
Tip: You can also refrigerate dough overnight in a covered bowl, bring to room temp, and allow to rise till doubled and proceed with recipe.

4. In the meantime, combine egg wash, make streusel, make filling of choice and set aside.
  • For the Streusel: Combine all ingredients and mix together with fingers. Cover and refrigerate until needed
  • For a Cheese Filling: Using stand mixer fitted with paddle, beat the Cream Cheese, Sugar, Flour, and Lemon Zest on low speed until smooth, about 1 minute.  Add Ricotta Cheese and beat until just combined, about 30 seconds.  Transfer to bowl, cover and refrigerate until ready to use.
  • For a Fruit Filling: Combine 10 oz frozen Pineapple, Blueberries, or Cherries with 5 Tablespoons Sugar; and 4 teaspoons Cornstarch in bowl.  Microwave, covered, until bubbling and thickened, about 6 minutes, stirring halfway through cooking.  Mash with a potato masher.  Let cool completely and fill Kolaches as directed.
  • For the Apple Filling... I used a previous frozen apple filling found in my apple turnover recipe.(You may or may not use all of the filling.)  
To Assemble and Bake the Kolaches: 
  • Line 2 rimmed baking sheets with parchment paper.
1. After dough has risen, remove from bowl and flatten dough into a rectangular shape with fingers...divide dough into quarters, and cut each quarter into 4 equal pieces.... resulting in 16 pieces  
2. Form each piece into a smooth, tight ball.  Arrange 8 balls on each baking sheet and cover loosely with plastic wrap.  
3. Place the baking sheets in  a warm place and allow to double. (alternately place sheets in the oven, replace the water in the small pot with 3 cups boiling water, close oven door and let rise until doubled, about 90 minutes or until nicely doubled and puffy.)
  • Preheat oven to 350 Deg F

4. Grease and flour the bottom of a ⅓ cup dry measure or a glass with a 2¼ inch diameter and use to make deep indents on top of each ball until bottom of measuring cup touches baking sheet.
5. Fill each indentation with about 1.5 tablespoons of filling... use your choice.
6. Brush tops of each pastry with egg wash, and then sprinkle sides with streusel
7. Bake for 20 to 25 minutes (do not over bake, lightly colored) and let cool for about 20 minutes. Glaze with powdered sugar glaze if desired.
 Tip: if you plan on freezing some baked. allow to cool and wrap well before placing in freezer. Defrost and warm slightly before serving.

Wednesday, December 17, 2014

Lemon Crinkle Cookies

Lemon Crinkle Cookies... Moving on with posting more cookies in the cookie series. These lemon crinkle cookies were an absolute favorite. Such a unique and lemony cookie. Chewy and soft... and totally worth having the recipe in my recipe index. 

As much as my husband doesn't care for lemony desserts, this lemon crinkle cookie managed to be one of his very favorites... actually, it was on top of the list from all the cookies I made. So I'm excited to share the recipe... especially for all you lemony dessert fans. I think you'll enjoy this cookie... or at least I hope so:)

While the normal crinkle cookie will have you dip the cookie dough in icing sugar before baking, I felt the icing sugar could easily be omitted... it's just a thought I had as the icing sugar sort of disappears as it bakes and there's little of it left on the surface, so I think next time I'll just skip that step. Or maybe the cookie needs the dunk in the powdered sugar... I don't know:). I'll leave that up to to you.

However, what I thought went really well... was a drizzle of lemony icing sugar glaze I topped the cookies with after they had cooled. I'm sorry I didn't have the chance to photograph them with the glaze, but hopefully mentioning the glaze will be enough to give you the main idea... The thing was that the cookies not only looked pretty with the drizzle, but the glaze added yet another dimension of lemony goodness. Sort of pumped up the lemon flavor one extra notch.

The original recipe has you add some yellow food coloring as an option. If you don't mind adding food coloring  to your baked goods, then feel free to add a few drops as it will help the cookies to have that lemony look. I was tempted to add a touch of turmeric for color, but backed out of the idea as the cookies were going to be given away. Maybe next time I'll try the turmeric idea:). So here's another cookie recipe that's considered a winner. Hope you enjoy...

Wishing you all a most blessed Christmas... 
Remembering Christ's birth was for a reason... 
That we might have eternal life. 

" But we see Jesus, who was made a little lower than the angels for the suffering of death, crowned with glory and honour; that He by the grace of God should taste death for every man. " Hebrews 2:9

You will need: adapted from Cooking Classy

2 cups all-purpose flour
2 tsps baking powder
1/4 tsp salt
10 TBS unsalted butter, softened
1 cup + 2 TBS granulated sugar
1 TBS lemon zest
1 large egg
1 large egg yolk
1 1/2 TBS fresh lemon juice
3/4 tsp lemon extract ( I used 1 tsp)
1/2 tsp vanilla extract
1/2 cup powdered sugar (optional)
lemon icing glaze optional, not pictured  (icing sugar+lemon juice to drizzling consistency)

Directions
  • Preheat oven to 350 degrees F. 
  • Line baking sheets with parchment paper
1. Whisk together flour, baking powder and salt. Set aside.
2. Using an electric mixer with paddle attachment, whip together butter, sugar and lemon zest until pale and fluffy ... scraping bowl occasionally.
3. Mix in egg then blend in egg yolk.
4. Add lemon juice, lemon extract and vanilla extract; mix until combined.
5. On low speed, slowly add in dry ingredients and mix just until combined.
6. Pour powdered sugar into a small bowl.
7. Scoop 1 1/2 tablespoon of dough and shape into a ball.
8 Drop ball in powdered sugar and roll to evenly coat.
9. Transfer cookies to prepared baking sheet and repeat with remaining dough making sure to space cookies 2-inches apart.
10 Bake in preheated oven for about 10 - 13 minutes. Cool on baking sheet several minutes then transfer to a wire rack to cool.

Note: If desired, opt to make a lemon icing sugar glaze to drizzle cookies by mixing lemon juice with icing sugar till drizzling consistency. Drizzle over cookies and allow icing to set.

Store cookies in an airtight container or freeze.

Thursday, December 11, 2014

Strawberry-Pecan Rugelach

Strawberry-Pecan Rugelach... Ok, so we've probably all heard about rugelach cookies... they've been around for a long time. Originally dating back to Jewish origin, the rugelach is a crescent type of cookie that's filled with a myriad of fillings. Rugelach cookies may be known in different countries by different names... and in Romania, rugelach are simply known as "cornulte". Romanians like to fill them with bits of Turkish delights and cover them in plenty of powdered sugar. 

The rugelach dough is a tender type of dough... normally made with plenty of butter (or lard/shortening) along with the addition of either sour cream or cream cheese. The dough usually doesn't have any type of leavening, however, there are older recipes that do use yeast to make the cookies super light and tender. The non-leavening version is a bit less complicated and has more of a crumbly texture...

What I really like about making rugelach is that you can use up those jams you may have sitting in the fridge, or those  small amounts of nuts or dried fruits you may have hanging in the freezer. And if you don't have any nuts or fruits on hand, you can simply use  a bit of jam... any flavor you prefer. In all honesty, even if you don't have any jam on hand, you can get away with a generous dusting of cinnamon-sugar filling. That's what's nice about the rugelach, you can make as many different filling variations as you like. You can even go a bit fancy and use chocolate, marzipan, or even a poppy seed filling. Lots of variations...

Because I had some strawberry jam on hand... and some pecans, my variation was simply a strawberry-pecan rugelach:). But you can make the rugelach your own. Be creative and use ingredients you have on hand. Hope you enjoy....

Tip: Dough needs to be chilled for a couple of hours or more... so plan ahead.

Ingredients: adapted from Family Baking Book (ATK)... makes about 32 cookies, recipe can easily be doubled.

For the dough:
1 stick unsalted butter, softened
4 ounces cream cheese, softened
1 tablespoon sugar
1/2 teaspoon salt
1 cup (5 ounces) flour
1/8 tsp rum extract, optional
couple drops of almond extract, optional
1 tsp freshly grated orange zest

For the Filling:
1/3 cup (2 1/2 ounces) of sugar
1 tablespoon of ground cinnamon, or to taste
1/2 cup strawberry jam, can use jam of choice
1 cup (four ounces) pecans, chopped fine, can use walnuts even mini-chocolate chips
1/2 cup dried fruit of choice, cranberries, apricots golden raisins, can be omitted
2 tablespoons unsalted butter, melted

Topping, optional
icing sugar

Directions:
Make Dough:
1. Beat the butter, cream cheese, sugar, vanilla,  rum and almond extracts(if using), orange zest and salt together until light and fluffy.... about 3-6 minutes. 
2. Scrape down the sides of the bowl as needed. 
3. Reduce speed and add flour. Mix until just combined.... about 30 seconds or so.
4. Remove dough from mixer bowl and place onto a floured counter.
5. Divide dough into two equal pieces. Wrap in plastic wrap, and refrigerate until firm, about 2 hours or so. I left mine overnight in the fridge, and then took it out  to soften a bit on the counter before rolling.
  • Pre-heat the oven to 375 F. 
  • Line two large baking sheets with parchment.
Assemble Cookies:
1. Roll each piece of dough into an 11 inch circle, about 1/4 inch thick. I ended up using a large dinner plate to cut a nice circle, but it isn't needed.
2. Spread about 1/4 cup of the jam on top of each round. 
3. Sprinkle each with 1/2 cup of pecans. 1/4 cup dried fruit of choice, if using and 1 tablespoon of the cinnamon sugar. You could use less of the cinnamon sugar, if you like.... I did.
4. Using a pizza cutter(or knife), cut each dough round evenly into 16 wedges. 
5. Roll up each wedge(starting at the wide end) into a crescent. Place the cookies on the prepared baking sheets, with the pointed end underneath. 
6. With the pointed end of cookie on the bottom, place each cookie about two inches apart unto the prepared cookie sheet.
7. Brush the melted butter over the cookies and sprinkle with a tiny amount of the remaining cinnamon sugar.  If you use too much sugar it will eventually burn as it bakes... so use minimal amount and place it only on top of the cookie... use about a pinch.
8. Bake cookies until pale gold and slightly puffy, about 20 min. 
9. Immediately transfer the hot cookies to a wire rack... removing any burnt sugar/filling that may have leaked out around the cookie... and cool completely before serving. Don't allow the cookies to cool on the cookie sheet as it will be hard to remove the baked on sugary filling around the cookies.... and they won't look pretty.
10. Dust with icing sugar if desired.


Wednesday, November 26, 2014

Oatmeal Cream Pies... and Homemade Marshmallow Fluff(no corn syrup).

Oatmeal Cream Pies... and Homemade Marshmallow Fluff(no corn syrup). Ok, so this was one of those recipes I made for the youth group this year that needed the step-by-step photos. So I've included them... and therefore the long post:).

I made the cookies totally from scratch... even the marshmallow fluff:)! And since I was going to make my own marshmallow filling, I opted to skip the corn syrup and used honey instead. If you want to use corn syrup, feel free to do so. Or if you are in a real hurry, you can just buy the marshmallow fluff. 

The nice part about this recipe is that you can skip the filling completely.... and you'll still have some wonderful cookies! The cookies are quite soft and yet chewy... and loaded with flavor. They're a treat! 

I'll admit, they aren't the healthiest of cookies when you include the filling... they 're actually a bit sweet... but ... once in a while... they are worth it:). Interestingly, I ended up cutting the cookies in half... felt better about it:). 

A fun little project that makes some delicious cookies. Hope you enjoy...

"What shall I render unto the Lord for all His benefits toward me?
I will offer to Thee the sacrifice of Thanksgiving, 
And will call upon the name of the Lord." 
Psalm 116: 12,17

Wishing all my readers a most blessed Thanksgiving!

You will need: adapted from Cooking Classy

Tip: I found it easier to freeze the cookies before filling. The cookies are quite soft and can break easily, so if they are frozen it makes it easy to spread the filling without having the cookies crack. 

1 3/4 cups + 2 TBS all-purpose flour
1 cup quick oats, slightly ground in a food processor to about half their size
2 tsps cocoa powder
2 tsps cornstarch
1 tsp baking powder
1/2 tsp baking soda
3/4 tsp salt
3/4 tsp cinnamon
1/4 tsp ground nutmeg
1/4 tsp ground ginger
1/2 cup butter, softened
1/2 cup coconut oil, not melted
1 cup + 1TBS granulated sugar
2 1/2 TBS molasses
2 large eggs
2 tsp vanilla extract

Marshmallow Fluff/Creme: adapted from CHOW

¾ cup granulated sugar
½ cup honey 
¼ cup water
Pinch of salt
2 egg whites, at room temperature
¼ teaspoon cream of tartar
1-2 teaspoons vanilla extract, or use vanilla beans from 1/2 vanilla pod

Marshmallow Buttercream Filling: adapted from Cooking Classy
1/2 cup butter,  at room temperature, maybe a little bit colder
1- 1 1/2 cup powdered sugar (I used only 1 cup)
1/2 vanilla bean pod, seeds only (or use extract to taste)
8 oz. marshmallow fluff/creme(homemade or bought)

DIRECTIONS:

Make Marshmallow Fluff/Creme 
Note:You can also whip the eggs ahead to soft peaks and then make the syrup... this way you don't have 2 things going on at the same time.

1. Combine the sugar, honey, water and salt in a small saucepan over medium-high heat. Boil, stirring occasionally, until the mixture reaches 240 degrees F on a candy thermometer.

While the sugar mixture is boiling: 

2. Add  egg whites and cream of tartar to a stand mixer fitted with a whisk attachment. 
3. Whip on medium-high speed till  soft peaks. Turn off mixer. 
4. When the sugar mixture reaches 240 degrees F. remove from heat and turn the mixer speed to low .
5. With mixer running, slowly drizzle the syrup down the side of the mixer bowl. Once all of the syrup has been added, increase the speed to medium-high and beat until stiff, glossy peaks form... and the mixture has cooled substantially. This should take about about 7- 9 minutes. 
6. During the last minute or two of beating, add vanilla extract or beans, if using
7. Use immediately, or store in an airtight container in the refrigerator for up to 2 weeks.


Make and Bake Oatmeal Cookies
  • Preheat oven to 350 degrees F. 
  • Line baking sheets with parchment paper
1. In a mixing bowl, whisk together flour, oats, cocoa powder, cornstarch, baking powder, baking soda, salt, cinnamon, nutmeg and ginger. Set set aside.
2. Using a  paddle attachment of an electric mixer, whip together butter, coconut oil, sugar and molasses on medium-high speed until pale and fluffy, about 2 minutes. 
3. Mix in eggs one at a time, mixing well after each addition. 
4. Stir in vanilla extract. 
5. Slowly add in dry ingredients and mix until well combined. Refrigerate dough while you clean up. 
6. Using a 1 1/2 TBS ice cream scoop, form and shape dough into balls. You can slightly flatten balls a bit.
7. Bake in preheated oven 10 - 12 minutes ... I baked mine for exactly 10 minutes, you don't want to overbake cookies, as they should still be a bit soft. 
8. Allow cookies to cool for a few minutes on the cookie sheet before transferring them to a wire rack to cool completely. Cookies are quite fragile so be careful when spreading filling. You might want to refrigerate or even freeze them for a  bit so that they don't break on you. 
9. Spread marshmallow buttercream filling along bottom side of one cookie and place another cookie to make a sandwich. 
10. Store cookies in an airtight container at room temperature. 

Note: I stored my unfilled cookies in the freezer... and then defrosted them slightly before filling them 

Make Marshmallow Buttercream Filling: You know, if you want, you can totally skip the butter and additional sugar and simply use the marshmallow fluff alone... it will be a bit softer but it works:) 

1. Using the paddle attachment of an electric mixer, whip butter on medium-high speed, until pale and fluffy, about 3 - 4 minutes. 
2. Add powdered sugar and blend on low speed until combined, then increase speed to medium-high and whip for an extra minute. 
3. Mix in marshmallow fluff and thoroughly combine.

Wednesday, October 29, 2014

Cranberry Bliss Cookies... a recent FAVORITE cookie.


Cranberry Bliss Cookies... When I first saw this recipe on Cookie and Cups' website, I instantly loved the look of the cookie.... and well, the name too:). Of course, I filed it in my " to do list of cookies"...  and am SO glad I made them! 

Funny thing is, I always add my own spin to most recipes, and I chose to do so with this one as well. But I am sure staying true to the original will yield a fantastic cookie as well... but I'll post my version because I loved the changes and plan on making them this way in the future.

I ended up subbing in a bit of coconut oil for some of the butter, just because I like the flavor coconut oil imparts to cookies. And because I love to play around with flavors, I added a bit of "everything"... enough to make the cookie unique, but not too much as to overpower the cookies. A little bit of spice always works:).

While the original cookie had a frosting and topping added to the cookies... similar to the Cranberry Bliss Bars from Starbucks, I chose to omit them for these cookies. It's kind of interesting I did that, because the topping and frosting is what originally attracted me to the cookies in the first place. However, I just felt the cookies were amazing as is... maybe it was because I made them smaller and loved how pillowy soft they looked. 

If you are interested in making the topping and frosting as well, do feel free to check the original recipe in the link below. I suppose if I would have made my cookies bigger and flatter I might have been tempted to add the frosting and topping... Actually,  I might do that next time, as they sure look pretty all frosted up:). 

These cookies are quite ideal for a Christmas cookie exchange.... especially if you frost them with tiny bits of chopped cranberries....they'll be quite festive looking. Hope you enjoy...   

You will need: adapted from Cookies and Cups

1/2 cup butter, room temperature
1/4 cup coconut oil, not melted
2 oz cream cheese, room temperature
1 1/4 cup light brown sugar
2 eggs
2-3 drops almond extract*
2 tsps vanilla extract
2-3 drops rum extract*
1 tsp baking soda
pinch salt
pinch nutmeg*
pinch ginger*
pinch cinnamon*
2 1/4 cups flour
1 cup white chocolate chips(I used Toll House)
3/4 cup coarsely chopped dried cranberries
* can be optional

Directions:

1. Using an electric mixer, cream butter, coconut oil and cream cheese together until smooth.
2. Add brown sugar and beat for and additional 1-2 minutes...  or until fluffy.
3. Add eggs, vanilla (and optional extracts, if desired), baking soda, salt and optional nutmeg, ginger, cinnamon, if desired. Beat until thoroughly combined.
4. Add flour and combine on low speed.
5. Stir in white chocolate chips and chopped cranberries.
6. Remove and chill dough for at least 2 hours ... or overnight.. can even freeze dough.
  • Preheat oven to 375° F. 
  • Line baking sheets with parchment paper.
7. Remove dough from fridge and form dough in 1 inch balls( or whatever size you prefer). Place dough on baking sheet, about 2 inches apart  and flatten slightly if you prefer your cookies flatter or do not flatten if you prefer your cookies rounder and more mound-like with a softer cookie dough interior .
8. Bake for 7-11 minutes,  depending on size... or until edges are golden and centers are just set.
9. Remove and cool completely.

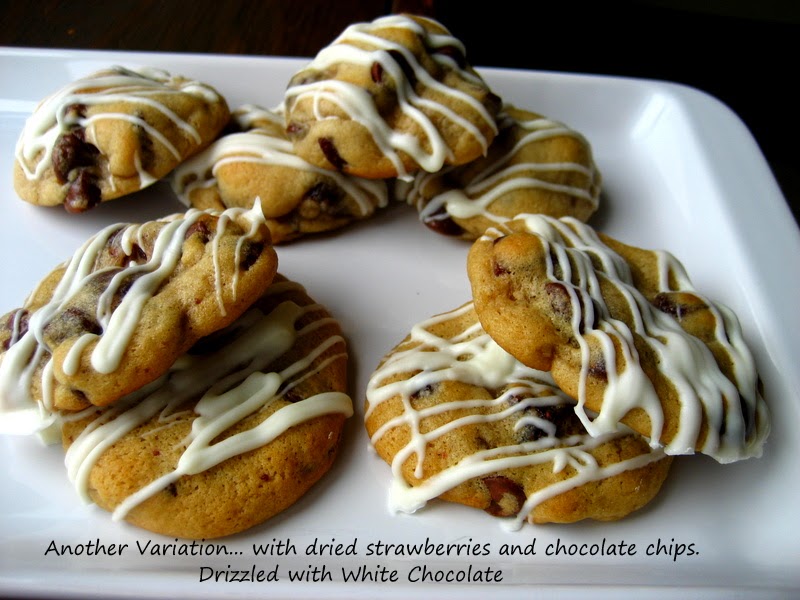
Note: I made another variation using the basic dough... with dried strawberries chocolate chips and all butter, omitting coconut oil then drizzled with white chocolate.... the cookies were still good, but somehow I much preferred the coconut oil version and white chocolate chips with cranberries. 


Wednesday, October 22, 2014

Nutella Pocket Cookies... Nutella "Dreams"

Nutella Pocket Cookies...  or Nutella "Dreams".  It's been quite some time since my last post. I've been quite busy... but I thought to stop by a bit and post a few new recipes. 

Every year about this time, I bake cookies for our annual church youth weekend retreat. And I've made it a habit to post some of the recipes I bake here on my blog. Normally in my baking frenzy, I don't take step-by-step pictures... so the recipes I'll be posting will most likely just have the directions without the usual step-by-step photos. Maybe one or two will have  a few photos for clarification, but for the most part, the directions should suffice. 

It's a bit awkward for me as well not to include the step-by-step photos:)... as I'm so used to a ton of photos attached to a single recipe... but bear with me while I post these cookie recipes in the near future. Hopefully you'll be inspired to make one or two... why, with Christmas around the corner the cookie recipes might come in handy:). 

In any case, here is the first... in a series of cookies. This particular cookie was a  personal favorite of my husband... who tends to sample the cookies...just to make sure they are all right:). Hope you enjoy...

You will need: adapted from Mrs. Fields Cookie Book

Cookie:
3/4 cup butter, softened
1/2 cup icing sugar
1/4 cup light brown sugar, packed
2 large egg yolks
1 tsp vanilla extract, or a bit more:)
1 1/2 cups all purpose flour
pinch of salt

Filling:  
Note: You can use a chocolate ganache filling instead if you like

Nutella, as needed ... about 1 slightly rounded teaspoon per cookie

Topping :

icing sugar

Directions: 
1. In a bowl of an electric mixer cream butter on medium speed about a minute or so.
2. Add icing sugar, brown sugar and pinch of salt; beat till smooth.
3. Add yolks and vanilla and mix till light and fluffy using medium speed. Scrape bowl as needed
4. Add flour and and blend until thoroughly combined. 
5. Remove dough, form into a ball and flatten into a disc.
6. Refrigerate for 1+ hours. I left mine overnight.

Prepare Filling:
1. If making chocolate ganache, prepare while dough is chilling. Scald 1/2 cup cream and add 1 cup chocolate chips, combine and set aside to thicken and cool) 
2. If using nutella, place in fridge to harden a bit so that it will be a bit easier to scoop teaspoons unto the cookie.  

Bake Cookies:
  • Preheat oven to 325 deg F
  • Line cookie sheet with parchment paper.
1. Remove cookie dough from fridge... if dough has been sitting in fridge overnight or longer than an hour allow to soften a bit before proceeding with recipe. Otherwise, the dough will crack.
2. Flour counter top and rolling pin. Using the floured rolling pin, roll dough to about 1/4 inch  thick. 
3. Cut circles with a 2 inch round cookie cutter(you can also make them a bit larger or smaller depending on preference, just adjust baking time).
4. Place cookie circles onto parchment lined cookie sheet. Continue with rest of dough, using all scraps, until dough is used up.
5. Place 1 teaspoon of nutella(or ganache) in center of cookie circle and top with another circle. 
6. Completely seal the edges of the cookie with the tines of a fork. 
7. Bake until cookies are lightly golden brown around the edges, being careful not to burn... this can take anywhere from 10-15 minutes, depending on the thickness and size of the cookies. Just keep an eye on them...
8. Remove from oven and allow to cool. Sprinkle with icing sugar, if desired... or you can be creative and drizzle chocolate over the top. 

Monday, April 14, 2014

Apple Pie Cookies... and a gluten-free version.


Apple Pie Cookies... and a gluten-free version. I'm sorry I don't intend on posting too many dessert recipes one after another... but I've had a few sitting in my draft that I should post. So bear with me as I "clean" my draft folder.

If you remember I posted a make-ahead pie crust recipe some time ago... a pie crust you could store in the freezer for future use. Well, I wanted to show you what I ended up doing with half the batch. I made these apple pie cookies last year, for a church Christmas hymn sing, but I'm finally getting around to posting the recipe.

The idea of making apple pie cookies might not be so new, as I'm sure many of you have seen apple pie cookie recipes floating all over the internet. Personally, I've always wanted to make them. I thought they were the cutest of things:).

Since I always make my own pie crust, I ended up using my homemade version, but this recipe can easily made with any pie crust really. You can use a ready-made store bought pie crust, or even use your own pie crust recipe that's special to you... maybe handed down from your mother or grandmother. The recipe I use is an all-butter crust...  which makes for a tender and flaky pastry-like crust.

I love adding a nut filling to my apple pies, as it gives it extra flavor and a bit of texture. It also holds the bottom of the pie crust from getting too soggy. I applied the same idea when making these pie cookies, but you can certainly skip the nut filling if you want... or you can add a bit of caramel.

While you can make simple, round, double-crusted apple pie cookies, I rather like the lattice look. It makes the cookies look a bit more elegant... more pastry-like, rather than cookies. But feel free to make the cookies without the lattice top.

And since I also made a gluten-free version, I thought to post that as well. The lattice for the GF apple pie cookies was quite a bit harder to make. I'd recommend crisscrossing the lattice part, without interweaving them, or even skipping the lattice part completely and using just round pie circles(double-crust). The GF crust is much more fragile... prone to breaking, and giving you a headache:).

Hopefully, the apple pie cookie idea is seen in this post, my intention was not to make it look too complicated:).... because it really isn't.  They're just mini apple pies... flatter... to take on the form of cookies. You'll  have a few scraps from the cutouts, but you can bake them as is, or place the scraps in x-small muffin tins.... makes really good mini "tarts". Of course, you can skip the cutouts and  make one large lattice apple pie cookie. Actually, I thought of  making one large cookie myself... but I'd probably call it an apple pie tart:).... especially if you cut it in wedges. Maybe next time. Hope you enjoy...    

You will need: makes about 20 ( 2-3 inch) apple pie cookies

Ingredients For Making Pie Cookies:

2 pie crusts
apple pie filling
nut filling, or can use a caramel filling
cinnamon, nutmeg sugar
raw sugar crystals
icing, optional
beaten egg for brushing top of pie cookies

Nut Filling: For one regular apple pie cookies recipe. Will need to make another 1/2 of the recipe for a GF version 

1/2 cup ground walnuts
1 TBS brown sugar, or to taste
1 TBS beaten egg
1/8 tsp vanilla

Apple Filling: will need only 1/2 of the filling to make the regular apple pie cookies recipe... can freeze the rest or use the rest to make the GF version below

2 large apples*
1 TBS cornstarch
4- 5 TBS sugar
2-3 TBS lemon meyer juice
1/2 tsp vanilla extract
1/4 tsp cinnamon
* I used 1 large fuji apple + 1 large pink lady apple= 4 1/2- 5 cups sm. dice apples


Directions:

Make Nut Filling:
1. Beat egg, and remove 1 TBS beaten egg and place in a bowl. Reserve the rest of the egg for brushing the top of the cookies.
2. To the 1 TBS beaten egg, add the ground walnuts, brown sugar and vanilla. Combine all ingredients. Set aside. This nut filling makes enough for just the regular pie  cookies, but if you would like to make a gluten-free version, then you will need to make another 1/2 a batch. Set aside.

Make Apple Filling: 
1. Peel and cut apples in small dice pieces( 1/4 inch or so)... you should have about 5 cups.
2. In a medium saucepan, add diced apples, cornstarch, sugar, and cinnamon. Heat on med-low and mix ingredients until combined. Cook, stirring often... till apples slightly soften and thicken. This will take about 10 -12 minutes or so. Taste filling, adjust for sweetness and add the lemon juice. Stir in the vanilla. Set aside.


Make Cinnamon Sugar + Icing:
1 TBS sugar+ 1/4 tsp cinnamon+ a few gratings of nutmeg
Powdered sugar+ a bit of water + lemon/vanilla extract to drizzling consistency

Assemble Apple Pie Cookies:
  • Preheat oven to 375 deg F
  • Line a cookie sheet with parchment paper.

1. Roll out one pie crust to about 12 inches in diameter... or so. 
2. Spread nut filling on bottom of crust... all the way to the edge.
3. Place about 1 cup of the diced apple filling and spread on top of the nut filling. You will have some apple filling leftover. You may freeze the rest for another use,  or use it to make another small batch of GF pie cookies , as I did.
4. Roll out second pie crust to about 12 inches and cut 1/2 inch strips. Place strips in lattice design on top of the apple filling. 
5. Brush lattice top with beaten egg, sprinkle with cinnamon sugar, can add a bit of raw coarse sugar as well, if desired.
6. Using a 2 1/2- 3 inch sharp round cookie cutter, cut out cookies... making sure to leave as little a space between cutouts to maximize the number of cookies you get.
7. Place cookies on parchment lined cookie sheet. With scraps, I like to use a mini muffin tin and bake them... this way I don't waste the scraps and turn them into mini muffin pie scraps.  You can see this in the GF version photos below.
8. Bake in preheated 375 deg F oven for 20-25 minutes or until golden.
9. If you like, you can drizzle some cookies with a powdered sugar icing. 

Gluten- Free Apple Pie Cookies
Note: It is best to keep pie crust cold, as it is difficult to work with if dough is soft. And use a bit of GF flour to dust work surface as you roll out dough.

You will need:

1 GF pie crust recipe, 4 pieces, rolled in 6 inch circles
1 cup diced apple pie filling
1/2 nut filling(recipe above)

Directions:
  • Preheat oven to 375 deg F
  • Line a cookie sheet with parchment paper
1. Cut pie crust in 4 pieces. You will need to work with smaller pieces, as the crust is quite fragile. Roll out one piece of the dough to about 6 inch or so.
2. Spread about 2 tablespoons or so of nut filling on crust, then add about 1/2 cup of apple pie filling and spread it to the edge.
3. Roll out another 6 inch pie crust, cut in strips and form lattice top.... 
Now, I must admit this was quite challenging as the dough breaks easily. I used a knife to lift up the strips and had many broken pieces. In the end it turned out ok. It's doable, but if you want to make it easier, you can opt to cut out small shapes and use those instead or even placing another rolled out crust on top as you would when making regular pies(w/out any lattice work). 
4. Brush top with beaten egg, sprinkle with cinnamon sugar, can add a bit of raw coarse sugar as well, if desired.
5. Using a 2 1/2- 3 inch sharp round cookie cutter, cut out cookies... 
6. Place cookies on parchment lined cookie sheet.
7. Repeat the process with the other 2 pieces. 
8. With scraps, I like to use a mini muffin tin and bake them... this way I don't waste the scraps and turn them into mini muffin pies. 
9. Bake in preheated 375 deg F oven for 15 minutes or so... or until golden.
10. If you like, you can drizzle some cookies with a powdered sugar icing.


Wednesday, March 26, 2014

Chocolate Covered Figs... easy and healthy.

Chocolate Covered Figs... as a snack or perfect for gift giving. I think the title of this recipe is all the information one needs to make these delicious treats.  There's nothing complicated in this recipe... well, as long as the chocolate doesn't burn in the melting process:). 

In any case, I thought to share with you a simple recipe... I feel as I don't have too many quick and simple recipes here on this site:).... and I have a recipe I'll be posting soon that will probably take the prize for the longest recipe ever. But for now, this one is definitely uncomplicated...  quick and simple! It's great as a snack, a breakfast treat, placed next to a fancy dessert.... or simply given out as gifts, all wrapped up nicely.

Last week  while on a weekend drive out of town, my husband and I stopped at a CO-OP. Love the CO-OP... because you can feel like a kid again.... it's where you can pick all sorts of treats from a variety of bins and you don't feel bad about your selection. It's usually healthy:). So both my husband and I picked out our favorite treats... dried figs for my husband... and chocolate for me:).  

When we got home, we snacked on the figs and chocolate... found out that chocolate and figs taste incredibly well together. So the next day, I put the 2 flavors together and made these little treats.  I left them simple... just chocolate and figs, but you can easily add some chopped nuts to the dipped chocolate base, or even dried coconut. I think green pistachios would bring a nice bright pop of color. 

If you're looking to add an edible treat to brighten up a gift basket or cookie plate, you might want to try these simple chocolate covered figs. They are gluten-free... and you can use a good chocolate to make them free of most allergens. Hope you enjoy...  

You will need: you can make a few or as many as you like

dried calimyrna figs
melted chocolate

Optional:
chopped nuts
dried coconut 

Directions:

1. Melt chocolate... either in a double boiler or the microwave in 30 second increments.
2. Dip dried figs in chocolate.... and if you like, in chopped nuts or coconut. 
3. Place dipped figs on a plastic lined plate ... or parchment lined plate and allow chocolate to harden in the fridge (if chocolate isn't tempered).