~ "By wisdom a house is built, and through understanding it is established; Through knowledge its rooms are filled with rare and beautiful treasures." ~ "Reckless words pierce like a sword, but the tongue of the wise brings healing" ~ "But the wisdom that is from above is first pure, then peaceable, gentle, and easy to be intreated, full of mercy and good fruits, without partiality, and without hypocrisy." ~ "Trust in the LORD with all your heart, and lean not on your own understanding; in all your ways acknowledge Him, and He shall direct your paths."~

Thursday, October 9, 2008

Stuffed Mushrooms


Stuffed Mushrooms...Since we love mushrooms, I decided to stuff them and try a new recipe. This is another recipe that I created on the spur of the moment. I happened to have some Cambozola cheese(soft blue cheese, brie) pecans , Parmesan cheese, bread and of course baby bella mushrooms. So this recipe is from things I had around the house. You can definitely use any cheese you like(I've used feta,mozzarella,cream cheese, swiss cheese before) and add any seasonings you like to make them your own(minced garlic,onion etc). This was my version. Hope you enjoy...

Ingredients:
  • 10-12 mushrooms ,stems removed ( I used baby bella...)
  • 10-12 cambozola cheese cubes( or any cheese you like)
  • 1 white sliced bread
  • 8 pecan halves
  • 1 TBS chives or more
  • 2-3 TBS olive oil
  • 2-3 TBS grated Parmesan cheese
  • salt and pepper to taste
Directions:
Preheat oven to 375-400 deg F ( I used my toaster oven at 425)

1. Wash and dry mushrooms. Remove stems.
2. In a bowl, place mushrooms and toss with some olive oil and season with a bit of salt.
3. In a food processor, process bread pecans, chives, salt and pepper till almost fine consistency.

4. Pulse about 30 seconds or so.... and set aside.
5. Place mushrooms on a sheet pan and place about 1 small cube of cheese in the center.
6. Top with about 1 TBS of bread stuffing . Sprinkle with some grated Parmesan cheese.
7. Bake for 20 minutes or until nicely browned.

Wednesday, October 8, 2008

Mushroom Vegetable Chowder


Mushroom vegetable chowder...O.K. this recipe came out of pure creativity as I rushed to make something warm and comforting for lunch. I was limited to what I had on hand and I wanted something light and not greasy or heavy. So, I opted to make this chowder without meat,bacon,ham or such (it was a challenge for me as I usually always use some sort of meat). But, I wanted to make something good that we could have without worrying to much about the fat content. Also, I had just picked some fresh zucchini, carrots,sweet cherry peppers from the garden along with some fresh thyme and rosemary .... and I wanted to use that. I decided to use mushrooms as the major ingredient in the chowder along with a big russet potato. So here is the final product. Hope you enjoy...

Ingredients:
  • 2-3 TBS olive oil
  • 1 carrot, diced (I used 3-4 small carrots from my garden)
  • 1 small zucchini, diced
  • 1/2 celery stalk
  • 1/2 onion, diced
  • 2 cloves garlic, minced
  • salt/pepper to taste
  • 6- 8 mushrooms,sliced (I used baby bella & quartered mine...)
  • 1 large russet potato, diced
  • 1 cup 2 % milk
  • 1/2 cup water + 3 TBS Flour (for slurry to thicken soup)
  • 1 tsp fresh rosemary, chopped
  • 1 tsp fresh thyme, chopped
  • water
Directions:

1. Add olive oil to a medium pot that has been heated on medium.
2. Add diced onion, garlic and saute on med low for about 2 minutes.
3. Add carrots, zucchini, celery and mushrooms.


4. Saute on low until vegetables are soft. Season with salt and pepper.
5. Add potatoes and water just enough to cover the vegetables (about 3-4 cups?).
6. Cover and let simmer until potatoes are tender. Adjust seasoning.
7. Add milk and slurry and cook on low (uncovered) until thickened... about 15-20 minutes. You can adjust the thickness of the chowder by adding more flour/water mix. Add rosemary and thyme and finely chopped sweet cherry peppers. Cook for an additional minute or two.
Cherry peppers are definitely optional I just had it and liked the color addition to the chowder. Serve warm on a cold day!

Monday, October 6, 2008

Pan Fried Halibut


Pan Fried Halibut...A really quick and easy way to do your fillet of fish. A really simple recipe....
I usually BBQ my fish but, when I don't have time to heat up the grill I opt for this version. The trick is to leave the fish to cook on one side for a few minutes without constantly turning and moving it. You want the fish to get a carmel color and seal in the juices before you turn it on the second side. Cooking it with a mixture of butter/olive oil also gives it the golden color. In this recipe, I decided to skip the butter. Hope you enjoy...

Ingredients:
  • 1 fillet of fish (I used halibut...but you can use salmon,mahi mahi or any other fish)
  • 2 tsp fresh dill (I used 1 tsp dried)
  • salt and pepper to taste
  • chopped garlic, minced, optional
  • olive oil/butter
  • wedge of lemon
Directions:
1. Rinse fish under cold water and pat dry. Coat fish with some olive oil. Sprinkle kosher salt , pepper and dill on both sides of fish.
2. Let rest for about 20 minutes.
3. Heat frying pan to high and add about 1 TBS olive oil.
4. Add fish fillet and lower heat to medium. It is at this point you can add 2 tsp butter to the pan (optional).
5. Cook fish for about 3-4 minutes on one side depending on the thickness.
6. Turn fish over and cook for an additional 3-4 minutes or until fish is cooked through and flakes easily. Squeeze some lemon over the dish.
7. Serve warm with roasted asparagus and rice/mashed potatoes.

Roasted Asparagus


Roasted Asparagus...This dish is very simple to make. I like to make it in my toaster oven...but, I am sure it works just as well in the oven. I like to add some zip and color to the dish by sprinkling some chile flakes. Hope you enjoy...

Ingredients:
  • 1 bunch of asparagus (ends either broken off or peeled)
  • 2-3 garlic cloves minced
  • 2-3 TBS olive oil
  • salt and pepper to taste
  • a sprinkle of chile flakes (optional)
Directions:
1. Wash asparagus and pat dry.
2. Peel and mince garlic.
3. Place asparagus in pan in a single layer.

4. Drizzle oil, and add minced garlic salt and pepper. Toss to coat. Sprinkle with some chile flakes if you like.

5. Bake in a preheated oven at 375-400 deg F.( I usually do it at 450 deg in the toaster oven but, I think you need to adjust it on the regular oven) for 15 minutes or until nicely roasted. You can turn the asparagus towards the end to roast evenly. Serve warm.

Thursday, October 2, 2008

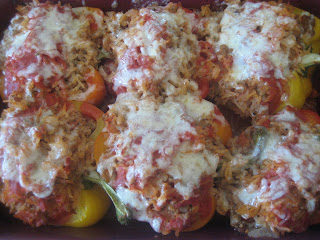
Baked Stuffed Bell Peppers


Stuffed Bell Peppers.... We love stuffed bell peppers. I think both my husband and I have great memories of eating stuffed peppers throughout our childhood days. We both liked the way our mothers made them...we added a dollop of sour cream on top. But, this version is a bit different in that it is baked rather than cooked on the stove top, uses turkey instead of beef and has a bit more rice for a lighter version. The stove top method makes the peppers extra soft. The peppers in this recipe have a bit more bite to them Hope you enjoy....

Ingredients: You can easily adjust the amount of rice and meat to suit your liking... and use tomato paste thinned out with water for the canned tomato sauce/ diced tomatoes... or use a mixture of tomato paste with grated fresh tomatoes.
  • 3 large red/orange/yellow/green bell peppers
  • 1 small onion, diced
  • 1 TBS olive oil
  • 3-4 garlic cloves, minced
  • 1 cup rice (used basmati rice for a fluffier filling)
  • 10 oz ground turkey
  • 16 oz can diced tomatoes
  • 6 oz can tomato sauce
  • 1/2 cup grated jack cheese
  • salt/pepper to taste
  • dill or parsley to taste
Directions:

1. You can cook the rice to have a head start. I use 1 cup of rice uncooked (the cup that comes with the rice cooker) and get approx. 2 cups cooked rice.
2. Wash peppers and cut in half lengthwise. (You can also leave them whole and cut off just the tops. Keep the tops as a "lid" by placing it on top of the filled peppers.) Take out seeds and membranes. Rinse to clean out all the seeds.

3. At this point, blanch peppers in salted boiling water for about 3-5 minutes or until softened. I skipped this step and left them raw.
4. Place about 1/3 of the cut up tomatoes on the bottom of your dish. You may add about 1/2 cup-1 cup water and mix with the tomatoes. Place the peppers on top of the sauce. Set aside.
5. Add olive oil to frying pan. Heat on med-low and add onion and garlic.
6. Saute for about 4-5 minutes or until soft. Lower the heat if you need to so as not to burn.
7. Add turkey, salt, pepper and dill/parsley.
8. Cook until turkey is cooked through and no longer pink.
9. Add rice and remainder of the diced tomatoes, and 1/2 can of tomato sauce.
10. Mix and combine. Turn off heat. Fill bell peppers with rice mixture. Top with a tablespoon or so of the leftover tomato sauce.
11. Cover with foil and bake in a 375 deg F. preheated oven for about an hour (test and see how soft you want the bell peppers to be halfway through the cooking time... and leave them in a bit longer if you wish)... uncover ...bake an additional 10-15 minutes. Sprinkle some cheese the last minute or so of the baking time.

Wednesday, October 1, 2008

Low Fat Blueberry Scones


Low Fat Blueberry Scones....I came across this recipe (check out Mennonite Girls Can Cook blog) and immediately thought...Low Fat Scone?! I won't feel too bad if I add some creme fraiche with a dollop of jam on these scones!
So, I ventured out to try the recipe... I was amazed at the result. For being low fat the scone was light, fluffy, moist and not dense at all. It wasn't sweet and the blueberries added a touch of tartness to the scone. They also look great when they come out of the oven as well (not to mention the wonderful aroma that lingers in the kitchen). I have to say that I liked the recipe and so I decided to post it. Hope you enjoy...

Ingredients:
  • 2 cups all purpose flour
  • 1/4 cup sugar
  • 1 Tablespoon baking powder
  • 1/4 teaspoon salt (I used a pinch)
  • 1/4 teaspoon baking soda
  • 1 Tablespoon grated orange or lemon zest (I used orange)
  • 1/4 cup butter
  • 3/4 cup buttermilk or plain yogurt (I used 2% milk with juice of a 1/2 lemon
  • 1 egg
  • 1 teaspoon vanilla
  • 1/2 tsp almond extract, optional
  • 1 - 2 cups fresh blueberries*
*I used fresh-frozen... I bought them fresh and then froze them... they are a ton better than store-bought frozen, which I don't recommend in this recipe as it makes the scones purple-ish.

Directions:

Preheat oven to 400 deg F .
1. Mix dry ingredients together in a large bowl.
2. Cut the butter into the dry ingredients with a pastry blender, until fine.

3. Mix the wet ingredients in another bowl then add to the dry ingredients, stirring with a fork until all the mixture has been moistened. (I usually mix half way and then fold in the blueberries so that I don't overwork the dough). Fold in the blueberries. The key is to not overwork the dough... just mix until it just comes together. Don't feel the need to press and compact the dough...it will get tough!

4. Drop by large spoonfuls(I used a 1/4 cup measurement and formed them(lightly...don't compact) into balls....be gentle with this kind of dough) onto a parchment paper lined cookie sheet.

5. Bake at 400 Deg F for 18 minutes.

Glaze Ingredients:
  • 3/4 cup icing sugar
  • 1 tsp of the peel from the citrus you chose earlier.
  • 3 Tbsp of lemon or orange juice( I used milk) .
  • a drop of almond extract, optional.
Directions:
1. Mix all ingredients and drizzle over scones while still warm. Enjoy!