~ "By wisdom a house is built, and through understanding it is established; Through knowledge its rooms are filled with rare and beautiful treasures." ~ "Reckless words pierce like a sword, but the tongue of the wise brings healing" ~ "But the wisdom that is from above is first pure, then peaceable, gentle, and easy to be intreated, full of mercy and good fruits, without partiality, and without hypocrisy." ~ "Trust in the LORD with all your heart, and lean not on your own understanding; in all your ways acknowledge Him, and He shall direct your paths."~
Showing posts with label crackers. Show all posts

Tuesday, May 14, 2013

Flax Seed Crackers... Gluten-Free/Egg-Free/Flour-less.


Flax Seed Crackers... Gluten-Free/Egg-Free/Flour-less. Sorry, I'm back to making crackers again:). But ever since I made the chia seed crackers, I knew I wanted to try the flax seed version. This time around I chose to sort of  "get rid" of some seeds, grain and nuts I had in my fridge. I often manage to buy certain seeds, nuts or grains  for specific recipes... use some of them, but then sort of "forget" about the rest. Oh, I know they are there,  because I see them every time I open my fridge:). Nuts normally aren't a problem, as we like to munch on them whenever we look for  a snack. Sunflower seeds tend to be used in salads... and as of recent, for making sunflower seed "flour" to use in gluten-free recipes. Made some gluten-free french macarons using sunflower seed flour and it works really well.... in case you are interested in trying it:). In any case,  flax seeds, chia seeds and millet sort of get forgotten. So this time around my intention was to "clear" out my fridge... got all my little containers  with various seeds, nuts, and millet to make these crackers.

The resulting crackers were delicious! Even though this batch of crackers weren't grain-free or nut- free(like the chia crackers), I felt they had more character:). The flax seeds and millet provided quite a bit of extra texture... and the almonds gave the crackers added flavor. You'll have to overlook the fact that some of the seeds can get stuck in your teeth:). 

Because I SO loved the flavor of  onion in the chia seed crackers, I decided to add it to these crackers as well.  Personally, I think the onion flavor is what really elevates the crackers and makes them unique. I like to eat the crackers as a snack, sort of curbs my appetite for chips.... even my husband likes them:). They go wonderfully well with various cheeses and dips. So if you you are looking for yet another cracker recipe that's a bit different, you might want to give this recipe a try. Hope you enjoy...

Note: If  you notice the cracker is not crisp when you break it in pieces, it probably wasn't dried enough in the initial baking process... so all you'll need to do, is to bake it for another few minutes until the crackers are crisp. It can be anywhere from 10-20 extra minutes.  

You will need:

1 cup flax seeds(I used golden)
1 cup water
1 cup sunflower seeds( I used 1/2 cup raw +1/2 cup roasted)
1/3 cup millet
2/3 cup raw sliced almonds
2 tsps  dried onion powder 
chile flakes to taste, optional
11/4 tsp kosher salt, or to taste

Directions:
1. In a large bowl, add all ingredients. Mix well to combine evenly. Allow to sit for 10 minutes or more ... until mixture "clumps" up and forms a thick "batter". 
At this point, you can proceed to bake the crackers, or you could let the cracker mixture soak for 2 hours or so... which is what I ended up doing. The mixture does get drier, but it still works.
  • Preheat oven to 170 deg F
2. Line a large cookie sheet with parchment paper, and place cracker mixture in center. With wet or oiled hands press the mixture into a thin even layer... about 1/4 inch thick. You will need to wet your hands often, as the mixture can be quite sticky.
3.  Place pan in preheated oven and bake for 60-80 minutes. Turn cracker sheet over and bake an additional 60-80 minutes... or until you notice the cracker sheet is no longer soft in the center. 
When turning the cracker sheet over, you might find it helpful to use another baking sheet of the same size to help you turn it over without breaking in pieces.
4. Turn oven off and allow cracker sheet to dry further in the oven with the residual heat. I leave mine overnight... 
I placed a range in baking time, because this depends on how thick or thin the cracker was spread... and all ovens are different. Mine took about 70 minutes on each side.

Wednesday, April 24, 2013

Chia Seed Crackers...Gluten-free, Nut-Free, Egg-Free


Onion Flavored Chia Seed Crackers...Gluten-free, Nut-Free, Egg-Free. I love crackers.  And even though I haven't posted a new cracker recipe in quite a while, I've actually made a few new recipes... just haven't posted them. Sometimes it's hard to keep up with the recipes that come out of my kitchen:). But this particular cracker recipe I just had to share. The recipe came about one day when I realized I had a large bag of chia seeds in my fridge. I've been using the chia seeds in lots of dishes, but that day I decided to turn the chia seeds into healthy crackers... with minimal work.

I noticed most whole food stores sell these raw gluten-free crackers. They're crackers made mainly from flax seeds... with minimal ingredients. And they're sold in small snack packs that are quite expensive. I'll admit it's convenient to buy them ready made, and they're actually a better option when you want a quick snack to munch on. Yes, you do pay for convenience, but I'm always looking to see if I can eliminate the high price tag and make the product myself. So that's when I decided to make my own crackers at home... 

I had seen plenty of recipes for raw flax seed crackers online, and knew I could substitute chia seeds instead of the flax seeds. They both work to thicken liquids as they release this gel-like substance when soaked. So even though I couldn't  really make my crackers raw( no dehydrator)  I could still make them healthier than other crackers. The lowest heat I could go with my oven was exactly 170 degrees F, so that's the temperature I used. But if you have a dehydrator, it would probably be the way to go.

When making my cracker recipe, I chose to sort of use what I had on hand. Ingredient amounts were pretty much measured out to my liking. I had plenty of sunflower and pumpkin seeds, so I used more of those. But I am sure you can play around with amounts to suit your preference. And while I made the crackers nut-free, I am sure you could even add a variety of nuts. I also decided to flavor the crackers with onion, just because I love the onion flavor. But you can use whatever spices you like, and you can even make them spicy. It is important to note that the crackers do need a bit of salt, because if too little salt is used, then the crackers can be quite bland. I simply loved these crackers. Sturdy enough for any dip. Hope you enjoy...

Tip: Since you are using the oven for 2 hours of heating time, it's nice to double, or triple recipe. The crackers stay crisp for days.  
  
You will need:

1 cup chia seeds
1 cup water
2 TBS sesame seeds
2/3 cup raw pumpkin seeds
2/3 cup raw sunflower seeds
2 tsps onion powder
1 1/4 tsp kosher salt, or to taste

Directions: 
  • Preheat oven to 170 deg F...  for a raw version use a dehydrator.
  • Line a sheet pan with parchment paper 
1. Mix chia seeds and water... it will thicken rather quickly.
2. Add rest of the ingredients and mix to combine thoroughly.
3. Using wet or oiled hands spread mixture unto parchment paper and spread thinly and evenly... as thin as you can get it... maybe 1/4 inch thickness. 
4. Place in preheated oven and bake for 60-70 minutes.... turn cracker "sheet" over and bake another hour or so... depending how thin you spread the cracker.  If you find it difficult to turn the cracker(in case it breaks), use another cookie sheet to help you turn it over... as you would use a plate to turn over a big pancake in a skillet:).  
5. Turn heat off and allow cracker to dry out in the oven.  I just left mine overnight in the oven.
6. Break cracker sheet in smaller pieces. Serve as a snack or with dip of choice...   


Friday, March 16, 2012

Grain-Free Crackers... Almond Thins


Grain-Free Crackers... Almond Thins. My fascination with crackers continues:)... If you've been following me for some time now, you would have probably noticed that I love making crackers... all sorts of crackers. I think the cracker "bug" bit me when I first made my very own Parmesan sesame crackers... years ago.

The Parmesan Sesame Crackers were first created after I noticed I had run out of crackers one day. Decided then to find a recipe and try my hand at making them at home. That's also when I realized that I could flavor the crackers any way I wanted. Made my first batch of crackers with plenty of seeds and some grated Parmesan.... After tasting them, I quickly realized that homemade crackers are the best!

So even though I've made plenty of crackers since then, I realized all of them contain flour as a major ingredient. But lately I've been wanting to make some crackers that are grain-free. Even though I'm not on any grain-free/gluten-free/vegetarian diet, I still enjoy eating as healthy as possible. I love being able to have a recipe for crackers that contain minimal ingredients and are homemade. But could there really be a cracker recipe that contained no wheat flour? Did a quick search and found out that there was such a cracker... and so simple to make!

Had to file this recipe under my cracker recipes. Can you believe making a cracker with just 2 ingredients? O.K. maybe 3 ... if you include the salt. These crackers qualify for those on Paleo/Gluten-free/Grain-free diets... and any of us who love crackers. And it probably took me less than a half hour to make. I should mention that a few of these crackers go a long way... quite filling. But too good not to share:). Actually, they are simply amazing! Hope you enjoy...

Note: Depending on the size of your egg white, you may need to add a bit more almond meal to bring it to the right consistency... mentioned it below. I kept some of the crackers in an airtight container and they stay crisp. I wouldn't keep them out too long(weeks), as nuts can get rancid quickly.
I haven't made this recipe with soaked and dried almonds... but I am thinking it should still work.

Tip: Feel free to add a bit of seasoning, like cayenne, paprika, onion powder, etc. You can add other small seeds... sesame, poppy, flax seeds, etc.
It's best to roll out the dough as thinly as possible... though if you like them thicker, just bake longer.

You will need: inspired by Caveman Food

1 cup raw almonds, ground finely*
1 egg white
pinch of salt, or to taste
*you can use store-bought almond meal(1 cup+/-)

Directions:
1. PREHEAT OVEN TO 350 deg.F.
2. Finely grind almonds(I used my Vita-mix). Measure out 1 cup almond meal (use a spoon to measure) and place in a bowl. You will have a bit of leftover almond meal... just set it aside.
3. To the 1 cup almond meal add a pinch of salt(I used sea salt) and the egg white. Mix with a fork to fully incorporate.
4. If mixture is too wet, add some of the reserved almond meal a TBS at a time until the mixture resembles thick peanut butter... and you can form it into a ball without it being too sticky. I ended up using all of the reserved almond meal( maybe another 1/4 cup) as my egg white was from an ex-large egg.
5. Place the ball of almond mixture between 2 large parchment papers and roll out very thin...the thinner, the crispier the cracker.
6. Cut squares( or any shape you prefer) using a sharp knife... (you can roll and cut the cracker dough on the back of a parchment-lined baking sheet... or you could roll them out on the counter and then place the crackers(with bottom parchment paper) onto a preheated baking stone... which is what I ended up doing).
7. Bake crackers until lightly golden... 5-8 minutes depending on thickness. Don't over-brown. Keep a close eye on them as they bake. They can quickly burn. You may need to watch and remove crackers that brown earlier, especially if the dough is not evenly rolled out.
8. Allow crackers to cool... they will continue to crisp up a bit. They aren't overly crunchy... more like tender-crisp, if that's a word:).

Tuesday, September 20, 2011

Phyllo Dough Crackers with Seeds... a new favorite!


Phyllo Dough "Crackers" with Seeds... I really get excited when I stumble upon a recipe, end up trying it, and really like it... even better when it becomes a favorite recipe. This one is a favorite, and it's so easy to do... not to mention, so tasty! Who would have thought that such a simple recipe could make such a sophisticated appetizer/snack?
I love using phyllo dough, and many times I may have some leftover sheets. Sometimes I end up re-freezing the sheets, but then they can sort of dry up and break. It's nice to have found a way to use up those extra phyllo dough sheets... just turn them into seeded crackers. Love, love...absolutely love this recipe!
When I first stumbled on this recipe, I was in a bit of a hurry...didn't have too much time to pay close attention to the written version. But while quickly glancing at it, I remembered a few details... something about using 3 buttered phyllo sheets, sunflower seeds, and an egg wash.... and then turning it into simple, yet elegant crackers. That's basically what I remembered...but I forgot a few things... didn't exactly remember the sugar in the recipe:). Even so, the idea was so neat, that the majority of the details stuck...
Recently I decided to make some apple turnovers... noticed I had a few extra phyllo sheets to work with.. then I remembered the phyllo crackers. I took out all the seeds I had in the freezer, and quickly made my own version of the crackers I originally saw... recipe posted below. But after I made the crackers, I started looking for the original recipe again.... just to compare. Found it. And that's when I realized the original recipe was a bit different than the one I made. While my crackers were a savory cracker, the original was a sweet/savory cracker... called Tejas...or "roof tiles" in Spanish. So I'm posting the link to the original, in case you want to see the fabulous photos, as well as the original recipe that inspired me to make them.
These "crackers" are so light and crispy...they shatter in your mouth. It's the perfect entertaining appetizer. ...a great little treat to munch on before a dinner gathering. Or make them for special occasions.... or simply as a snack. Hope you enjoy...

Note: You can make as many crackers you want...I only used 3 (13x9) sheets, and had seeds and egg white left over. Ideally, for an egg white to be used up, you will need to make more crackers(maybe using 6 or 9 sheets).

Tip: You can butter and layer the phyllo sheets directly on a parchment lined baking sheet, sprinkle seeds and then cut... this way you won't need to transfer the crackers.
Feel free to use other seeds...caraway, fennel, etc.
I am thinking some Parmesan cheese would work well as a topping.... haven't tried it, yet.
If you want a thicker cracker, try using a few extra phyllo sheets when layering.

You will need: inspired by The Galley Gourmet

phyllo dough sheets
melted butter
egg white, beaten
seeds....sunflower seeds, flax(brown and golden), poppy seeds, sesame seeds,etc
kosher salt

Directions:

Preheat oven to 375 deg F

1. Mix seeds in a bowl...I use a bit more sunflower seeds and then use the same amount of the other seeds. Example 3 TBS sunflower seeds , 1 TBS flax, 1 TBS poppy seeds, 1 TBS sesame...you can add other seeds of choice.

2. Brush 1 phyllo dough sheet with melted butter, add second phyllo sheet on top and brush with melted butter, making sure the whole surface is brushed well.

3. Place a third sheet on top of the 2 buttered phyllo sheets and brush with beaten egg white, making sure the whole sheet is brushed well.

4. Sprinkle with seed mixture, making sure the phyllo sheet gets covered with the seeds.

5. Sprinkle the top lightly with a bit of kosher salt and cut in tho strips.

6. Place strips onto a parchment lined cookie sheet and bake in a preheated 375 deg F oven for 5 minutes... or until golden brown. Keep on eye on them as every oven is different.

7. Allow to cool and enjoy!... You can keep them in an airtight container...just pack them gently.

Wednesday, August 31, 2011

Almond Butter Wheat Crackers...wholesome version.


Almond Butter Wheat Crackers...a wholesome version. Yes, I know... another cracker recipe:)... but I just love making homemade crackers. When I first saw this recipe in a cookbook at the library some time ago, I thought it would be a great recipe to try. I simply loved the idea of of using a whole cup of nut butter in a cracker recipe...and no butter. The recipe came from a rather interesting cookbook....a cookbook that featured "forgotten" recipes from the backs of boxes, cans, and such. I usually don't gravitate towards such cookbooks... but what made me leaf through the book, was really more out of sheer curiosity... just to see what kind of recipes were actually featured. There were recipes from Betty Crocker cake mixes, Pillsbury flour sacks, Skippy peanut butter jars... and so on.
So when I spotted the recipe for Skippy peanut butter crackers I thought it was just a recipe for crackers that were sandwiched with peanut butter filling...but I was wrong. Now, I really don't buy peanut butter, I'll make my own if I have to....and I'll do the same with most all other nut butters. But recently I had bought some almond butter(got it at a good price) and actually had plenty of it... and wanted to use it. So the idea to switch the peanut butter ingredient with almond butter crossed my mind. Peanut butter tastes quite a bit different from almond butter. And different brands taste different as well... some have other things added... besides the roasted nuts. It can have sugar, salt, oil, etc. The almond butter I used was simply made out of roasted almonds.
You might be wondering why I'm saying all this? Well, it's because I think the crackers made with Skippy peanut butter would probably taste different than the one I made. While I really liked the crackers, I felt they needed something else to bring the flavors together....can't put my finger on it...maybe it needed a bit of sugar... not quite sure. But they are very good crackers... I like them because of the good-for-you ingredients. I also love how sturdy they are... they actually keep their shape when baked, and that's always a plus when you want the edges to have some sort of design....and look pretty:).
So what was initially supposed to be a peanut butter cracker,... well... made its way into being an almond butter cracker:). But I'm posting this recipe in case some of you would like to try the peanut butter version... or be brave enough and try the almond version:). Seriously though, I'm also posting this recipe for myself... because all in all, it's a cracker recipe that I will be making again...maybe adding a bit of sugar next time....or not. Hope you enjoy...

Note: The crackers could actually be dairy-free if you skip the step where you brush the crackers with milk.
Tip: If you don't care for caraway, opt to leave it out...though it isn't really very strong.

You will need: inspired from HERE
Makes about 40 (3 inch round) crackers... but more or less using other cookie cutters.

1 cup all-purpose flour
1 cup whole-wheat flour
1/4 cup plain wheat germ, (I skipped this)
1 1/2 teaspoons caraway seeds
3 TBS sesame seeds, optional
1 teaspoon salt
1/2 teaspoon baking soda
1 cup almond butter (chunky peanut butter is preferred)
1/2 cup water, plus more as needed
2 tablespoons cider vinegar
2 tablespoons milk, for brushing
Coarse salt, optional

Directions:
1. Preheat the oven to 375 degrees.
2. In a large bowl add the flours, wheat germ( if using), caraway seeds, sesame seeds(if using), salt, and baking soda. Whisk to combine.
3. With a pastry blender, fork or hands( which is what I used), cut in the almond butter( or peanut butter) until coarse crumbs form.
4. Add water and vinegar. Mix until dough holds together. If mixture seems too dry, add more water, about a teaspoon or so at a time until it feels like a pliable dough.
5. Divide the dough in half or thirds. On a lightly floured surface( or between parchment paper) roll half the dough out until it is about 1/8 inch thick.
6. Cut with a floured 3-inch round cookie cutter...or any cutter you like...any shape you like.
7. Re-roll scraps and repeat. Continue until all dough is used up.
8. Place on parchment-lined baking sheets....or directly on ungreased cookie sheets.
9. Brush tops lightly with milk...this is optional. I've done it with and without the milk.... Seems to not make a huge difference.
10. Sprinkle lightly with coarse salt, if desired. I skipped the salt...but maybe that's what was missing...
11. Bake in the center of the oven about 13-15 minutes or until nicely browned and crisp. The timing all depends on how small or big your crackers are...so keep an eye on them. You want them to be nicely browned and crisp.
12. Remove to wire racks and cool completely. Store in airtight containers....they stay crisp for days.

Monday, June 6, 2011

Chickpea Flour Crackers with Chives...Parmesan Crackers Revisited


Parmesan Crackers Revisited...using some Chickpea Flour.
I recently came up with another cracker recipe...a variation of the Parmesan Sesame Crackers I posted quite a while back. The original recipe is fantastic as is...a cracker recipe that uses pretty basic ingredients. You can easily adjust the recipe to include various seeds, herbs or spices. And as of recent, I found out that even the flour can be adjusted...
I had some overnight guests coming over, so I wanted to make some crackers to have on hand. As I was getting my ingredients ready, an idea came to me....to use some of the chickpea flour I had sitting in the fridge. On the spur of the moment, I decided to go ahead with the idea....and ended substituting half of the regular flour for chickpea flour.... at the time I didn't know if using so much chickpea flour would alter the taste too much or have a negative affect. I figured it probably wouldn't be too much ..as we like hummus:). In any case, the crackers were a hit... so delicious! They sort of reminded me of Cheeze-its and I think the chickpea flour actually worked in this recipe:).
The crackers are great as a simple snack...when you need to munch on something. But they are also the type of cracker that can stand up to hearty dips...they're thicker and don't break so easily. It's definitely a cracker I will be making again...
I am posting this variation in case some of you would like to make your own crackers at home... and want to go a bit healthier. Feel free to check out the original recipe I posted way back during my very early days of blogging...I still love the recipe:). Hope you enjoy...

Note: I used half all purpose flour and half chickpea flour, but if you like, you can probably get away with substituting the all purpose flour with some whole wheat or even spelt....it might even work with just using all chickpea flour(haven't tried it though)

Tip: After I bake all the crackers, I then like to place the crackers(those that aren't so crispy) in the warm oven with the heat turned off... to crisp up even further. The residual heat is just enough to crisp them up without burning...and they stay crisp for days.
I prefer to store my crackers in the freezer...this way they stay nice and fresh.

You will need: basic cracker recipe

1 cup all purpose flour
1 cup chickpea(garbanzo) flour
1/2 tsp salt
1 tsp baking powder
2/3 cup warm water
1/3 cup light olive oil
6 TBS sesame seeds
1/3 cup shredded hard cheese( Parmesan, Manchego, Gruyere, etc.)

Optional add ins:
cayenne
paprika
dried chives
caraway
poppy seeds
sunflower seeds

Directions:
1. Preheat oven to 400 F and lightly grease two 14x17-inch baking sheets(grease the pans only if you are not using the parchment paper).

2. In a large bowl, combine flour, chickpea flour, baking powder, sesame seeds, cheese, dried chives, and salt...you can also add any additional add-ins you prefer... such as paprika, caraway seeds, poppy seeds, etc.

3. Stir in water and oil, mixing until smooth dough forms. Halve dough.

4. Roll out half of the dough into large square as thin as you can get it...1/4 inch or so( they will puff up a bit more in the oven) . You can roll out the dough on the back of an oiled cookie sheet... or on a parchment paper.

5. Cut rolled out dough into small squares or whatever shapes you prefer....strips would be fun. Place on baking sheet. Pierce all over with fork. Repeat with remaining half of dough.

I prefer rolling my cracker dough on a parchment paper and then transferring the crackers (parchment paper and all) unto a cookie sheet.

6. Bake until crackers are dry and golden, 10 to 12 minutes. You may need to pull out some of the crackers that brown a bit earlier...so that they don't burn.... leave the rest to continue baking. Re-cut if necessary. Cool on racks. See tip above if you want really crisp crackers.
7. Store crackers in airtight container or in the freezer.

Friday, April 15, 2011

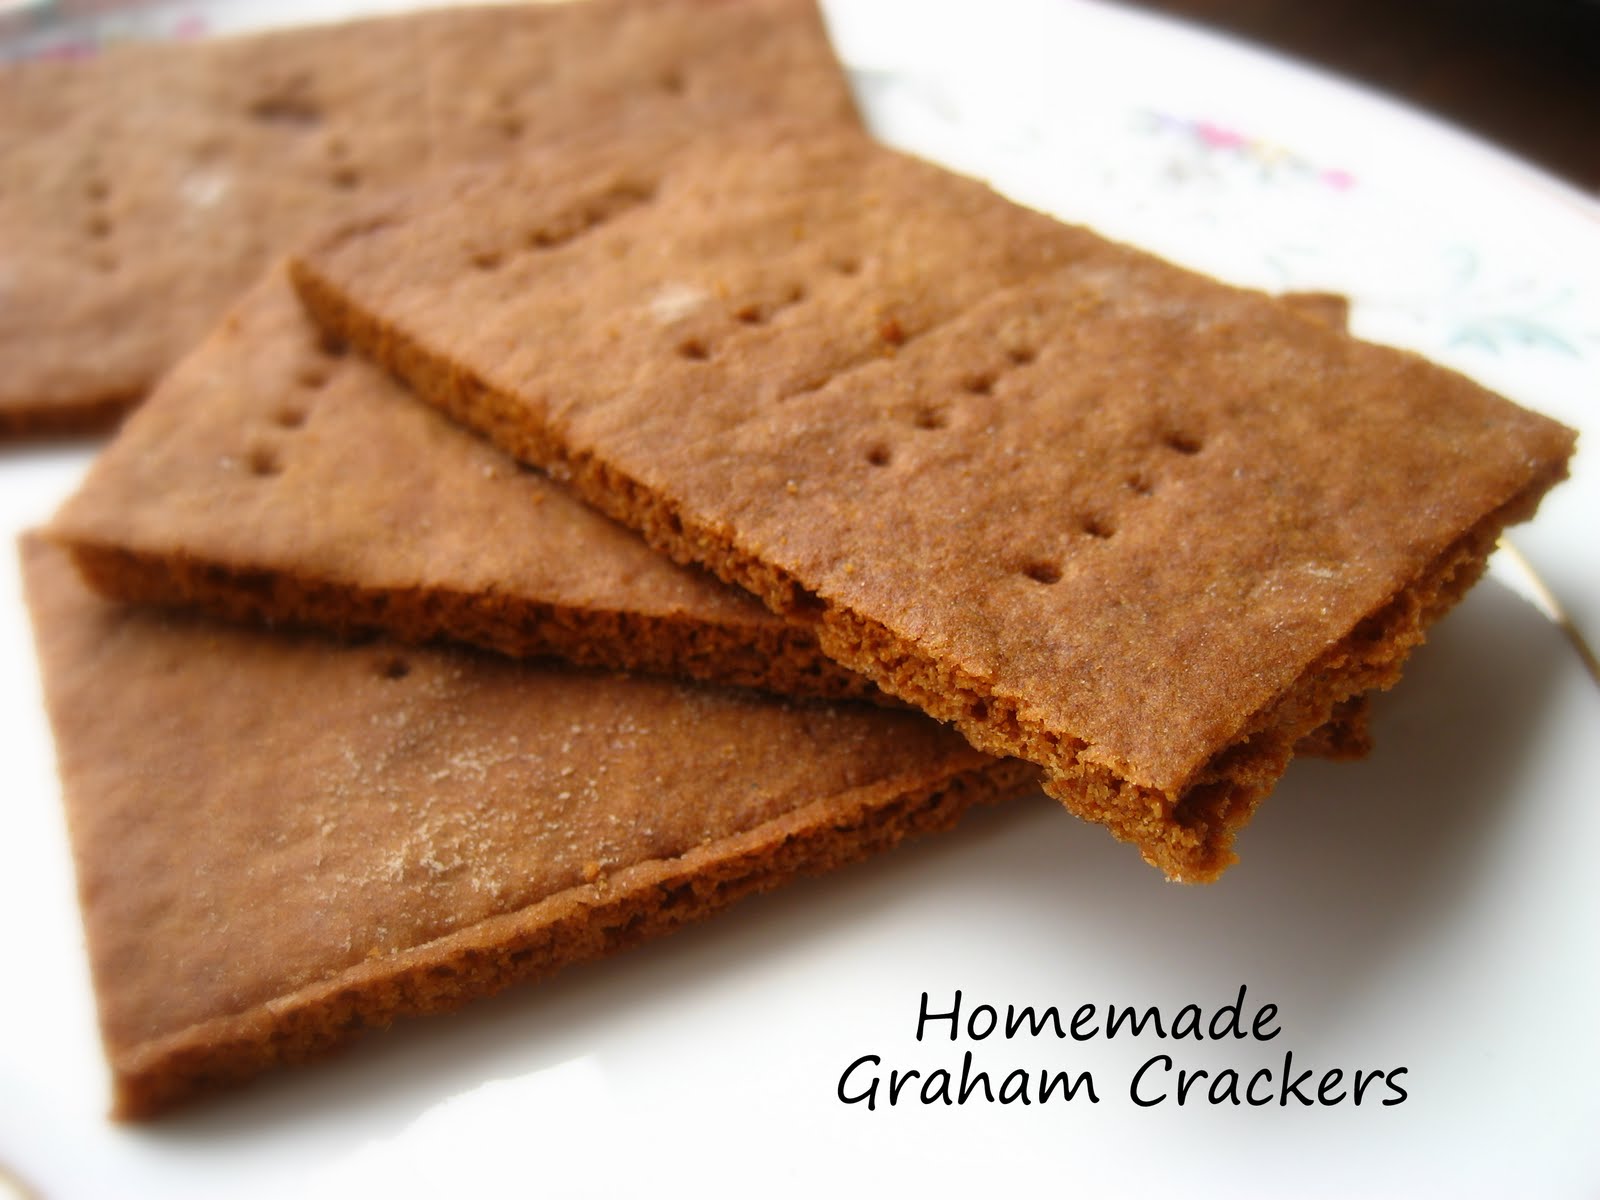
Homemade Graham Crackers


Homemade Graham Crackers...
I've been baking lately. More baking than normal. I've felt the need to bake some of the many recipes I've bookmarked for some time now. This recipe for graham crackers was one of them. I love crackers... and I love to challenge myself to make a recipe that comes as close to(or better) than the store-bought version. I love the feeling when I feel the recipe is a success. These crackers really tasted like graham crackers....and they even resembled them. Many thanks to Nancy Silverston...
After I made them, I offered one to my husband for his opinion. His face lit up. I knew we were on the same page....they were good!
I am going to keep this post short...to make up for the last post:). But I wanted to share the recipe, and file it for future reference. Please feel free to check the original recipe as I adapted it(I felt the need to use some whole wheat pastry flour and omit the sugar/cinnamon topping)...there's also a cream cheese frosting recipe as well. The crackers stay crisp for days. Hope you enjoy...

Note: Top photo is of crackers baked for about 15 minutes or so. Bottom photo of crackers baked slightly less...about 12 minutes or so.

You will need: adapted from 101Cookbooks and originally from Nancy Silverston's cookbook Pastries from La Brea Bakery

1 cup+ 2 TBS unbleached all purpose flour
1 1/2 cups whole wheat pastry flour(or unbleached all-purpose flour)
1 cup dark brown sugar*
1 tsp baking soda
1/4 -1/2 tsp cinnamon, optional
pinch of salt
7 TBS unsalted butter, cut into 1-inch cubes and frozen
1/3 cup mild-flavored honey
5 TBS whole milk
2 scant TBS pure vanilla extract
*just noticed that the original recipe had a cup of lightly packed sugar...I packed mine:), so my result is with a sort- of- packed cup of dark brown sugar.

Directions:
1. In the bowl of a food processor combine the flour, brown sugar, baking soda, and salt. Pulse for a few seconds to evenly incorporate the mixture.
2. Add the butter and pulsing on and off on...until the mixture is like that of a coarse meal.
3. Whisk together the honey, milk, and vanilla extract and add it to the flour mixture. Pulse on and off a few times until the dough barely comes together. The dough will be soft and sticky.
4. Wrap the dough in plastic and chill until firm... a couple of hours or so...or overnight.
5. Divide the dough in half and return one half to the refrigerator. Place a large piece of parchement paper onto a work surface and sprinkle the parchment liberally with flour.
6. Place dough on floured paper, sprinkle additional flour, and roll the dough into a rectangle or the size of your parchment paper... about 1/8-1/4 inch thick. The dough will be sticky, so flour as necessary.
7. Trim the edges. Gather the scraps together and set aside.
8. Cut through the dough to make large crackers(2x4) or small ones(2x2), if you prefer. If making large crackers, mark a vertical line( or dotted line) down the middle of each cracker...just be careful not to cut through the whole dough.
9. Using a toothpick, skewer or fork, prick the dough to form two dotted rows on each side of the dividing line. Or simply cut in small squares and prick the dough. Place the crackers along with the parchment on a baking sheets.
10. Chill until firm, about 30 to 45 minutes.
11. Repeat with the second batch of dough and gather all the scraps together into a ball, chill until firm, and reroll.

Preheat the oven to 350 degrees.

12. Bake for 10-15 minutes(original recipe says 25 minutes...I thought it was way too long as after 15 minutes they start burning, but maybe it's just my oven...just check them after the 10 minute mark), until browned and slightly firm to the tough, rotating the sheets halfway through to ensure even baking.
Crackers will continue to crisp up as they cool...crackers should have a "snap" to them when you break them.

If you feel the crackers are still a bit soft, just place them in the oven after you've finished baking(oven temp off) to further crisp up from the residual heat.

Wednesday, March 2, 2011

Homemade Wheat Thin Crackers...King Arthur Flour

..
Homemade Wheat Thin Crackers...King Arthur Flour
I am so glad I stumbled upon this recipe recently. Homemade Wheat Thins... I simply knew I had to make them. I just love homemade crackers, and hardly ever buy crackers anymore. I've made quite a few different crackers in the past... and some some have become real favorites. But I hadn't yet made this version of crackers that uses 100% whole grains...homemade Wheat Thins.
Crackers, in general, don't require a ton of ingredients, and I quickly noticed I had everything in the house to make them. I had some spelt flour as well, so I decided to make a double batch using some whole grain spelt flour for one and 100% whole wheat for the other batch. The spelt flour version was easier to roll out as the dough was slightly softer, and resulting crackers were probably a bit more tender as well. But both versions were fantastic! Crispy, yet tender and sightly sweet with a hint of vanilla. I think they even tasted like the Wheat Thins...only better:).
King Arthur Flour has really come up with a winner of a recipe! Definitely a favorite in our house...
I noticed that the crackers were incredibly delicious rolled very thin...close to 1/16th of an inch. But they are just as delicious when rolled just a bit thicker(1/8th or so)....just need to bake them a bit longer. You definitely don't want them too thick.... as they really are at their best when rolled thin. I guess that's why they are called, Wheat Thins:).
The crackers do crisp up as they cool, but in case you feel they aren't crispy enough, you can opt to place them back in the hot oven after you've baked all the batches. Just turn the heat off and let them crisp up a bit more with the residual heat....do look after them.
I really liked these crackers and kept talking about them for days:). If you have some time, and want to try the crackers, I highly recommend them. I think the yield is close to 8 oz (or so)....for one batch...Glad I made a couple of batches:), but I did end up making a couple more batches later on during the week:)...even a soaked wheat variation using whey for the liquid. Hope you enjoy...
Note: The crackers stay crisp for days in an airtight container...
Also, I have tried substituting oil for the butter...definitely NOT the same taste.

You will need: initially inspired by Tracey's Culinary Adventures and adapted from King Arthur Whole Grain Baking

1 ¼ cup( 5 oz) whole wheat flour*
1 ½ TBS sugar(or honey)
½ tsp. salt
¼ tsp. paprika
4 TBS butter, cut up
¼ cup water
¼ tsp. vanilla
salt for topping( optional, I skipped)
* you can also use whole grain spelt flour... I absolutely LOVED the spelt flour variation, and probably preferred it.
If you do not have a scale, you might want to use about 1 cup+ 2TBS whole wheat flour and then add the other 2 TBS at the end... only if the dough needs it. You don't want the dough to be stiff...it'll be harder to roll them thinly. I noticed my whole wheat version was harder to roll than the spelt flour variation....probably because I didn't weigh it:). The spelt dough was softer in texture (not by too much)... the rolling was a breeze.

Directions:
PREHEAT OVEN TO 400 deg F.
1. In a processor bowl(or mixing bowl if doing by hand), combine the whole wheat flour, sugar, salt, paprika and butter.
2. Pulse for a few times until you get fine crumbs...no bigger than a pea(if doing by hand, use a pastry blender to cut in the butter).
3. Combine water and vanilla and pour over dry mixture( if using honey, and not sugar, you can add it with the water).
4. Process again for a few seconds until everything is evenly combined... or mix well by hand. You should be able to form a smooth dough....sort of like a play dough consistency. Try not to mix it too much...the crackers won't be as tender
5. Form into a ball and cut into 4 pieces...cutting them in 4 pieces will help you work with a small amount of dough so that you can roll the dough as thinly as possible. Cover the rest of the dough as you work...so as not to dry out.
6. Take one piece of dough and place between parchment paper. Roll dough as thinly as possible close to 1/16-1/8th inch. Lift the top parchment paper and reposition it to evenly roll out the dough... You can also remove the top parchment paper after you've rolled the dough out a bit and then just continue to roll the dough out on the bottom parchment....till you get it thin enough. You can slightly wet your countertop before placing the parchment paper on it so it won't slide too much on you as you roll....but I deal with the sliding:).
OR
Roll the dough out, however it seems easier for you: suggestions below or use your own
  • on a lightly floured counter top
  • lightly greased back of a cookie sheet
  • directly on a pizza stone
  • on a silpat
7. Cut crackers using a sharp knife...about 1 1/2 inches square. If you want "perfect" squares, trim edges and re-roll scraps once.
8. You can place crackers on a parchment paper... or if you've rolled it out on a parchment paper, just slide it onto a cookie sheet parchment and all. The crackers don't spread much. Sprinkle the squares lightly with kosher salt...I didn't. Repeat with the remaining pieces of dough.
9. Bake crackers until crisp and browned 5-7 minutes( depending on thickness)... remove the thinner crackers that brown too quickly and bake the remaining crackers. Do watch them closely, as they can burn quickly.
You want the crackers to be almost crispy, golden brown when removing them.... they will crisp up a bit more as they cool on the cookie sheets.
10. Remove the crackers from oven and cool in the pan...this will crisp them up even more. These crackers will stay crisp for days...loved that about them.
Best stored in airtight containers.

LOVE, LOVED, LOVED these crackers...

Thursday, June 24, 2010

Crisp Rosemary and Sesame Flatbread....made into Crackers


Crisp Rosemary Sesame Flatbread....made into Crackers. I hardly ever buy crackers anymore...for some reason I find they taste much better homemade...plus, I know exactly what goes in them. Making the crackers at home also allows you to play around with seasoning. You can add various spices, nuts and herbs to your liking. This actual recipe comes from a 2008 Gourmet Magazine issue, that is also posted on Epicurious. I was actually inspired to make it after I saw it on several blogs....including Smitten Kitchen. It seemed that everyone loved this simple-to-make flatbread/cracker. So, I decided to make it. When making crackers, I usually like to make my Parmesan-Sesame crackers or the Goldfish crackers. But this sounded easy to do, plus I had plenty of fresh rosemary in my garden. The crackers are easy to make, as long as you make them in large discs(tortilla style). If you decide to make them in assorted shapes, it will take you a bit longer, just because of all the cutting and re-rolling of the dough. But I think they look cuter....especially the flowers:). I did manage to make some "football" shapes so that it wouldn't be all girlie:). But however you make them, these crackers are delicious. It is important to roll the dough pretty thin... Try to keep the edges of the rolled out cracker the same thickness(or thinness) as the middle part. Otherwise, the outside edge will brown quicker than the middle. These are just tips...it really isn't that complicated.
The recipe uses heavy cookie sheets to bake the crackers. I don't know about your cookie sheets, but mine always bend at high temps. They make this loud popping noise that always scares me. So, I used my baking stone instead:)...
I decided to add a few other ingredients to mine, just because I wanted to bring in additional flavor...and to make the crackers my own. I added some dried onion, black and white sesame seeds and rosemary. They were really flavorful...I loved the green specks of rosemary peeking through. The black sesame seeds really stood out against the light colored cracker. You can also use poppy seeds instead of the black sesame seeds....or simply follow the original recipe. We loved the crackers plain...and also with some hummus. They were gone before we knew it:). Hope you enjoy...

You will need: adapted from Epicurious
1 3/4 cups unbleached all-purpose flour
2 tsps-1 TBS chopped rosemary
1 teaspoon baking powder
3/4 teaspoon salt
1/2 cup water
1 TBS dried onion flakes~optional
1 TBS sesame( you can use black and white)~optional
1/3 cup olive oil

Directions:
Preheat oven to 450°F with a heavy baking sheet(or pizza stone~which is what I used) on rack in middle.
In a medium bowl, add the flour, chopped rosemary, sesame seeds(if using), dried onion(if using), baking powder, and salt. Make a well in center. Add the water and and then add the oil. Stir in the flour using a wooden spoon until a dough forms and all the flour is incorporated. Place the dough on a countertop, and knead it gently 4 or 5 times.
Divide dough into 3 pieces. Roll out 1 piece on a sheet of parchment paper into a 10-inch round Don't worry about making a perfect circle...it can be rustic. Just make sure the dough is thin...very thin. If the dough is not thin it will be "bready". Keep the remaining pieces covered with plastic wrap.
Now I made one round piece, but as always, I like to make it harder on myself by changing a few things:). I decided to make a few different shapes...flower, football shapes, round shapes, big and small triangles.... I liked the flower and the long triangles the best. The long triangles will definitely make a statement in a bread basket...for some reason I didn't take a good picture of those.
Slide round cracker dough~or shapes~with the parchment paper onto preheated baking sheet(or stone) and bake until pale golden and browned in spots, 8 to 10 minutes. I noticed the time was different on the pizza stone...it took only about 4-6 minutes. It is important to watch the time as the crackers can burn easily...every oven is different, so do keep a watchful eye.
Transfer flatbread to a rack to cool, then make 2 more rounds or more shapes. Break the round flatbread into pieces. Serve with various dips, hummus, or eat as a snack.


Tuesday, September 30, 2008

Parmesan Sesame Crackers


Parmesan Sesame Crackers..... One day I ran out of crackers and thought there must be a recipe for crackers that are easy to make and yet delicious. So I found a recipe for simple water crackers and adjusted it a bit to include some of my favorite toppings. This recipe makes wonderful crispy crackers that have so much flavor. Delicious and great! It is definitely a keeper! Hope you enjoy...


In the above photo, I did not sprinkle with cheese on top ( I forgot) and yet they still came out great:)

Note: Feel free to adjust amounts of some of the seeds/toppings/ flavorings... I've used chives, paprika, caraway... but flax, fennel seeds and other small seeds can be added.
These crackers are excellent served with salad, soup, cheese or spreads.

Ingredients: Makes about 4 dozen.
  • 2 cups All-purpose flour
  • 1 tsp Baking powder
  • 1/2 tsp Salt
  • 2/3 cup warm water
  • 1/3 cup Vegetable oil
  • 1 Egg white blended with 2 TBS water
  • 6 TBS Sesame seeds
  • 3 TBS poppy seeds
  • 1 /3 cup shredded Parmesan cheese

Directions:

1. Preheat oven to 400 F. Lightly grease two 14x17-inch baking sheets. Combine flour, baking powder and salt, most of the seeds and cheese in large bowl.
Sometimes I mix in all the parmesan and seeds into the dough. But you can reserve some as a topping.
2. Stir in water and oil, mixing until smooth dough forms. Halve dough.
3. Flatten 1 piece into large square directly on 1 prepared sheet. Cut into 2 3/4 x 3 1/4-inch pieces, leaving in place on baking sheet.
4. Pierce all over with fork. Brush generously with egg white mixture.
5. Sprinkle with extra cheese and seeds( if you didn't use it all in the dough). Repeat with remaining half of dough. Bake until crackers are dry and golden, 10 to 12 minutes. Recut if necessary. Cool on racks.
6. Store crackers in airtight container.