Michel Richard's "Egg" Pastry...Including Homemade Puff Pastry! A year ago, we welcomed the New Year (2009) in Paris, France. Paris.... a city bustling with tourists and so many pastry shops. It seemed there was a Patisserie shop at every corner. The freshly made pastries filled with fruit, chocolate, or pastry cream were always such a delight to behold on a chilly morning. Of course, the espresso was always a must. Oh, and the bread,...one could never get enough of their freshly-made crusty bread. There were all sorts of sizes and shapes, each one just as delicious. Indeed, a food lover's delight. I loved Paris. I loved the food.
This recipe was inspired by our trip to Paris, and the many pastries sampled while there. The apricot pastry(tarte aux abricots) was a favorite. I knew I wanted to make this at home eventually. Well, it has taken me a whole year, but I was very happy with the result. In this post, the pastry is supposed to look like sunny side-up eggs, thus the name "egg" pastry. They were so delicious...actually, we are still talking about how wonderful they were:). This post is rather long, but don't get put off by it. Its long only because I have included the recipe for homemade puff pastry as well....meant for those of you who are looking for a challenge:). If you like, you can skip through the puff pastry section and go straight to the apricot pastry. You can use store-bought puff pastry instead...it would definitely cut the amount of work involved. Though I have to say, it was worth making it all from scratch. Really, truly. I just love homemade puff pastry... The process of making puff pastry (or laminated dough) is really not as difficult as it may seem. Of course, by now, I have had a bit of practice in that department. But unless you try, you will never know.
I found a wonderful blog that details the puff pastry incredibly well!!! Please check out her site called A Whisk and a Spoon. She has a link to a printable document that is worth reading and re-reading before you begin the puff pastry. Actually, I would recommend printing it. As for the apricot pastry, you can easily see Michel Richard make it on Julia Child's PBS program. He will take you through the steps, starting with the puff pastry and assembling the apricot pastry. I would also recommend watching that as well, if you are planning to make it. In the video, Michel Richard uses fresh apricots for his pastry. I, on the other hand, didn't. I searched all over for fresh apricots, and didn't find any! But really, what was I thinking...in winter?! So, I had to settle for the canned apricots. But if you have fresh...use those instead. Well, I hope you will enjoy this recipe as much as we did....
Video of Michel Richard and Julia Child making the puff pastry, pastry cream and "egg" pastry click HERE
Michel Richard’s Puff Pastry Dough:
From: Baking with Julia by Dorie Greenspan
Yield: 2-1/2 pounds dough
Ingredients:
2-1/2 cups (12.2 oz/ 354 g) unbleached all-purpose flour
2-1/2 cups (12.2 oz/ 354 g) unbleached all-purpose flour
1-1/4 cups (5.0 oz/ 142 g) cake flour
1 1/2 tsps salt
1-1/4 cups (10 fl oz/ 300 ml) ice water
1 pound (16 oz/ 454 g) very cold, unsalted butter
plus extra flour for dusting work surface
Mixing the Dough:
plus extra flour for dusting work surface
Mixing the Dough:
For step-by-step folding photos please click HERE
Put the all-purpose flour, cake flour, and salt in the work bowl of a food processor fitted with a metal blade and pulse a couple of times just to mix. Add the water all at once.

Pulse until the dough forms a ball on the blade.
You may need to add a few more teaspoons of water if the dough is still crumbly. The dough will be very moist and pliable and will hold together when squeezed between your fingers.
Remove the dough from the machine, form it into a ball.
Remove the dough from the machine, form it into a ball.

With a small sharp knife, slash the top a few times.
Wrap the dough in a damp towel and refrigerate for about 5 minutes.
Meanwhile, place the butter between 2 sheets of plastic wrap and beat it with a rolling pin until it flattens into a square that's about 1" thick.
Meanwhile, place the butter between 2 sheets of plastic wrap and beat it with a rolling pin until it flattens into a square that's about 1" thick.
Take care that the butter remains cool and firm: if it has softened or become oily, chill it before continuing.
Incorporating the Butter:
Unwrap the dough and place it on a work surface dusted with all-purpose flour (A cool piece of marble is the ideal surface for puff pastry...but if you don't have one, use what you have as in my case) with your rolling pin, press on the dough to flatten it and then roll it into a 10" square or thereabouts. Keep the top and bottom of the dough well floured to prevent sticking and lift the dough and move it around frequently. Starting from the center of the square, roll out over each corner to create a thick center pad with flaps.
Place the cold butter in the middle of the dough
and fold the corners over the butter, stretching them as needed so that they overlap slightly and encase the butter completely.
(If you have to stretch the dough, stretch it from all over; don't just pull the ends) you should now have a package that is 8" square (or so)...mine was more like a rectangle:).
To make great puff pastry, it is important to keep the dough cold at all times. If your room is warm, or you work slowly, and you notice oily butter coming out, you best cover the dough with plastic wrap and refrigerate it . You can stop at any point in the process and continue when the dough is chilled. Just remember where you left off in the turning.

To make great puff pastry, it is important to keep the dough cold at all times. If your room is warm, or you work slowly, and you notice oily butter coming out, you best cover the dough with plastic wrap and refrigerate it . You can stop at any point in the process and continue when the dough is chilled. Just remember where you left off in the turning.
Making the Turns:
Gently but firmly press the rolling pin against the top and bottom edges of the square (this will help keep it square).
Gently but firmly press the rolling pin against the top and bottom edges of the square (this will help keep it square).
Then, keeping the work surface and the top of the dough well floured to prevent sticking, roll the dough into a rectangle that is three times as long as the square you started with, about 24" 

With this first roll, it is particularly important that the butter be rolled evenly along the length and width of the rectangle.You might have to really use your strength here as the butter can be quite hard. If the butter is too hard, the dough may may rip as you roll and expose the butter. Just patch it up and make sure you get a smooth, even dough-butter sandwich.
With a pastry brush, brush off the excess flour from the top of the dough, and fold the rectangle up from the bottom and down from the top in thirds, like a business letter, brushing off the excess flour. You have completed one turn.
With a pastry brush, brush off the excess flour from the top of the dough, and fold the rectangle up from the bottom and down from the top in thirds, like a business letter, brushing off the excess flour. You have completed one turn.
Repeat the rolling and folding process, rolling the dough to a length of 24" and then folding it in thirds. This is the second turn.
Chilling the Dough:
Refrigerate the dough for at least 30 minutes. Each time you refrigerate the dough, mark the number of turns you've completed by indenting the dough with your fingertips. It is best to refrigerate the dough for 30 to 60 minutes between each set of two turns.
The total number of turns needed is six. That means about 1 and 1/2 hours of chilling time.
You should plan to chill the dough for at least an hour before cutting or shaping it.
Don't bunch the dough into a ball. You want to keep the layers intact as much as possible. Roll the scraps out ...the layers will probably not rise as much. I usually use them to make small quiches or other things where the layers are not as important.
TO MAKE THE APRICOT PASTRY:
Pastry Cream:
2 cups milk
½ cup Sugar
pinch Salt
1 Vanilla bean, split
5 Egg yolks (I used only 4)
⅓ cup cornstarch
Pastry Cream:
2 cups milk
½ cup Sugar
pinch Salt
1 Vanilla bean, split
5 Egg yolks (I used only 4)
⅓ cup cornstarch
Directions:
Cook the pastry cream ingredients until it boils and is thick. Cool. It should be the consistency of a thick pudding.


Assembling the "Egg Pastry":
Roll puff pastry out to about 1/2 inch thick. Cut a 2 1/2(or 3) inch circle using a biscuit cutter. Cut through cleanly, don't twist the cutter back and forth.

Take a circle of pastry and dust one side with flour. Turn it over and press the pastry in the coarse sugar. Turn the pastry with the sugar coated side up.

Roll out little circles of pastry leaving the two edges slightly thicker than the sides. Sprinkle a bit more sugar on top.
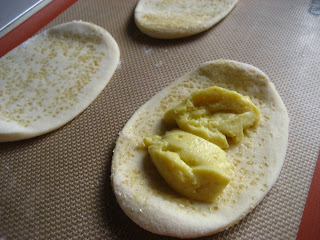
Place a generous tablespoon or so of cream on the pastry dough.
Since I used canned apricots, I first patted them very dry. I chose the firmer apricots. Bake in 350F( I baked mine at 375) oven for 35 minutes or until nicely golden brown.

This can vary depending how thick or thin you rolled the dough. Brush pastry and apricots with a nice sweet apricot glaze....I used the juice from the can, which I reduced to a syrup-like consistency.
If you are using fresh apricots, you need to add a sweetened apricot glaze as the baking takes the sweetness out of the apricots. I would probably even melt some apricot jam to glazeit with. Dust with powdered sugar for some elegance.


11 comments:
What an inspiring post! That looks like the *perfect* breakfast with a hot cup of smooth, black coffee.
Very tempting.....
Wonderful post and I want to make this and definitely want to eat it all myself:) Call me Miss Piggy but this is way to good to share with people who have no love of pastry:)
Joyce
Beautifully done. Gorgeous pastries.
delish! sorry i'll have to wait for the diet to end.
Allison
@
http://lastbite.blogspot.com
Ginny, It is a wonderful breakfast...coffee is a must:)
Sailaja, Thanks...
Joyce, Aww...that's sweet! Thanks for stopping by.
Thibeault's Table, Thanks for stopping by... and Thank you!
Zegliano, Thanks for stopping by,...it was delicious:)
~Ellie
I just saw this post, as I am thinking of making these pastries and googled around to see if anyone else had. Yours look delicious, and thanks so much for the kind words and link to the puff recipe on my blog!
Steph, Thanks for stopping by. I must say these pastries are amazing... my husband's favorite. I've made them for guests as well... and they're always a hit. So classy and so delicious!
Sometimes I like to make them a bit smaller, and use just one half of an apricot on a round shaped pastry. But I think the homemade puff pastry really takes them over the top. I highly recommend making them.
Thanks for this recipe! I loved reading about your experience and my pastry cream tastes delicious. Fingers crossed that the final combination is just as delicious tomorrow morning.
Samantha, You are welcome:)... this is one of my favorites and I sure hope the final result will be just as delicious as the pastry cream, if not better! Thanks a bunch for stopping by and sharing your feedback. Enjoy the pastries... and have a wonderful day!
Hi Barbara, Yield for the puff pastry is about 2.5 lbs of dough . I’ve used it to make beef wellington and it was plenty. Hope you enjoy making it… and thanks for stopping by.
Post a Comment