~ "By wisdom a house is built, and through understanding it is established; Through knowledge its rooms are filled with rare and beautiful treasures." ~ "Reckless words pierce like a sword, but the tongue of the wise brings healing" ~ "But the wisdom that is from above is first pure, then peaceable, gentle, and easy to be intreated, full of mercy and good fruits, without partiality, and without hypocrisy." ~ "Trust in the LORD with all your heart, and lean not on your own understanding; in all your ways acknowledge Him, and He shall direct your paths."~

Monday, August 31, 2009

Grilled Vegetables...Including Potatoes!

Grilled Vegetables...Including Potatoes! I harvested my first big zucchini recently and I wanted to put it to good use. I love having a garden.... just to be able to go and pick some fresh herbs is a blessing indeed. It makes such a difference to be able to use fresh ingredients in a dish. I don't know about you, but I think it makes the dish taste 100 times better. It is also a great bonus when you can harvest vegetables...right from your own garden. So, it was rather exciting to see my zucchini plant produce such a big zucchini. I know most of you might not think that it is such a big deal. But lately, my zucchini plants have had to deal with some very cold summer weather. They have had to brace against some really heavy hailstorms...and who knows, maybe even a lack of minerals in the soil. You know, it is quite interesting how attached I have become to my little garden:). I was rather glad that my zucchini survived. Naturally, I wanted to make the best of my zucchini and put it to good use. I didn't want to use it in any dessert recipe... I just wanted to keep it simple. I decided to grill it. As you well know, zucchini doesn't have that much flavor...which is why it can be used in desserts. So, in order to bring some flavor to the zucchini, I chose to use garlic. You can't go wrong with garlic! Some time ago, I had seen a recipe on grilled potato wedges. I was intrigued at the time....but I had forgotten about it. But the other day, when I wanted to make something quick, I remembered the potatoes:)...I grilled them alongside the zucchini . They were delicious. Of course, I had to make some sort of meat for my husband:)...chicken sausages. A rather quick meal in a matter of minutes.
You will need:.
For the zucchini:
1 extra large zucchini (or 2 medium), sliced diagonally
1 large garlic, crushed
2 TBS olive oil
salt/pepper to taste
* you can easily add some favorite herb as well
Marinade for the potatoes:
1 ex-large baking potato (or 2 medium), cut in wedges
1 large garlic, crushed
2 TBS olive oil
juice of 1/2 lime
1/2 -1 tsp dill or rosemary, dried or fresh
pinch of paprika(optional)
pinch of cayenne pepper(chile flakes),optional
salt/pepper to taste
Directions:
Pre-heat your grill on high. In a bowl, mix all of the zucchini marinade ingredients. Set aside. In a second bowl mix all of the potato marinade ingredients. Set aside.
In the meantime, cut your potato(es) in wedges. Place the potato wedges in a single layer on a microwave dish. Cook wedges on high for 4 minutes(or until almost done). If, you don't want to use the microwave, I think you can also just grill them on low until done.
Add the marinade and toss to coat all the pieces. Set aside.
Cut the zucchini in diagonal slices. They should be on the thicker side (maybe about 1/2 inch). Toss with zucchini marinade and coat all zucchini pieces well.
Place on both zucchini and potatoes on hot grill and lower heat to medium.
Cook on both sides until you see grill marks and potatoes are cooked through.

Wednesday, August 26, 2009

Chicken Tikka Masala...Cook's Illustrated Version


Chicken Tikka Masala...

With turmeric and thinned out with milk.
This was before I added turmeric for color...and thinned it a bit with milk.
Chicken Tikka Masala... A popular dish in many Indian restaurants. Supposedly this dish was created in a Glasglow restaurant when a customer ordered some Chicken Tikka and thought it was too dry. He ordered some gravy to go along wth the dish. The chef complied and made a sauce from tomato soup, yoghurt, and spices. The story isn't proven ...but the dish has become very popular. It even became Britain's "true national dish". Recently , my sister-in-law had this dish at a restaurant and absolutely loved it. She asked me if I had ever made it...I hadn't. So, I searched the internet for a great Chicken Tikka Masala recipe.

I finally decided to try the Cook's Illustrated version found on Recipezaar. I love Cook's Illustrated and felt that I couldn't go wrong with their recipe. It actually turned out to be a wonderful recipe! I did change a few things, just because I felt the outcome would taste and look better. I wanted the chicken to have a ton of flavor so I marinated the chicken overnight. I adjusted the seasoning...added a bit more salt and increaded the sugar to balance out the acidity of the tomatoes. After trying out a serving of the dish for lunch, I felt that the sauce could have been a bit thinner...so, I added some milk. Also, I would have liked the sauce to have a more yellow color...so, I added some color in the form of turmeric. After making these "minor" adjustments, I was finally satisfied!

Feel free to add some extra spice if you want it spicier. Just taste the masala sauce, and adjust seasoning to your liking. There are many recipes out there that have more garam masala and extra cream. But, I was very happy with the result ...my husband loved it and had seconds. He even had it for dinner:). I love the fact that you can easily reheat it on low heat...and it tastes just as good. We served it with some homemade Indian flatbread...Paratha. You can also serve it with some homemade Naan bread. I hope you will enjoy it as well. Feel free to do the original recipe found here. Hope you enjoy...

Note: You can marinate chicken and then grill it... setting it aside, while you make the masala sauce. OR you can make the masala sauce ahead and then grill the chicken... it's up to you, do the steps however it is easier  for you. 

You will need: adapted from Cook's Illustrated

Chicken Tikka:
1/2 teaspoon ground cumin
1/2 teaspoon ground coriander
1/4 teaspoon cayenne pepper, or to taste ( I used some chile flakes)
1 teaspoon table salt
2 lbs boneless, skinless chiken breast , trimmed of fat (I used 2 1/2 lbs)
1 cup plain yoghurt
2 tablespoons vegetable oil
2 medium garlic cloves,minced or pressed through a garlic press
1 tablespoon fresh ginger (grated)

Masala Sauce
3 tablespoons vegetable oil
1 medium onion, diced fine
2 medium garlic cloves, minced or pressed through a garlic press
2 teaspoons fresh ginger (grated)
1 serrano chili ( I used 2 jalapenos, since that is what I had on hand)
1 tablespoon tomato paste
1 tablespoon garam masala
1 (28 ounce) can crushed tomatoes
2 teaspoons sugar (I used more like 3-4 tsps)
1/2 teaspoon table salt ( I used about 3/4 tsp)
2/3-1 cup heavy cream*
1 tsp turmeric, optional
1/4 cup chopped cilantro, or to taste
* I find myself thinning out the sauce with an extra 1/2 cup half-half/cream... even whole milk

Directions:

FOR THE CHICKEN:

1. Combine cumin, coriander, cayenne, and salt in small bowl.


2. Sprinkle both sides of chicken with spice mixture, pressing gently so mixture adheres.
3. Add the crushed garlic and ginger.


4. Rub it on the chicken and drizzle the olive oil.
5. Place chicken in a ziploc bag and refrigerate overnight (or several hours).


6. Take the chicken out from the fridge and add the yoghurt. Make sure it coats the chicken well.


7. Let marinate for another 1-2 hours.

In the meantime, get all the ingredients for the masala ready.


FOR THE SAUCE:

1. Heat oil in large Dutch oven over medium heat until shimmering.
2. Add onion and cook, stirring frequently, until light golden, 8 to 10 minutes.
3. Add garlic, ginger, chile, tomato paste, and garam masala; cook, stirring frequently, until fragrant, about 3 minutes.


4. Add crushed tomatoes, sugar, and salt; bring to boil.


5. Reduce heat to medium-low, cover, and simmer for 15 minutes, stirring occasionally. It is at this point that you may adjust the seasoning and add more spice if you like it spicier.

6. Stir in cream and return to simmer.


7. Remove pan from heat and cover to keep warm.
8. Grill chicken on medium heat. Make sure you coat the chicken well with the yoghurt. Also, make sure you oil the grill ...as the chicken can easily stick.
Now, I often make the chicken ahead...as I have found it much easier to warm it back up in the sauce. This way you can even make it a day ahead or hours before.

Note: You can also do the chicken in the oven using the broiler. Just adjust oven rack to upper-middle position and heat broiler. Dip chicken into yogurt mixture (chicken should be coated with thick layer of yogurt) and arrange on wire rack set in foil-lined rimmed baking sheet or broiler pan. Discard excess yogurt mixture. Broil chicken until thickest parts register 160 degrees on instant-read thermometer and exterior is lightly charred in spots, 10 to 18 minutes, flipping chicken halfway through cooking.

9. Let chicken rest 5 minutes, then cut into 1-inch chunks and stir into warm sauce (do not simmer chicken in sauce).

10. Stir in cilantro, and serve over rice.

Monday, August 24, 2009

Mini Fruit Tarts...Filled with a Lemon Curd Mousse and a Shortbread crust.


Mini Fruit Tarts with a Lemon Curd Mousse and a Shortbread Crust ....Perfect for Tea Parties. We recently had a tea party for 9 people. I had quite a lot of help...it is quite nice when you have nieces to help you! I mean ,really, who doesn't appreciate some extra helping hands in the kitchen. We had a lot of fun coming up with the menu. These little fruit tarts were amazing! I thought they were so cute...so, I decided to post the recipe in case you would like to try it one day. I loved the freshness of the lemon curd mousse paired with the buttery shortbread crust. They are a perfect little bite...and they don't require too much fuss. I found an awesome shortbread crust on allrecipes.com which I used. The actual recipe was for 3 (9 inch) pies! ...so, I scaled it down to make less. For the tea party, I made the crust for 8 servings which yielded about 20-24 little tarts. For this post, I made only 2 servings... giving me about 12 tarts. I didn't make them as thick , otherwise you would only get about 8-10 thicker crust tarts. I really like that Allrecipes has a feature on each of their recipes where you can cut the amount of servings to fit your needs. So, feel free to go to their site and adjust the amount of servings. You can click on the highlighted link above or here . Of course, you can always freeze the dough you are not using for another recipe. I used some homemade lemon curd with some whipped cream to make the mouse...I love the flavor! It goes really well with berries. I am posting the lemon curd recipe as well. You can also find it in my Berry Napoleon Recipe. One day I will make the lemon curd, take some photos and post about it as a separate recipe. It is actually quite easy to make. It freezes very well, so I always have some on hand.
Shortbread Crust adapted from allrecipes.com
yields about 20-24 mini tarts
1 cup butter, softened
3 tablespoons and 1 teaspoon light brown sugar
3 tablespoons and 1 teaspoon confectioners' sugar
1-1/2 cups all-purpose flour
Directions:
Preheat oven to 325 degrees F (165 degrees C).
Using your hands, mix butter, brown sugar, white sugar and flour together in a large bowl.
Squeeze and work dough until it holds together.
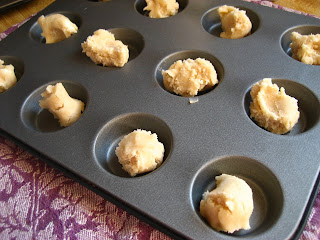
Chill slightly...enough where the butter solidifies again. Take a small chunk and place it into each mini tart.
Press and form the dough all the way up to the edge.
Chill for 2 hours ( I just chilled it for a few minutes until the dough hardened).
Bake for 10-12 minutes, or until lightly brown around the edges. Keep an eye on them after 8 minutes or so. Depending how thick the dough is, the baking time will vary. You don't want them to burn. Let cool slightly and make an indentation with the back of a teaspoon.
This will help hold the filling. Cool/chill completely.
Lemon Curd Mousse:
1 cup heavy whipping cream
4-5 TBS lemon curd
Whip heavy cream to medium peaks.
Fold in lemon curd.
Place the mousse in a plastic bag(or use a piping bag) and cut a small hole. Pipe lemon curd mousse in each tart.
Top with berries.
Homemade Lemon Curd Recipe:
Homemade Lemon Curd....really easy to make and have on hand for scones, pies tarts,cakes etc...I tried freezing the lemon curd and had outstanding results. So make some and freeze it in small containers and you will have lemon curd at your fingertips!

You will need: this makes about half of the original recipe (1 3/4 cups). You can see the original lemon curd post by clicking on this link...LEMON CURD
2 eggs
1 cup sugar
1/2 cup butter(no substitutes),melted
1/3 cup lemon juice
1 1/2 TBS grated lemon peel
pinch of salt
In the top of a double boiler, beat eggs and sugar. Stir in butter, lemon juice, peel and salt. Cook over simmering water for 15 minutes or until mixture is thickened and reaches 160 degrees. Cover and store in the fridge for 1 week (or freeze).

Thursday, August 20, 2009

Pizza Bites...Thin Crust Pizza Revisited


Pizza Bites....Thin Crust Pizza Revisited. I recently made these little bites and they were great. Perfect as an appetizer. Sometimes I want a different sort of appetizer. This was it! Do you remember the post on Thin Crust Pizza ? You don't!? :) Well, this uses the same method. Really, if you haven't tried the original recipe yet, you should...at least once. It comes together in no time and it is a great alternative to a store-bought thin crust pizza. This recipe for pizza bites came to me as I was making the Tomato Puff Pastry Bites. I loved the puff pastry bites and thought, why not make them out of flour tortillas? This would be ideal if you don't have any puff pastry in the freezer. So, this is the result of an idea I had. Don't you ever lay awake at night thinking how to perfect/change a recipe? Well, sometimes I do...not everything comes out the way I intend it to be. Other times, they do...this was one of them! Feel free to make them whatever size you like...mine were about 2 inches. For this post, I used soft taco size(8 inch) flour tortillas to get about 5 (2 inch) bites. I had leftover scrap tortilla which I turned into baked tortilla strips. No use in wasting food. They were great as a snack and as a topping for tortilla/bean soups. Hope you like them.
You will need:
flour tortillas(any size)
mozzarella cheese (or any good melting cheese)
olive oil (for brushing flour tortillas)
favorite toppings(onion, diced tomato,bell peppers, olives, meats, herbs, etc)
salt and pepper to taste

Directions:
Brush some olive oil on both sides of the tortillas.
Cut into small circles(or whatever size you prefer).
Sprinkle some cheese.
Top with second tortilla.
Sprinkle some more cheese and add toppings.
Be careful not to place too many toppings...it can get too heavy and fall off. I sprinkle some extra cheese to keep the toppings in place.
Bake in a preheated 500 deg. oven for 6-10 minutes. Keep an eye on them you don't want them to burn. just crisp up and have the cheese melted.
If you want to make some tortilla strips out of the tortilla scraps, you will need to cut the scraps into strips and drizzle some olive oil over them. Toss them so that they will all be coated with the olive oil. After you are done baking the pizza bites, turn off the oven and place the strips on a baking sheet(the oven will still be hot)...try to place in a single layer without having them overlap. You don't need to have the oven turned on, the lingering heat(from previous baking) in the oven will bake them. Just check them often so that they won't burn. They should be nicely browned and crispy.